In this blog, we’ll explain the Step By Step method for installing Nagios in Amazon Linux. Nagios is a very lightweight monitoring tool.
I have been using this tool for the past 1-2 years but somehow one day it crashed and to setup/restore Nagios it took more than 4 hours (on-premises). so rather than running it on a machine that was constantly crashing, I moved it onto Amazon Web Services EC2 platform using the Free Tier Entitlement you get when you first sign up. Therefore the total cost to me to move it from home to the cloud was $0, at least for the first 12 months and not taking into account time.

Exploring the Pros and Cons of Nagios for Monitoring: A Comprehensive Analysis
Here are the pros and cons of using Nagios for monitoring in Amazon Linux:
Pros:
- Comprehensive Monitoring: Nagios offers extensive monitoring capabilities, allowing you to track various network services, hosts, and system metrics in your Amazon Linux environment.
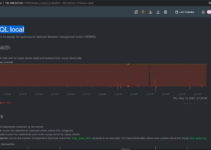
- Real-time Alerts: Nagios provides immediate alerts when issues or anomalies are detected, enabling quick responses and proactive problem-solving.
- Open-Source and Free: Being open-source, Nagios is freely available, making it a cost-effective solution for monitoring Amazon Linux instances.
- Customizable: Nagios allows for extensive customization, enabling users to tailor the monitoring setup to their specific needs and preferences.
- Wide Community Support: With a large and active user community, Nagios enjoys continuous development and has a wealth of resources, including plugins, extensions, and user-contributed content.
- Ease of Integration: Nagios can be integrated with various third-party tools, making it versatile and adaptable to different environments and workflows.
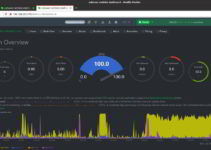
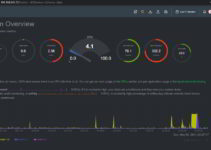
- Centralized Monitoring: Nagios provides a centralized dashboard, making it convenient to monitor multiple systems and services from a single interface.
- Performance Data Visualization: The availability of tools like NagVis and Nagios Grapher allows users to visualize performance data, aiding in analysis and decision-making.
Cons:
- Steep Learning Curve: For users new to Nagios or monitoring systems in general, the initial learning curve can be challenging, requiring time and effort to master.
- Configuration Complexity: The extensive customization options can sometimes lead to complex configurations, which may be overwhelming for beginners.
- Resource Consumption: Running Nagios and continuous monitoring can consume system resources, especially if monitoring a large number of services and hosts.
- Maintenance Overhead: Nagios requires regular maintenance and updates to ensure it functions optimally and remains secure.
- Alert Overload: Improperly configured alerting can lead to a flood of notifications, causing alert fatigue and potentially overlooking critical issues.
- Limited Reporting: While Nagios offers basic reporting, generating detailed reports might require additional plugins or external tools.
- Scaling Challenges: In extremely large-scale environments, Nagios may face challenges in handling a massive number of checks simultaneously.
- Dependency on Plugins: Some specific monitoring needs may require additional plugins, which may not always be readily available or may require custom development.
Overall, Nagios is a powerful and versatile monitoring tool, but its effective usage depends on proper planning, configuration, and ongoing maintenance. Understanding the pros and cons will help users make informed decisions on its implementation in an Amazon Linux environment.
Do and Don’t: Best Practices for Nagios Monitoring in Amazon Linux
Do:
- Plan Your Monitoring Strategy: Before deploying Nagios, define the scope of monitoring, including critical services and hosts, to avoid unnecessary overhead.
- Regular Backups: Backup your Nagios configurations and settings regularly to ensure quick recovery in case of system failures.
- Use Host Templates: Employ host templates to streamline configuration management and ensure consistency across monitored devices.
- Configure Notifications Wisely: Set up notifications judiciously to avoid alert overload, focusing only on critical issues that require immediate attention.
- Monitor Essential Services: Include crucial services like HTTP, SSH, and databases in your monitoring setup to catch potential problems early.
- Use Nagios Plugins: Leverage a wide range of Nagios plugins to extend monitoring capabilities for specific applications and services.
- Periodic Maintenance: Regularly update Nagios and its plugins to benefit from the latest features, bug fixes, and security patches.
- Monitor Performance Metrics: Monitor system performance metrics to detect performance bottlenecks and anticipate resource limitations.
Don’t:
- Don’t Over-Monitor: Avoid monitoring unnecessary services and hosts, as it can lead to resource wastage and unnecessary alerts.
- Avoid Ignoring Alerts: Take all alerts seriously and investigate each one promptly to prevent potential system downtime or data loss.
- Don’t Neglect Security: Secure your Nagios installation with strong passwords, access controls, and encryption to protect sensitive data.
- Avoid Manual Checks: Automate monitoring tasks wherever possible to reduce the risk of human errors and save time.
- Don’t Overlook Dependencies: Ensure that all dependencies for Nagios plugins and services are met to avoid monitoring failures.
Common Mistakes:
- Inadequate Alerting: Improper alert configurations can lead to excessive notifications, causing alert fatigue and overlooking critical issues.
- Not Monitoring Key Services: Failing to monitor essential services can lead to service outages without timely intervention.
- Ignoring Log Files: Neglecting Nagios log files can hinder troubleshooting efforts during critical incidents.
- Skipping Regular Maintenance: Skipping updates and maintenance can lead to compatibility issues and security vulnerabilities.
- Lack of Documentation: Failing to document Nagios configurations can make it challenging for other team members to manage or troubleshoot the system.
By adhering to these “Do and Don’t” best practices and avoiding common mistakes, you can make the most of Nagios for monitoring your Amazon Linux environment effectively and efficiently.
Step By Step method for installing Nagios in Amazon Linux
If you want to monitor your IT infrastructure efficiently, Nagios is an excellent choice. It is an open-source monitoring tool that provides comprehensive monitoring and alerting services. In this article, we will guide you through the process of installing Nagios on Amazon Linux, step by step.
Step 1: Launch an Amazon Linux EC2 Instance:
- Log in to your AWS account and navigate to the EC2 dashboard.
- Click on “Launch Instance” and choose an Amazon Linux AMI.
- Select your desired instance type, configure the instance, and choose the necessary security settings (e.g., SSH access, etc.).
- Launch the instance.
Step 2: Connect to your Amazon Linux Instance:
- Once the instance is running, use SSH to connect to it. You can use the following command in your terminal (replace
your-instance-ipwith your actual instance’s public IP address or DNS name):ssh -i /path/to/your/key.pem ec2-user@your-instance-ip
Step 3: Update the System:
- Update the package lists and upgrade the existing packages on the system:
sudo yum update -y
To Start Nagios Core Installation you must have your EC2 instance up and run and have already configured SSH access to the instance.
Step 4: Install Prerequisite Software
Nagios requires the following packages to be installed on your server prior to installing Nagios:
* Apache
* PHP
* GCC compiler
* GD development libraries
You can use yum to install these packages by running the following commands (as ec2-user):
sudo yum install httpd php
sudo yum install gcc glibc glibc-common
sudo yum install gd gd-devel
Step 5: Create Account Information
You need to set up a Nagios user. Run the following commands:
sudo adduser -m nagios
sudo passwd nagios
Type the new password twice.
sudo groupadd nagcmd
sudo usermod -a -G nagcmd nagios
sudo usermod -a -G nagcmd apache
Step 6: Download Nagios Core and the Plugins
Create a directory for storing the downloads.
mkdir ~/downloads
cd ~/downloads
Download the source code tarball of both Nagios and the Nagios plugins. over the period below download link may expire, so better to download it from the official Nagios link. (Visit http://www.nagios.org/download/ for links to the latest versions)
wget http://prdownloads.sourceforge.net/sourceforge/nagios/nagios-4.0.8.tar.gz
wget http://nagios-plugins.org/download/nagios-plugins-2.0.3.tar.gz
(OR)
wget https://nagios-plugins.org/download/nagios-plugins-2.3.3.tar.gz
Step 7: Compile and Install Nagios
Extract the Nagios source code tarball.
tar zxvf nagios-4.0.8.tar.gz
cd nagios-4.0.8
Run the configuration script with the name of the group which you have created in the above step.
./configure --with-command-group=nagcmd
Compile the Nagios source code.
make all
Install binaries, init script, sample config files, and set permissions on the external command directory.
sudo make install
sudo make install-init
sudo make install-config
sudo make install-commandmode
Step 8: Customize Configuration
Change the E-Mail address with nagiosadmin contact definition you’d like to use for receiving Nagios alerts.
sudo vim /usr/local/nagios/etc/objects/contacts.cfg
Step 9: Configure the Web Interface
sudo make install-webconf
Create a nagiosadmin account for logging into the Nagios web interface. Note the password you need while login in to Nagios web console.
sudo htpasswd -c /usr/local/nagios/etc/htpasswd.users nagiosadmin       //Type the new password twice.
sudo service httpd restart                                             //Restart Service
Step 10: Compile and Install the Nagios Plugins
Extract the Nagios plugin’s source code tarball.
cd ~/downloads
tar zxvf nagios-plugins-2.0.3.tar.gz
cd nagios-plugins-2.0.3
Compile and install the plugins.
./configure --with-nagios-user=nagios --with-nagios-group=nagios
make
sudo make install
Step 11: Start Nagios
Add Nagios to the list of system services and have it automatically start when the system boots.
sudo chkconfig --add nagios
sudo chkconfig nagios on
Verify the sample Nagios configuration files.
sudo /usr/local/nagios/bin/nagios -v /usr/local/nagios/etc/nagios.cfg
If there are no errors, start Nagios.
sudo service nagios start
Step 12: Update AWS Security Group
You need to open port 80 on the new AWS EC2 server to incoming traffic so you can connect to the new Nagios webpage.
* From the EC2 console select Security Groups from the left navigation pane.
* Select the Security Group applicable for the instance that Nagios was installed on and open the Inbound tab
* If there is no rule to allow HTTP traffic on port 80 then click edit in the Inbound tab to add a new rule
* Click on the New Rule button
* Scroll down to select HTTP from the list of Type
* If you want to be able to access Nagios from anywhere then select Save, otherwise enter the IP address or range of IP address you want to be able to access it from then select Save.
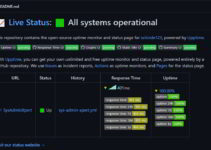
Step 13: Log in to the Web Interface
Access the Nagios web interface to do this you will need to know the Public DNS or IP for your instance, you can get this from the Instance section of the EC2 Console if you do not already know it. You’ll be prompted for the username (nagiosadmin) and password you specified earlier.
e.g. http://ec2-xx-xxx-xxx-xx.ap-west-1.compute.amazonaws.com/nagios/
This is the end of the Tutorial, We detailed Step By Step method for installing Nagios in Amazon Linux. you can now monitor your IT infrastructure with ease, ensuring its reliability and stability.
FAQs
Q: What is Nagios, and why is it beneficial for monitoring in Amazon Linux?
A: Nagios is a powerful monitoring tool that helps track the performance of various network resources and services in Amazon Linux. It provides real-time alerts and proactive monitoring, ensuring optimal system functionality.
Q: Is Nagios free to use for Amazon Linux monitoring?
A: Yes, Nagios is an open-source tool available for free, making it an affordable and efficient solution for monitoring Amazon Linux environments.
Q: Can I install Nagios on any other Linux distribution apart from Amazon Linux?
A: Yes, Nagios can be installed on various Linux distributions, making it versatile for monitoring different types of systems.
Q: What are the minimum system requirements for installing Nagios on Amazon Linux?
A: Nagios has modest system requirements, but it is recommended to have sufficient RAM and CPU resources to handle monitoring tasks effectively.
Q: Do I need to be an expert in Linux to install and configure Nagios?
A: While some Linux knowledge is beneficial, Nagios installation can be done following step-by-step guides, making it accessible to users with varying levels of experience.
Q: Can I monitor Windows systems using Nagios in Amazon Linux?
A: Yes, with the appropriate setup and plugins, Nagios can monitor Windows systems as well.
Q: How often does Nagios check the monitored services and hosts in Amazon Linux?
A: The check frequency is configurable, but typical setups involve checks every few minutes to ensure timely updates on service status.
Q: Does Nagios support email and Slack notifications for alerts?
A: Yes, Nagios can be configured to send notifications via email, Slack, or other methods, ensuring that you are promptly informed of any issues.
Q: Can I customize the Nagios web interface for a personalized experience?
A: Absolutely! The Nagios web interface can be customized with themes and layouts to suit your preferences and needs.
Q: Is Nagios scalable for large-scale infrastructures in Amazon Linux?
A: Yes, Nagios is designed to scale and can effectively handle monitoring tasks in large and complex infrastructures without compromising performance.
Read Other Articles:
Simple Steps for Installing Munin Monitoring Tool
Steps to install Nagios in Amazon Linux
How to execute script or command on reboot or startup in Linux
Install EPEL Repository on CentOS or RHEL or Amazon Linux


I got the error in step 4. I am using CentOS7.
ERROR:
[root@nagios nagios-4.0.8]# make all
cd ./base && make
make[1]: Entering directory `/root/downloads/nagios-4.0.8/base’
make[1]: *** No rule to make target `../include/locations.h’, needed by `nagios.o’. Stop.
make[1]: Leaving directory `/root/downloads/nagios-4.0.8/base’
make: *** [all] Error 2
[root@nagios nagios-4.0.8]# pwd
/root/downloads/nagios-4.0.8
[root@nagios nagios-4.0.8]#
For centos7/RHEL7
#yum install httpd php php-cli gcc glibc glibc-common gd gd-devel net-snmp
# service httpd start
# cd /opt/
# wget https://assets.nagios.com/downloads/nagioscore/releases/nagios-4.3.4.tar.gz
# tar zxvf nagios-4.3.4.tar.gz
# cd nagios-4.0.8
# ./configure –with-command-group=nagcmd
# make all
# make install
# make install-init
# make install-config
# make install-commandmode
# htpasswd -c /usr/local/nagios/etc/htpasswd.users nagiosadminmake install-webconf
# service httpd restart
hello sir
i got error in step 3
iam using aws ec2\linux server
>download link also error
https://nagios-plugins.org/download/nagios-plugins-2.3.3.tar.gz>error
try to download with the below command.
wget https://nagios-plugins.org/download/nagios-plugins-2.3.3.tar.gz