This tutorial teaches you how to install FFmpeg on CentOS 7. FFmpeg is an open-source tool in-build solution to record, stream, convert, and many more. FFmpeg tool is designed for command-line-based processing of video and audio files. It is widely used for basic editing (trimming and concatenation), format transcoding, video post-production effects, media production, broadcasting, live streaming applications, and video scaling. FFmpeg is available for various platforms, including Linux, Windows, and macOS. This article will teach us how to install FFmpeg on CentOS 7.
Steps to Install FFmpeg on CentOS 7
In this tutorial, we will show you 2 methods to install FFmpeg on CentOS 7.
Prerequisites:
A CentOS 7 server with root access.
A terminal or SSH client to connect to the server.
Method 1: Step to install FFmpeg using yum repository
This FFmpeg is unavailable on default CentOS 7 core yum repositories, so you must install it using EPEL Yum repositories.
Follow the below steps.
Step 1: Install EPEL Repository on CentOS 7
FFmpeg is not available in the default CentOS 7 repositories. Therefore, we need to install the Extra Packages for Enterprise Linux (EPEL) repository, which contains additional packages unavailable in the default repositories. To install the EPEL repository, run the following command:
$ sudo yum install epel-release
Checkout tutorial on EPEL repository
Step 2: Install RPM Fusion repository
Run the below command to download RPM fusion repository on your CentOS machine.
$ sudo yum localinstall --nogpgcheck https://download1.rpmfusion.org/free/el/rpmfusion-free-release-7.noarch.rpm
Step 3: Install FFmpeg on CentOS
Run the below command to install FFmpeg on the CentOS machine.
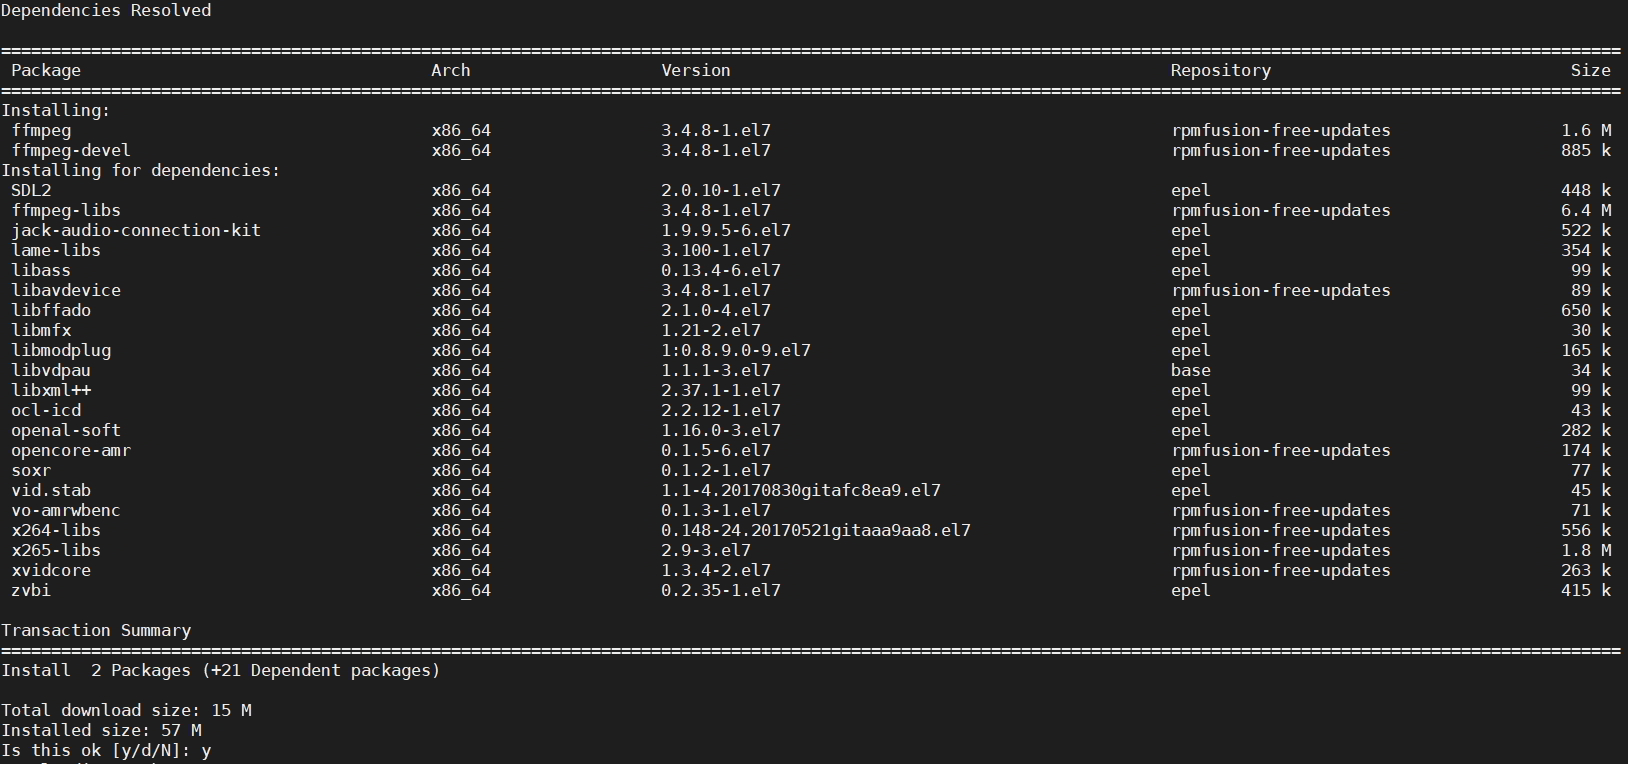
$ sudo yum install ffmpeg ffmpeg-devel
This will download and install FFmpeg and all its dependencies on your CentOS 7 server.
Step 4: Verify the FFmpeg version
After the installation is complete, you can verify that FFmpeg is installed correctly by running the following command:
$ ffmpeg -version
This will display the version of FFmpeg and its dependencies installed on your system.
You have successfully installed FFmpeg on CentOS 7 using the yum repository.
Optional: Install FFmpeg Documentation:
If you want to install FFmpeg documentation for reference, use the following command:
sudo yum install ffmpeg-doc
These steps should help you install FFmpeg on CentOS 7. Adjust any specific configurations based on your requirements.
Step 5: Using FFmpeg
Now that FFmpeg is installed on your CentOS 7 server, you can start using it to convert, record, and stream multimedia files. Here are some examples of how to use FFmpeg:
Convert a video file from one format to another:
ffmpeg -i input.mp4 output.avi
This command will convert the input.mp4 file to the output.avi format.
Record a video from a webcam:
ffmpeg -f video4linux2 -i /dev/video0 output.mp4
This command will record a video from the webcam connected to your server and save it to the output.mp4 file.
Stream a video over the network:
ffmpeg -re -i input.mp4 -c copy -f rtp rtp://192.168.1.100:1234
This command will stream the input.mp4 file over the network to the IP address 192.168.1.100 and the port 1234.
Method 2: Step to install FFmpeg using the build source file
This is another method to install FFmpeg on CentOS 7, here we have downloaded FFmpeg build and installed it manually.
Step 1: Download FFmpeg build tar file
Switch to /opt directory and run the below command to download FFmpeg build.
$ cd /opt

$ sudo wget https://johnvansickle.com/ffmpeg/builds/ffmpeg-git-amd64-static.tar.xz
Sample Output:
[root@centos ~]# cd /opt
[root@centos opt]# sudo wget https://johnvansickle.com/ffmpeg/builds/ffmpeg-git-amd64-static.tar.xz
--2020-11-30 06:39:07-- https://johnvansickle.com/ffmpeg/builds/ffmpeg-git-amd64-static.tar.xz
Resolving johnvansickle.com (johnvansickle.com)...
Connecting to johnvansickle.com (johnvansickle.com)... connected.
HTTP request sent, awaiting response... 200 OK
Length: 38996712 (37M) [application/x-xz]
Saving to: ‘ffmpeg-git-amd64-static.tar.xz’

100%[=========================================================>] 38,996,712 1.65MB/s in 32s

2020-11-30 06:39:40 (1.17 MB/s) - ‘ffmpeg-git-amd64-static.tar.xz’ saved [38996712/38996712]

[root@centos opt]#
Step 2: Verify FFmpeg tar file using md5sum
$ sudo wget https://johnvansickle.com/ffmpeg/builds/ffmpeg-git-amd64-static.tar.xz.md5

$ md5sum -c ffmpeg-git-amd64-static.tar.xz.md5
Sample Output:
[root@centos opt]# sudo wget https://johnvansickle.com/ffmpeg/builds/ffmpeg-git-amd64-static.tar.xz.md5
--2020-11-30 06:42:04-- https://johnvansickle.com/ffmpeg/builds/ffmpeg-git-amd64-static.tar.xz.md5
Resolving johnvansickle.com (johnvansickle.com)...
Connecting to johnvansickle.com (johnvansickle.com)... connected.
HTTP request sent, awaiting response... 200 OK
Length: 65 [application/x-xz]
Saving to: ‘ffmpeg-git-amd64-static.tar.xz.md5’

100%[=================================================================>] 65 --.-K/s in 0s

2020-11-30 06:42:05 (2.41 MB/s) - ‘ffmpeg-git-amd64-static.tar.xz.md5’ saved [65/65]

[root@centos opt]#
[root@centos opt]# md5sum -c ffmpeg-git-amd64-static.tar.xz.md5
ffmpeg-git-amd64-static.tar.xz: OK
[root@centos opt]#
Step 3: Untar the FFmpeg build
$ sudo tar xvf ffmpeg*.xz
Sample Output:
[root@centos opt]# cd ffmpeg-*-static
[root@centos ffmpeg-git-20201128-amd64-static]# ll
total 149144
-rwxr-xr-x. 1 root root 76044768 Nov 29 00:27 ffmpeg
-rwxr-xr-x. 1 root root 75934368 Nov 29 00:27 ffprobe
-rw-r--r--. 1 root root 35147 Nov 29 00:27 GPLv3.txt
drwxr-xr-x. 2 root root 4096 Nov 29 00:27 manpages
drwxr-xr-x. 7 root root 4096 Nov 28 23:55 model
-rwxr-xr-x. 1 root root 690888 Nov 29 00:27 qt-faststart
-rw-r--r--. 1 root root 2152 Nov 29 00:27 readme.txt
[root@centos ffmpeg-git-20201128-amd64-static]#
Step 4: Create symlink for ffmpeg and ffprobe binaries
$ sudo ln -s "${PWD}/ffmpeg" /usr/local/bin/

$ sudo ln -s "${PWD}/ffprobe" /usr/local/bin/
Sample Output:
[root@centos ffmpeg-git-20201128-amd64-static]# sudo ln -s "${PWD}/ffmpeg" /usr/local/bin/
[root@centos ffmpeg-git-20201128-amd64-static]# sudo ln -s "${PWD}/ffprobe" /usr/local/bin/
[root@centos ffmpeg-git-20201128-amd64-static]#
[root@centos ffmpeg-git-20201128-amd64-static]# which ffmpeg
/usr/local/bin/ffmpeg
[root@centos ffmpeg-git-20201128-amd64-static]# which ffprobe
/usr/local/bin/ffprobe
[root@centos ffmpeg-git-20201128-amd64-static]#
You have successfully installed FFmpeg on CentOS 7 using the build source file.
Conclusion:
In this article, we have learned how to install FFmpeg on CentOS 7. FFmpeg is a powerful multimedia framework that can be used to convert, record, and stream video and audio files. By following the steps outlined in this article, you should now be able to install FFmpeg on your CentOS 7 server and start using it to process multimedia files.
FAQs:
Q1: What is FFmpeg used for?
A1: FFmpeg is a powerful multimedia processing tool that can be used for tasks such as converting audio and video formats, transcoding media files, and performing various multimedia-related operations.
Q2: How do I use FFmpeg to convert a video file?
A2: To convert a video file from one format to another, you can use a command like the following:
ffmpeg -i input_video.mp4 -c:a aac -c:v libx264 output_video.mp4
Replace input_video.mp4 and output_video.mp4 with your actual input and output file names.
Q3: Can I install FFmpeg from source on CentOS 7?
A3: Yes, you can compile and install FFmpeg from source, but using the package manager (yum) is generally recommended for better maintainability and ease of updates.
Q4: How do I uninstall FFmpeg from CentOS 7?
A4: To uninstall FFmpeg, you can use the following command:
sudo yum remove ffmpeg
Q5: Are there any graphical user interfaces (GUIs) for FFmpeg on CentOS 7?
A5: Yes, there are several GUIs available for FFmpeg, such as WinFF and FFQueue. Keep in mind that these might not be available in the default repositories and may need to be installed separately.
These FAQs provide additional information and answers to common questions about installing and using FFmpeg on CentOS 7.


