In this tutorial, you’ll learn how to Install Varnish Cache for Nginx on CentOS 7. Varnish cache is used to increase the speed or accelerate web servers to serve the web pages. Varnish Cache is a free web application accelerator. Varnish cache saves the webpages in-memory so that every time when a user request/access any web pages it will be loaded from in-memory instead of afresh.
Varnish cache is also known as a caching HTTP reverse proxy. Varnish cache will boost your server to load web pages very fast, and this is one of the key factors for Google to rank higher.
Varnish Cache is a popular open-source HTTP accelerator designed to speed up web servers by caching frequently requested content. It works by storing copies of content in memory and serving them directly from there, rather than repeatedly requesting the same content from the origin server. Nginx is a powerful web server that can also act as a reverse proxy and load balancer. When used together, Varnish Cache and Nginx can greatly improve the performance and scalability of your web applications.
In this tutorial, we will explain how to install and configure Varnish Cache for Nginx on CentOS 7. We assume that you have a CentOS 7 server with Nginx already installed and configured. If you don’t, please follow our tutorial on “How to Install Nginx on CentOS 7” before proceeding.
Steps to Install Varnish Cache for Nginx on CentOS 7
Step 1: Install EPEL Repository on CentOS
sudo yum install -y epel-release
To know more how to install EPEL on Linux
Step 2: Install Nginx on CentOS
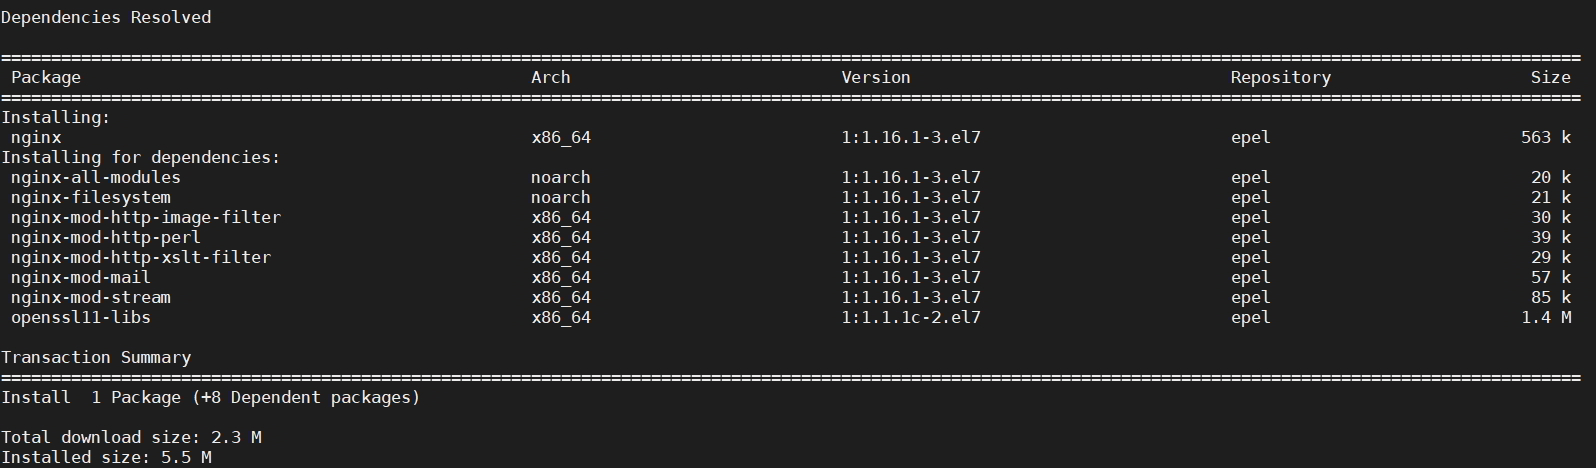
yum install nginx -y
Sample output:
[root@centos ~]# yum install nginx -y
Loaded plugins: fastestmirror, langpacks
Loading mirror speeds from cached hostfile
 * base: mirrors.piconets.webwerks.in
 * epel: ftp.jaist.ac.jp
 * extras: mirrors.piconets.webwerks.in
 * updates: mirrors.piconets.webwerks.in
Resolving Dependencies
--> Running transaction check
---> Package nginx.x86_64 1:1.16.1-3.el7 will be installed
--> Processing Dependency: nginx-all-modules = 1:1.16.1-3.el7 for package: 1:nginx-1.16.1-3.el7.x86_64
--> Processing Dependency: nginx-filesystem = 1:1.16.1-3.el7 for package: 1:nginx-1.16.1-3.el7.x86_64
--> Processing Dependency: libcrypto.so.1.1(OPENSSL_1_1_0)(64bit) for package: 1:nginx-1.16.1-3.el7.x86_64
--> Processing Dependency: libssl.so.1.1(OPENSSL_1_1_0)(64bit) for package: 1:nginx-1.16.1-3.el7.x86_64
--> Processing Dependency: libssl.so.1.1(OPENSSL_1_1_1)(64bit) for package: 1:nginx-1.16.1-3.el7.x86_64
--> Processing Dependency: nginx-filesystem for package: 1:nginx-1.16.1-3.el7.x86_64
--> Processing Dependency: libcrypto.so.1.1()(64bit) for package: 1:nginx-1.16.1-3.el7.x86_64
--> Processing Dependency: libssl.so.1.1()(64bit) for package: 1:nginx-1.16.1-3.el7.x86_64
--> Running transaction check
---> Package nginx-all-modules.noarch 1:1.16.1-3.el7 will be installed
--> Processing Dependency: nginx-mod-http-image-filter = 1:1.16.1-3.el7 for package: 1:nginx-all-modules-1.16.1-3.el7.noarch
--> Processing Dependency: nginx-mod-http-perl = 1:1.16.1-3.el7 for package: 1:nginx-all-modules-1.16.1-3.el7.noarch
--> Processing Dependency: nginx-mod-http-xslt-filter = 1:1.16.1-3.el7 for package: 1:nginx-all-modules-1.16.1-3.el7.noarch
--> Processing Dependency: nginx-mod-mail = 1:1.16.1-3.el7 for package: 1:nginx-all-modules-1.16.1-3.el7.noarch
--> Processing Dependency: nginx-mod-stream = 1:1.16.1-3.el7 for package: 1:nginx-all-modules-1.16.1-3.el7.noarch
---> Package nginx-filesystem.noarch 1:1.16.1-3.el7 will be installed
---> Package openssl11-libs.x86_64 1:1.1.1c-2.el7 will be installed
--> Running transaction check
---> Package nginx-mod-http-image-filter.x86_64 1:1.16.1-3.el7 will be installed
---> Package nginx-mod-http-perl.x86_64 1:1.16.1-3.el7 will be installed
---> Package nginx-mod-http-xslt-filter.x86_64 1:1.16.1-3.el7 will be installed
---> Package nginx-mod-mail.x86_64 1:1.16.1-3.el7 will be installed
---> Package nginx-mod-stream.x86_64 1:1.16.1-3.el7 will be installed
--> Finished Dependency Resolution


Dependencies Resolved


=====================================================================================
 Package                                             Arch                           Version                                Repository                    Size
=====================================================================================
Installing:
 nginx                                               x86_64                         1:1.16.1-3.el7                         epel                         563 k
Installing for dependencies:
 nginx-all-modules                                   noarch                         1:1.16.1-3.el7                         epel                          20 k
 nginx-filesystem                                    noarch                         1:1.16.1-3.el7                         epel                          21 k
 nginx-mod-http-image-filter                         x86_64                         1:1.16.1-3.el7                         epel                          30 k
 nginx-mod-http-perl                                 x86_64                         1:1.16.1-3.el7                         epel                          39 k
 nginx-mod-http-xslt-filter                          x86_64                         1:1.16.1-3.el7                         epel                          29 k
 nginx-mod-mail                                      x86_64                         1:1.16.1-3.el7                         epel                          57 k
 nginx-mod-stream                                    x86_64                         1:1.16.1-3.el7                         epel                          85 k
 openssl11-libs                                      x86_64                         1:1.1.1c-2.el7                         epel                         1.4 M


Transaction Summary
=====================================================================================
Install  1 Package (+8 Dependent packages)


Total download size: 2.3 M
Installed size: 5.5 M
Downloading packages:
(1/9): nginx-mod-http-image-filter-1.16.1-3.el7.x86_64.rpm                                                                             |  30 kB  00:00:01
(2/9): nginx-1.16.1-3.el7.x86_64.rpm                                                                                                   | 563 kB  00:00:02
(3/9): nginx-mod-mail-1.16.1-3.el7.x86_64.rpm                                                                                          |  57 kB  00:00:00
(4/9): nginx-all-modules-1.16.1-3.el7.noarch.rpm                                                                                       |  20 kB  00:00:02
(5/9): nginx-mod-stream-1.16.1-3.el7.x86_64.rpm                                                                                        |  85 kB  00:00:00
(6/9): openssl11-libs-1.1.1c-2.el7.x86_64.rpm                                                                                          | 1.4 MB  00:00:06
(7/9): nginx-mod-http-perl-1.16.1-3.el7.x86_64.rpm                                                                                     |  39 kB  00:00:16
(8/9): nginx-filesystem-1.16.1-3.el7.noarch.rpm                                                                                        |  21 kB  00:00:17
(9/9): nginx-mod-http-xslt-filter-1.16.1-3.el7.x86_64.rpm                                                                              |  29 kB  00:00:25
-------------------------------------------------------------------------------------------------------------------------------------------------
Total                                                                                                                          87 kB/s | 2.3 MB  00:00:26
Running transaction check
Running transaction test
Transaction test succeeded
Running transaction
  Installing : 1:openssl11-libs-1.1.1c-2.el7.x86_64                                                                                                       1/9
  Installing : 1:nginx-filesystem-1.16.1-3.el7.noarch                                                                                                     2/9
  Installing : 1:nginx-mod-http-perl-1.16.1-3.el7.x86_64                                                                                                  3/9
  Installing : 1:nginx-mod-http-xslt-filter-1.16.1-3.el7.x86_64                                                                                           4/9
  Installing : 1:nginx-mod-http-image-filter-1.16.1-3.el7.x86_64                                                                                          5/9
  Installing : 1:nginx-mod-stream-1.16.1-3.el7.x86_64                                                                                                     6/9
  Installing : 1:nginx-1.16.1-3.el7.x86_64                                                                                                                7/9
  Installing : 1:nginx-mod-mail-1.16.1-3.el7.x86_64                                                                                                       8/9
  Installing : 1:nginx-all-modules-1.16.1-3.el7.noarch                                                                                                    9/9
  Verifying  : 1:nginx-mod-mail-1.16.1-3.el7.x86_64                                                                                                       1/9
  Verifying  : 1:nginx-mod-http-perl-1.16.1-3.el7.x86_64                                                                                                  2/9
  Verifying  : 1:nginx-1.16.1-3.el7.x86_64                                                                                                                3/9
  Verifying  : 1:nginx-filesystem-1.16.1-3.el7.noarch                                                                                                     4/9
  Verifying  : 1:nginx-mod-http-xslt-filter-1.16.1-3.el7.x86_64                                                                                           5/9
  Verifying  : 1:nginx-all-modules-1.16.1-3.el7.noarch                                                                                                    6/9
  Verifying  : 1:openssl11-libs-1.1.1c-2.el7.x86_64                                                                                                       7/9
  Verifying  : 1:nginx-mod-http-image-filter-1.16.1-3.el7.x86_64                                                                                          8/9
  Verifying  : 1:nginx-mod-stream-1.16.1-3.el7.x86_64                                                                                                     9/9


Installed:
  nginx.x86_64 1:1.16.1-3.el7


Dependency Installed:
  nginx-all-modules.noarch 1:1.16.1-3.el7        nginx-filesystem.noarch 1:1.16.1-3.el7                nginx-mod-http-image-filter.x86_64 1:1.16.1-3.el7
  nginx-mod-http-perl.x86_64 1:1.16.1-3.el7      nginx-mod-http-xslt-filter.x86_64 1:1.16.1-3.el7      nginx-mod-mail.x86_64 1:1.16.1-3.el7
  nginx-mod-stream.x86_64 1:1.16.1-3.el7         openssl11-libs.x86_64 1:1.1.1c-2.el7


Complete!
[root@centos ~]#
Step 3: Start and Enable Nginx service on CentOS
Run the below command to start and enable the Nginx service
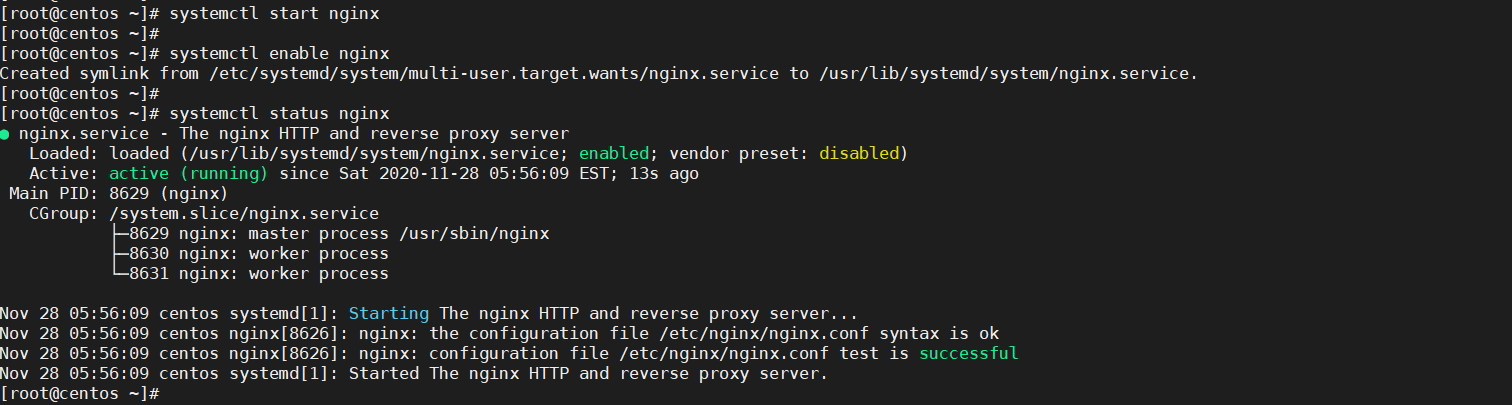
systemctl start nginx

systemctl enable nginx
Sample output:
[root@centos ~]# systemctl start nginx
[root@centos ~]#
[root@centos ~]# systemctl enable nginx
Created symlink from /etc/systemd/system/multi-user.target.wants/nginx.service to /usr/lib/systemd/system/nginx.service.
[root@centos ~]#
[root@centos ~]# systemctl status nginx
● nginx.service - The nginx HTTP and reverse proxy server
Loaded: loaded (/usr/lib/systemd/system/nginx.service; enabled; vendor preset: disabled)
Active: active (running) since Sat 2020-11-28 05:56:09 EST; 13s ago
Main PID: 8629 (nginx)
CGroup: /system.slice/nginx.service
├─8629 nginx: master process /usr/sbin/nginx
├─8630 nginx: worker process
└─8631 nginx: worker process

Nov 28 05:56:09 centos systemd[1]: Starting The nginx HTTP and reverse proxy server...
Nov 28 05:56:09 centos nginx[8626]: nginx: the configuration file /etc/nginx/nginx.conf syntax is ok
Nov 28 05:56:09 centos nginx[8626]: nginx: configuration file /etc/nginx/nginx.conf test is successful
Nov 28 05:56:09 centos systemd[1]: Started The nginx HTTP and reverse proxy server.
[root@centos ~]#
Step 4: Verify Nginx Service and Port
By Default Nginx work on Nginx 80, verify with netstat command.
netstat -plant | grep -w 80
Sample output:
[root@centos ~]# netstat -plant | grep -w 80
tcp        0      0 0.0.0.0:80              0.0.0.0:*               LISTEN      8629/nginx: master
tcp6       0      0 :::80                   :::*                    LISTEN      8629/nginx: master
[root@centos ~]#

Step 5: Install Varnish
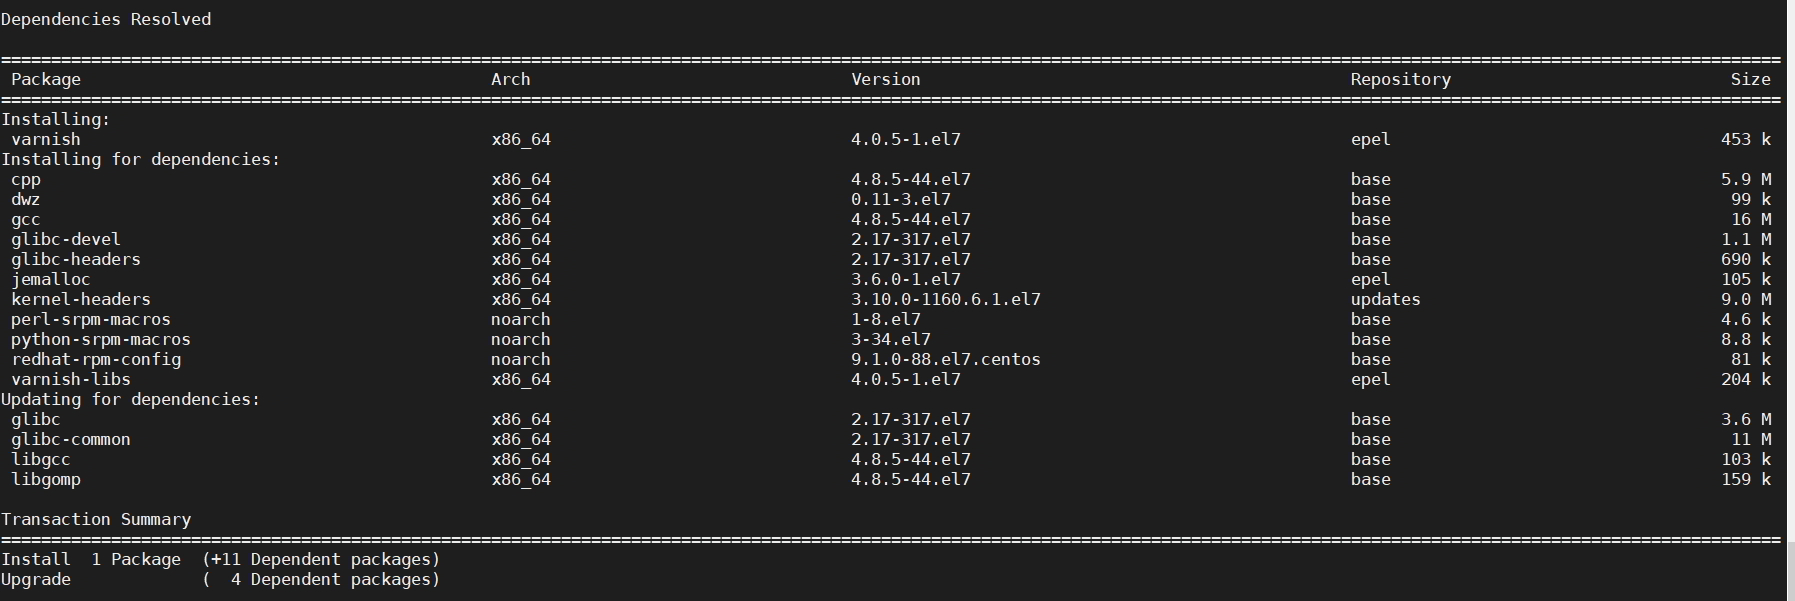
yum install varnish
Sample Output:
[root@centos ~]# yum install varnish
Loaded plugins: fastestmirror, langpacks
Loading mirror speeds from cached hostfile
* base: mirrors.piconets.webwerks.in
* epel: ftp.jaist.ac.jp
* extras: mirrors.piconets.webwerks.in
* updates: mirrors.piconets.webwerks.in
Resolving Dependencies
--> Running transaction check
---> Package varnish.x86_64 0:4.0.5-1.el7 will be installed
--> Processing Dependency: varnish-libs(x86-64) = 4.0.5-1.el7 for package: varnish-4.0.5-1.el7.x86_64
--> Processing Dependency: jemalloc for package: varnish-4.0.5-1.el7.x86_64
--> Processing Dependency: redhat-rpm-config for package: varnish-4.0.5-1.el7.x86_64
--> Processing Dependency: gcc for package: varnish-4.0.5-1.el7.x86_64
--> Processing Dependency: libvarnishapi.so.1(LIBVARNISHAPI_1.0)(64bit) for package: varnish-4.0.5-1.el7.x86_64
--> Processing Dependency: libvarnishapi.so.1(LIBVARNISHAPI_1.1)(64bit) for package: varnish-4.0.5-1.el7.x86_64
--> Processing Dependency: libvarnishapi.so.1(LIBVARNISHAPI_1.2)(64bit) for package: varnish-4.0.5-1.el7.x86_64
--> Processing Dependency: libvarnishapi.so.1(LIBVARNISHAPI_1.3)(64bit) for package: varnish-4.0.5-1.el7.x86_64
--> Processing Dependency: libjemalloc.so.1()(64bit) for package: varnish-4.0.5-1.el7.x86_64
--> Processing Dependency: libvarnishapi.so.1()(64bit) for package: varnish-4.0.5-1.el7.x86_64
--> Processing Dependency: libvarnishcompat.so()(64bit) for package: varnish-4.0.5-1.el7.x86_64
--> Processing Dependency: libvarnish.so()(64bit) for package: varnish-4.0.5-1.el7.x86_64
--> Processing Dependency: libvcc.so()(64bit) for package: varnish-4.0.5-1.el7.x86_64
--> Processing Dependency: libvgz.so()(64bit) for package: varnish-4.0.5-1.el7.x86_64
--> Running transaction check
---> Package gcc.x86_64 0:4.8.5-44.el7 will be installed
--> Processing Dependency: libgomp = 4.8.5-44.el7 for package: gcc-4.8.5-44.el7.x86_64
--> Processing Dependency: cpp = 4.8.5-44.el7 for package: gcc-4.8.5-44.el7.x86_64
--> Processing Dependency: libgcc >= 4.8.5-44.el7 for package: gcc-4.8.5-44.el7.x86_64
--> Processing Dependency: glibc-devel >= 2.2.90-12 for package: gcc-4.8.5-44.el7.x86_64
---> Package jemalloc.x86_64 0:3.6.0-1.el7 will be installed
---> Package redhat-rpm-config.noarch 0:9.1.0-88.el7.centos will be installed
--> Processing Dependency: dwz >= 0.4 for package: redhat-rpm-config-9.1.0-88.el7.centos.noarch
--> Processing Dependency: python-srpm-macros for package: redhat-rpm-config-9.1.0-88.el7.centos.noarch
--> Processing Dependency: perl-srpm-macros for package: redhat-rpm-config-9.1.0-88.el7.centos.noarch
---> Package varnish-libs.x86_64 0:4.0.5-1.el7 will be installed
--> Running transaction check
---> Package cpp.x86_64 0:4.8.5-44.el7 will be installed
---> Package dwz.x86_64 0:0.11-3.el7 will be installed
---> Package glibc-devel.x86_64 0:2.17-317.el7 will be installed
--> Processing Dependency: glibc-headers = 2.17-317.el7 for package: glibc-devel-2.17-317.el7.x86_64
--> Processing Dependency: glibc = 2.17-317.el7 for package: glibc-devel-2.17-317.el7.x86_64
--> Processing Dependency: glibc-headers for package: glibc-devel-2.17-317.el7.x86_64
---> Package libgcc.x86_64 0:4.8.5-39.el7 will be updated
---> Package libgcc.x86_64 0:4.8.5-44.el7 will be an update
---> Package libgomp.x86_64 0:4.8.5-39.el7 will be updated
---> Package libgomp.x86_64 0:4.8.5-44.el7 will be an update
---> Package perl-srpm-macros.noarch 0:1-8.el7 will be installed
---> Package python-srpm-macros.noarch 0:3-34.el7 will be installed
--> Running transaction check
---> Package glibc.x86_64 0:2.17-292.el7 will be updated
--> Processing Dependency: glibc = 2.17-292.el7 for package: glibc-common-2.17-292.el7.x86_64
---> Package glibc.x86_64 0:2.17-317.el7 will be an update
---> Package glibc-headers.x86_64 0:2.17-317.el7 will be installed
--> Processing Dependency: kernel-headers >= 2.2.1 for package: glibc-headers-2.17-317.el7.x86_64
--> Processing Dependency: kernel-headers for package: glibc-headers-2.17-317.el7.x86_64
--> Running transaction check
---> Package glibc-common.x86_64 0:2.17-292.el7 will be updated
---> Package glibc-common.x86_64 0:2.17-317.el7 will be an update
---> Package kernel-headers.x86_64 0:3.10.0-1160.6.1.el7 will be installed
--> Finished Dependency Resolution

Dependencies Resolved

===================================================================================
Package Arch Version Repository Size
===================================================================================
Installing:
varnish x86_64 4.0.5-1.el7 epel 453 k
Installing for dependencies:
cpp x86_64 4.8.5-44.el7 base 5.9 M
dwz x86_64 0.11-3.el7 base 99 k
gcc x86_64 4.8.5-44.el7 base 16 M
glibc-devel x86_64 2.17-317.el7 base 1.1 M
glibc-headers x86_64 2.17-317.el7 base 690 k
jemalloc x86_64 3.6.0-1.el7 epel 105 k
kernel-headers x86_64 3.10.0-1160.6.1.el7 updates 9.0 M
perl-srpm-macros noarch 1-8.el7 base 4.6 k
python-srpm-macros noarch 3-34.el7 base 8.8 k
redhat-rpm-config noarch 9.1.0-88.el7.centos base 81 k
varnish-libs x86_64 4.0.5-1.el7 epel 204 k
Updating for dependencies:
glibc x86_64 2.17-317.el7 base 3.6 M
glibc-common x86_64 2.17-317.el7 base 11 M
libgcc x86_64 4.8.5-44.el7 base 103 k
libgomp x86_64 4.8.5-44.el7 base 159 k

Transaction Summary
===================================================================================
Install 1 Package (+11 Dependent packages)
Upgrade ( 4 Dependent packages)

Total download size: 49 M
Is this ok [y/d/N]: y
Downloading packages:
No Presto metadata available for base
(1/16): dwz-0.11-3.el7.x86_64.rpm | 99 kB 00:00:16
(2/16): cpp-4.8.5-44.el7.x86_64.rpm | 5.9 MB 00:00:30
(3/16): glibc-2.17-317.el7.x86_64.rpm | 3.6 MB 00:00:06
(4/16): gcc-4.8.5-44.el7.x86_64.rpm | 16 MB 00:00:32
(5/16): glibc-devel-2.17-317.el7.x86_64.rpm | 1.1 MB 00:00:01
(6/16): glibc-headers-2.17-317.el7.x86_64.rpm | 690 kB 00:00:01
(7/16): libgcc-4.8.5-44.el7.x86_64.rpm | 103 kB 00:00:00
(8/16): libgomp-4.8.5-44.el7.x86_64.rpm | 159 kB 00:00:00
(9/16): perl-srpm-macros-1-8.el7.noarch.rpm | 4.6 kB 00:00:00
(10/16): python-srpm-macros-3-34.el7.noarch.rpm | 8.8 kB 00:00:00
(11/16): redhat-rpm-config-9.1.0-88.el7.centos.noarch.rpm | 81 kB 00:00:00
(12/16): varnish-4.0.5-1.el7.x86_64.rpm | 453 kB 00:00:03
(13/16): glibc-common-2.17-317.el7.x86_64.rpm | 11 MB 00:00:23
(14/16): jemalloc-3.6.0-1.el7.x86_64.rpm | 105 kB 00:00:26
(15/16): varnish-libs-4.0.5-1.el7.x86_64.rpm | 204 kB 00:00:01
(16/16): kernel-headers-3.10.0-1160.6.1.el7.x86_64.rpm | 9.0 MB 00:00:31
------------------------------------------------------------------------------------------------------------------------------------------------
Total 612 kB/s | 49 MB 00:01:22
Running transaction check
Running transaction test
Transaction test succeeded
Running transaction
Updating : libgcc-4.8.5-44.el7.x86_64 1/20
Updating : glibc-common-2.17-317.el7.x86_64 2/20
Updating : glibc-2.17-317.el7.x86_64 3/20
Installing : dwz-0.11-3.el7.x86_64 4/20
Installing : jemalloc-3.6.0-1.el7.x86_64 5/20
Installing : varnish-libs-4.0.5-1.el7.x86_64 6/20
Installing : cpp-4.8.5-44.el7.x86_64 7/20
Updating : libgomp-4.8.5-44.el7.x86_64 8/20
Installing : perl-srpm-macros-1-8.el7.noarch 9/20
Installing : python-srpm-macros-3-34.el7.noarch 10/20
Installing : redhat-rpm-config-9.1.0-88.el7.centos.noarch 11/20
Installing : kernel-headers-3.10.0-1160.6.1.el7.x86_64 12/20
Installing : glibc-headers-2.17-317.el7.x86_64 13/20
Installing : glibc-devel-2.17-317.el7.x86_64 14/20
Installing : gcc-4.8.5-44.el7.x86_64 15/20
Installing : varnish-4.0.5-1.el7.x86_64 16/20
Cleanup : libgomp-4.8.5-39.el7.x86_64 17/20
Cleanup : glibc-common-2.17-292.el7.x86_64 18/20
Cleanup : glibc-2.17-292.el7.x86_64 19/20
Cleanup : libgcc-4.8.5-39.el7.x86_64 20/20
Verifying : libgcc-4.8.5-44.el7.x86_64 1/20
Verifying : glibc-2.17-317.el7.x86_64 2/20
Verifying : dwz-0.11-3.el7.x86_64 3/20
Verifying : kernel-headers-3.10.0-1160.6.1.el7.x86_64 4/20
Verifying : jemalloc-3.6.0-1.el7.x86_64 5/20
Verifying : glibc-headers-2.17-317.el7.x86_64 6/20
Verifying : varnish-libs-4.0.5-1.el7.x86_64 7/20
Verifying : glibc-devel-2.17-317.el7.x86_64 8/20
Verifying : gcc-4.8.5-44.el7.x86_64 9/20
Verifying : glibc-common-2.17-317.el7.x86_64 10/20
Verifying : python-srpm-macros-3-34.el7.noarch 11/20
Verifying : varnish-4.0.5-1.el7.x86_64 12/20
Verifying : cpp-4.8.5-44.el7.x86_64 13/20
Verifying : libgomp-4.8.5-44.el7.x86_64 14/20
Verifying : perl-srpm-macros-1-8.el7.noarch 15/20
Verifying : redhat-rpm-config-9.1.0-88.el7.centos.noarch 16/20
Verifying : glibc-2.17-292.el7.x86_64 17/20
Verifying : libgcc-4.8.5-39.el7.x86_64 18/20
Verifying : libgomp-4.8.5-39.el7.x86_64 19/20
Verifying : glibc-common-2.17-292.el7.x86_64 20/20

Installed:
varnish.x86_64 0:4.0.5-1.el7

Dependency Installed:
cpp.x86_64 0:4.8.5-44.el7 dwz.x86_64 0:0.11-3.el7 gcc.x86_64 0:4.8.5-44.el7 glibc-devel.x86_64 0:2.17-317.el7
glibc-headers.x86_64 0:2.17-317.el7 jemalloc.x86_64 0:3.6.0-1.el7 kernel-headers.x86_64 0:3.10.0-1160.6.1.el7 perl-srpm-macros.noarch 0:1-8.el7
python-srpm-macros.noarch 0:3-34.el7 redhat-rpm-config.noarch 0:9.1.0-88.el7.centos varnish-libs.x86_64 0:4.0.5-1.el7

Dependency Updated:
glibc.x86_64 0:2.17-317.el7 glibc-common.x86_64 0:2.17-317.el7 libgcc.x86_64 0:4.8.5-44.el7 libgomp.x86_64 0:4.8.5-44.el7

Complete!
[root@centos ~]#
Step 6. Start and Enable Varnish
Start the Varnish service with the below command:
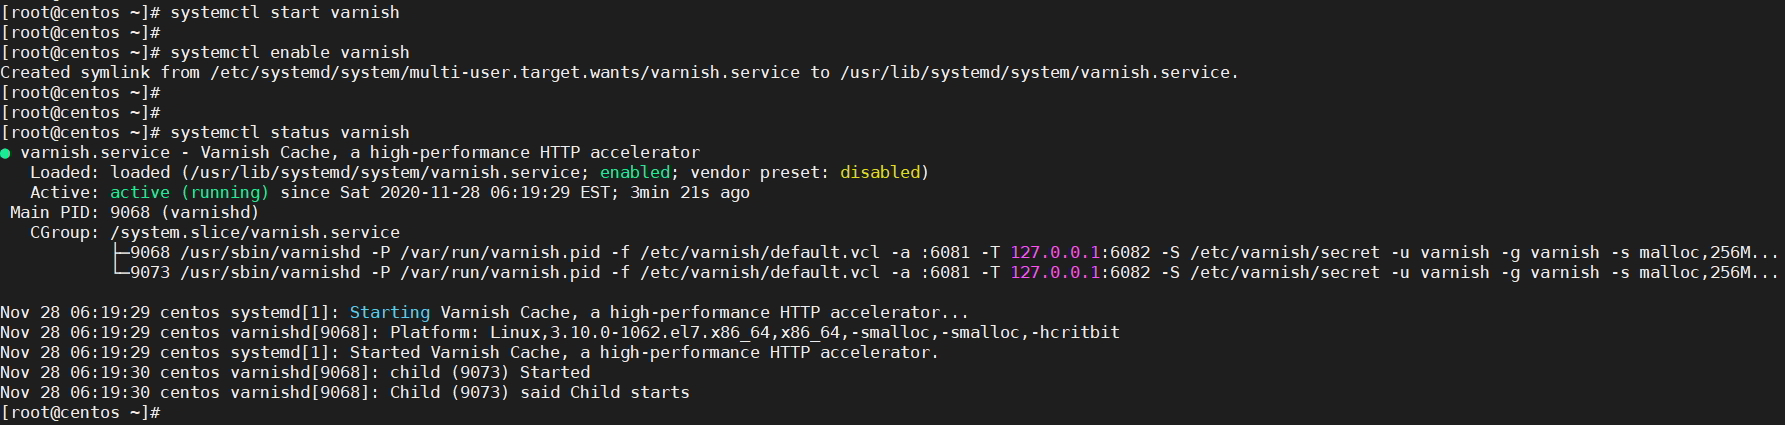
systemctl start varnish
Enable the varnish service to start on boot
systemctl enable varnish
Verify the Varnish service is up and running
systemctl status varnish
Sample Output:
[root@centos ~]# systemctl start varnish
[root@centos ~]#
[root@centos ~]# systemctl enable varnish
Created symlink from /etc/systemd/system/multi-user.target.wants/varnish.service to /usr/lib/systemd/system/varnish.service.
[root@centos ~]#
[root@centos ~]#
[root@centos ~]# systemctl status varnish
● varnish.service - Varnish Cache, a high-performance HTTP accelerator
Loaded: loaded (/usr/lib/systemd/system/varnish.service; enabled; vendor preset: disabled)
Active: active (running) since Sat 2020-11-28 06:19:29 EST; 3min 21s ago
Main PID: 9068 (varnishd)
CGroup: /system.slice/varnish.service
├─9068 /usr/sbin/varnishd -P /var/run/varnish.pid -f /etc/varnish/default.vcl -a :6081 -T 127.0.0.1:6082 -S /etc/varnish/secret -u varnish -g varnish -s malloc,256M...
└─9073 /usr/sbin/varnishd -P /var/run/varnish.pid -f /etc/varnish/default.vcl -a :6081 -T 127.0.0.1:6082 -S /etc/varnish/secret -u varnish -g varnish -s malloc,256M...

Nov 28 06:19:29 centos systemd[1]: Starting Varnish Cache, a high-performance HTTP accelerator...
Nov 28 06:19:29 centos varnishd[9068]: Platform: Linux,3.10.0-1062.el7.x86_64,x86_64,-smalloc,-smalloc,-hcritbit
Nov 28 06:19:29 centos systemd[1]: Started Varnish Cache, a high-performance HTTP accelerator.
Nov 28 06:19:30 centos varnishd[9068]: child (9073) Started
Nov 28 06:19:30 centos varnishd[9068]: Child (9073) said Child starts
[root@centos ~]#
Get details of Varnish package using “rpm -qi” command
rpm -qi varnish
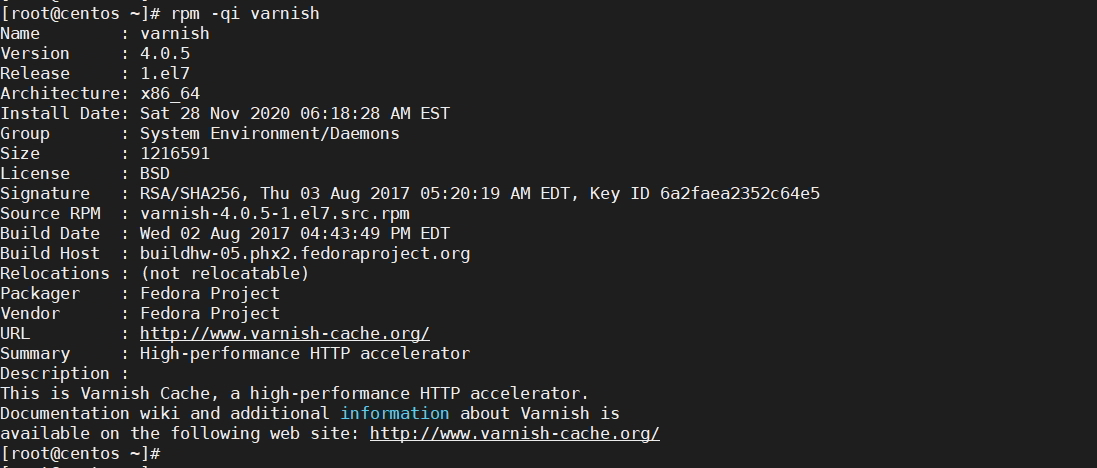
If you want to check the varnish version and to know more about installation details:
Sample Output
[root@centos ~]# rpm -qi varnish
Name : varnish
Version : 4.0.5
Release : 1.el7
Architecture: x86_64
Install Date: Sat 28 Nov 2020 06:18:28 AM EST
Group : System Environment/Daemons
Size : 1216591
License : BSD
Signature : RSA/SHA256, Thu 03 Aug 2017 05:20:19 AM EDT, Key ID 6a2faea2352c64e5
Source RPM : varnish-4.0.5-1.el7.src.rpm
Build Date : Wed 02 Aug 2017 04:43:49 PM EDT
Build Host : buildhw-05.phx2.fedoraproject.org
Relocations : (not relocatable)
Packager : Fedora Project
Vendor : Fedora Project
URL : http://www.varnish-cache.org/
Summary : High-performance HTTP accelerator
Description :
This is Varnish Cache, a high-performance HTTP accelerator.
Documentation wiki and additional information about Varnish is
available on the following web site: http://www.varnish-cache.org/
[root@centos ~]#
Step 7: Configure Varnish for Nginx
Now configure varnish in nginx as a reverse proxy. Basically, the Varnish cache / any other cache is placed in front of web server which serve HTTP/Web requests.
Change Nginx default port to 8080:
[root@centos ~]# cp -r /etc/nginx/nginx.conf /etc/nginx/nginx.conf-backup
[root@centos ~]#
[root@centos ~]# sed -i 's/80/8080/g' /etc/nginx/nginx.conf
Or else you can manually do it by editing the nginx.conf file and replace 80 to 8080 port and save the file.
…
server {
listen 8080 default_server;
listen [::]:8080 default_server;
server_name _;
root /usr/share/nginx/html;
…
Sample nginx.conf file:
[root@centos ~]# cat /etc/nginx/nginx.conf
# For more information on configuration, see:
# * Official English Documentation: http://nginx.org/en/docs/
# * Official Russian Documentation: http://nginx.org/ru/docs/

user nginx;
worker_processes auto;
error_log /var/log/nginx/error.log;
pid /run/nginx.pid;

# Load dynamic modules. See /usr/share/doc/nginx/README.dynamic.
include /usr/share/nginx/modules/*.conf;

events {
worker_connections 1024;
}

http {
log_format main '$remote_addr - $remote_user [$time_local] "$request" '
'$status $body_bytes_sent "$http_referer" '
'"$http_user_agent" "$http_x_forwarded_for"';

access_log /var/log/nginx/access.log main;

sendfile on;
tcp_nopush on;
tcp_nodelay on;
keepalive_timeout 65;
types_hash_max_size 2048;

include /etc/nginx/mime.types;
default_type application/octet-stream;

# Load modular configuration files from the /etc/nginx/conf.d directory.
# See http://nginx.org/en/docs/ngx_core_module.html#include
# for more information.
include /etc/nginx/conf.d/*.conf;

server {
listen 8080 default_server;
listen [::]:8080 default_server;
server_name _;
root /usr/share/nginx/html;

# Load configuration files for the default server block.
include /etc/nginx/default.d/*.conf;

location / {
}

error_page 404 /404.html;
location = /404.html {
}

error_page 500 502 503 504 /50x.html;
location = /50x.html {
}
}

# Settings for a TLS enabled server.
#
# server {
# listen 443 ssl http2 default_server;
# listen [::]:443 ssl http2 default_server;
# server_name _;
# root /usr/share/nginx/html;
#
# ssl_certificate "/etc/pki/nginx/server.crt";
# ssl_certificate_key "/etc/pki/nginx/private/server.key";
# ssl_session_cache shared:SSL:1m;
# ssl_session_timeout 10m;
# ssl_ciphers HIGH:!aNULL:!MD5;
# ssl_prefer_server_ciphers on;
#
# # Load configuration files for the default server block.
# include /etc/nginx/default.d/*.conf;
#
# location / {
# }
#
# error_page 404 /404.html;
# location = /404.html {
# }
#
# error_page 500 502 503 504 /50x.html;
# location = /50x.html {
# }
# }

}

[root@centos ~]#
Restart the Nginx to make changes in effect
Run the below command:
systemctl restart nginx
Verify Nginx is running on port 8080
netstat -plant | grep -w 8080
Sample Output:
[root@centos ~]# systemctl restart nginx
[root@centos ~]#
[root@centos ~]# netstat -plant | grep -w 8080
tcp 0 0 0.0.0.0:8080 0.0.0.0:* LISTEN 9901/nginx: master
tcp6 0 0 :::8080 :::* LISTEN 9901/nginx: master
[root@centos ~]#

Now, configure the varnish “default.vcl”
After installing Varnish Cache, you need to configure it to work with Nginx. The default Varnish configuration file is located at /etc/varnish/default.vcl. You can edit this file to customize the Varnish configuration.
Verify the below lines if it is available or not, it specify the default backend definition which is set to point to your content server.
vim /etc/varnish/default.vcl
...
backend default {
.host = "127.0.0.1";
.port = "8080";
}
...
Save and exit the file.
Note:
.host = Refers to the backend web server IP address.

.port = Refers to the backend webserver port it is running on.
Check on which port Varnish listens:
[root@centos ~]# grep -iR VARNISH_LISTEN_PORT /etc/varnish/varnish.params
VARNISH_LISTEN_PORT=6081
[root@centos ~]#
[root@centos ~]# netstat -plant |grep -w 6081
tcp 0 0 0.0.0.0:6081 0.0.0.0:* LISTEN 9073/varnishd
tcp6 0 0 :::6081 :::* LISTEN 9073/varnishd
[root@centos ~]#
Configure Varnish to listen on port 80.
Edit file /etc/varnish/varnish.params and replace ‘VARNISH_LISTEN_PORT’ to 80
Run below command which will replace port 6081 to 80 port:
sed -i 's/VARNISH_LISTEN_PORT=6081/VARNISH_LISTEN_PORT=80/g' /etc/varnish/varnish.params
Sample “varnish.params” file:
[root@centos ~]# cat /etc/varnish/varnish.params
# Varnish environment configuration description. This was derived from
# the old style sysconfig/defaults settings

# Set this to 1 to make systemd reload try to switch VCL without restart.
RELOAD_VCL=1

# Main configuration file. You probably want to change it.
VARNISH_VCL_CONF=/etc/varnish/default.vcl

# Default address and port to bind to. Blank address means all IPv4
# and IPv6 interfaces, otherwise specify a host name, an IPv4 dotted
# quad, or an IPv6 address in brackets.
# VARNISH_LISTEN_ADDRESS=192.168.1.5
VARNISH_LISTEN_PORT=80

# Admin interface listen address and port
VARNISH_ADMIN_LISTEN_ADDRESS=127.0.0.1
VARNISH_ADMIN_LISTEN_PORT=6082

# Shared secret file for admin interface
VARNISH_SECRET_FILE=/etc/varnish/secret

# Backend storage specification, see Storage Types in the varnishd(5)
# man page for details.
VARNISH_STORAGE="malloc,256M"

# User and group for the varnishd worker processes
VARNISH_USER=varnish
VARNISH_GROUP=varnish

# Other options, see the man page varnishd(1)
#DAEMON_OPTS="-p thread_pool_min=5 -p thread_pool_max=500 -p thread_pool_timeout=300"
[root@centos ~]#
Restart the Varnish service:
systemctl restart varnish
Verify Varnish running on port 80:
netstat -plant |grep -w 80
Sample Output:
[root@centos ~]# netstat -plant |grep -w 6081
tcp 0 0 0.0.0.0:6081 0.0.0.0:* LISTEN 9073/varnishd
tcp6 0 0 :::6081 :::* LISTEN 9073/varnishd
[root@centos ~]#
[root@centos ~]# systemctl restart varnish
[root@centos ~]#
[root@centos ~]# netstat -plant |grep -w 6081
[root@centos ~]# netstat -plant |grep -w 80
tcp 0 0 0.0.0.0:80 0.0.0.0:* LISTEN 10219/varnishd
tcp6 0 0 :::80 :::* LISTEN 10219/varnishd
[root@centos ~]#

Successfully changed Varnish port to 80.
Step 8: Install and configure Firewalld on CentOS
Follow the below command to install firewalld on CentOS.
yum install firewalld -y

Start Firewalld service:
systemctl start firewalld
Enable Firewalld service to start on boot:
systemctl enable firewalld
Sample Output:
[root@centos ~]# systemctl start firewalld
[root@centos ~]#
[root@centos ~]# systemctl enable firewalld
Created symlink from /etc/systemd/system/dbus-org.fedoraproject.FirewallD1.service to /usr/lib/systemd/system/firewalld.service.
Created symlink from /etc/systemd/system/multi-user.target.wants/firewalld.service to /usr/lib/systemd/system/firewalld.service.
[root@centos ~]#

Allow port HTTP (80) and HTTPS (443) port in Firewall
firewall-cmd --add-port=80/tcp --zone=public --permanent

firewall-cmd --add-port=443/tcp --zone=public --permanent
Sample Output:
[root@centos ~]# firewall-cmd --add-port=80/tcp --zone=public --permanent
success
[root@centos ~]# firewall-cmd --add-port=443/tcp --zone=public --permanent
success
[root@centos ~]#

Step 9: Testing Varnish configuration
To verify that Varnish Cache and Nginx are working together properly, you can use the following command:
curl -I localhost
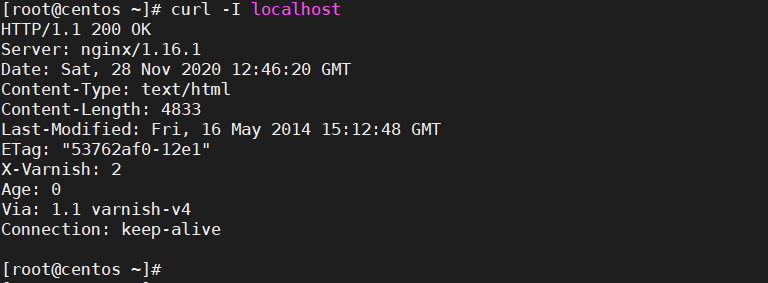
Sample output:
[root@centos ~]# curl -I localhost
HTTP/1.1 200 OK
Server: nginx/1.16.1
Date: Sat, 28 Nov 2020 12:46:20 GMT
Content-Type: text/html
Content-Length: 4833
Last-Modified: Fri, 16 May 2014 15:12:48 GMT
ETag: "53762af0-12e1"
X-Varnish: 2
Age: 0
Via: 1.1 varnish-v4
Connection: keep-alive

[root@centos ~]#
Check logs with the below command:
varnishncsa
Access the Web server with http://server-ip and check on the terminal with the above command you will get some logs.
If you didn’t get any logs then reload your http://server-ip webserver on the browser and check the terminal you will notice some logs being generated.

Conclusion
In this tutorial, we explained how to install and configure Varnish Cache for Nginx on CentOS 7. By using Varnish Cache and Nginx together, you can greatly improve the performance and scalability of your web applications. Varnish Cache works by caching frequently requested content in memory and serving it directly from there, rather than repeatedly requesting the same content from the origin server. Nginx is a powerful web server that can act as a reverse proxy and load balancer. By configuring Nginx to work with Varnish Cache, you can improve the performance of your web server and reduce the load on your origin server.
FAQ’s
Q: How can I test my Varnish Cache and Nginx configuration?
A: To test your Varnish Cache and Nginx configuration, you can use the following command: curl -I http://localhost:6081. This command will send a GET request to Varnish Cache, which will forward the request to Nginx on port 8080. Look for the “X-Cache-Status” header. If it says “HIT”, then Varnish Cache is serving the content from the cache. If it says “MISS”, then Varnish Cache is not serving the content from the cache.
Q: What is Varnish Cache?
A: Varnish Cache is an open-source web application accelerator that caches frequently requested content in memory, allowing web servers to serve content faster and with less load on the origin server.
Q: What is Nginx?
A: Nginx is a powerful web server and reverse proxy that is designed to handle high levels of traffic and provide excellent performance and scalability.
Q: How can Varnish Cache and Nginx be used together?
A: By configuring Nginx to work with Varnish Cache, you can improve the performance and scalability of your web applications. Varnish Cache caches frequently requested content in memory, and Nginx acts as a reverse proxy and load balancer, directing requests to the appropriate server and reducing the load on the origin server.
Q: What are the benefits of using Varnish Cache and Nginx together?
A: By using Varnish Cache and Nginx together, you can greatly improve the performance and scalability of your web applications. Varnish Cache caches frequently requested content in memory, reducing the load on the origin server and allowing content to be served faster. Nginx acts as a reverse proxy and load balancer, directing requests to the appropriate server and ensuring that your web application is highly available and scalable.
Q: What are some common issues that can arise when installing and configuring Varnish Cache and Nginx?
A: Common issues when installing and configuring Varnish Cache and Nginx include configuration errors, firewall issues, and SELinux restrictions. For example, Varnish Cache may not work properly if it is unable to connect to Nginx due to firewall rules or if SELinux is preventing Varnish Cache from accessing the necessary files.
Q: Can Varnish Cache and Nginx be used with SSL/TLS encryption?
A: Yes, Varnish Cache and Nginx can be configured to work with SSL/TLS encryption. This can be done by configuring Nginx to terminate SSL/TLS connections and proxy traffic to Varnish Cache over HTTP.
Q: Can Varnish Cache be used with other web servers besides Nginx?
A: Yes, Varnish Cache can be used with a variety of web servers, including Apache, IIS, and Lighttpd. However, Nginx is often used in conjunction with Varnish Cache due to its excellent performance and scalability.
Q: How can I monitor the performance of my Varnish Cache and Nginx setup?
A: There are several tools that can be used to monitor the performance of your Varnish Cache and Nginx setup, including Varnishstat, Nginx Amplify, and Munin. These tools can provide valuable insights into server performance, caching behavior, and traffic patterns.
Q: Are there any alternatives to Varnish Cache for web application acceleration?
A: Yes, there are several alternatives to Varnish Cache, including Memcached, Redis, and Squid. These tools can provide similar functionality to Varnish Cache and may be better suited for certain use cases, depending on your specific requirements and constraints.
End of tutorial. You have learned how to Install Varnish Cache for Nginx on CentOS 7.
See Also:
How to install Redis on Amazon Linux or CentOS