Are you struggling to quickly locate files on your Ubuntu 22 system? Look no further! In this article, we’ll guide you through the process of installing and using the locate command on Ubuntu 22. Say goodbye to endless searching and hello to efficient file locating.
Steps to Install Locate Command on Ubuntu 22
1. Introduction
Searching for files can be time-consuming, especially on a large and complex file system. The locate command comes to the rescue by offering a lightning-fast way to locate files based on their names. This article will show you how to install and make the most of this powerful tool on Ubuntu 22.
2. What is the locate Command?
The locate command is a built-in utility in most Unix-like operating systems, including Ubuntu. It allows users to quickly search for files by matching their filenames against a pre-built database of file paths. Unlike other search methods, locate doesn’t search the filesystem in real-time but relies on a periodically updated database for faster results.
3. Benefits of Using locate
Using locate provides several advantages:
- Speed: Searching for files using locate is significantly faster than traditional methods.
- Efficiency: The pre-built database allows for quick and efficient searches.
- User-Friendly: With a simple command, users can find files without complex search strings.
4. Prerequisites
Before installing locate, ensure that you have administrative privileges (sudo access) on your Ubuntu 22 system.
5. Installing the Locate Command on Ubuntu 22
To install the “locate” command on your Ubuntu 22 system, follow these steps:
1. Open a Terminal: Launch the terminal on your Ubuntu 22 system. You can do this by searching for “Terminal” in the applications menu or by using the shortcut Ctrl + Alt + T.
2. Update Package List: Before installing any new software, it’s a good practice to update the package list. Enter the following command:
sudo apt update
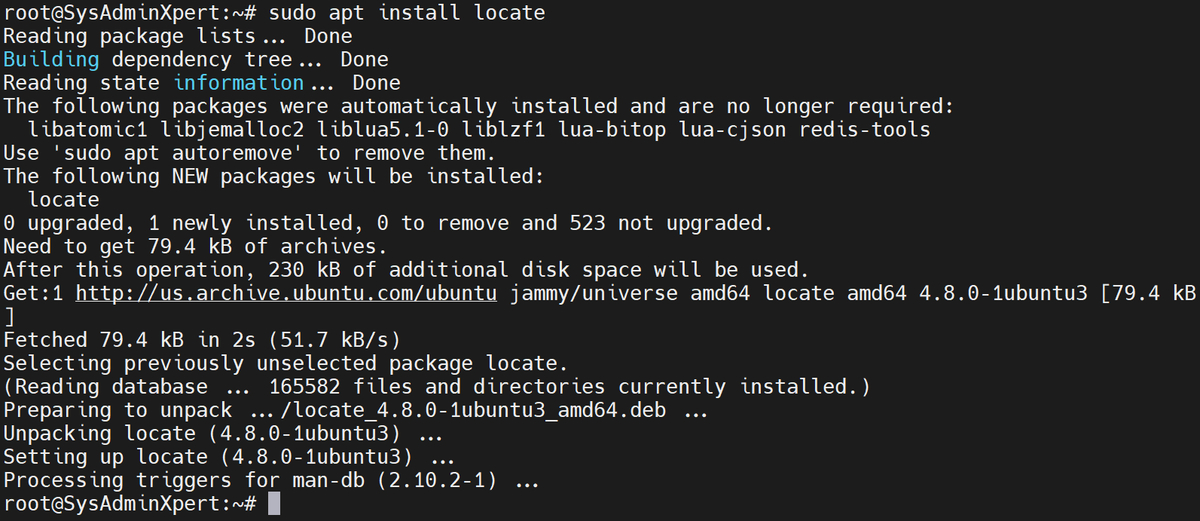
3. Install the Locate Package: Once the package list is updated, install the “locate” package by executing the following command:
sudo apt install locate
Demo Output:
root@SysAdminXpert:~# sudo apt install locate
Reading package lists... Done
Building dependency tree... Done
Reading state information... Done
The following packages were automatically installed and are no longer required:
libatomic1 libjemalloc2 liblua5.1-0 liblzf1 lua-bitop lua-cjson redis-tools
Use 'sudo apt autoremove' to remove them.
The following NEW packages will be installed:
locate
0 upgraded, 1 newly installed, 0 to remove and 523 not upgraded.
Need to get 79.4 kB of archives.
After this operation, 230 kB of additional disk space will be used.
Get:1 http://us.archive.ubuntu.com/ubuntu jammy/universe amd64 locate amd64 4.8.0-1ubuntu3 [79.4 kB]
Fetched 79.4 kB in 2s (51.7 kB/s)
Selecting previously unselected package locate.
(Reading database ... 165582 files and directories currently installed.)
Preparing to unpack .../locate_4.8.0-1ubuntu3_amd64.deb ...
Unpacking locate (4.8.0-1ubuntu3) ...
Setting up locate (4.8.0-1ubuntu3) ...
Processing triggers for man-db (2.10.2-1) ...
root@SysAdminXpert:~#
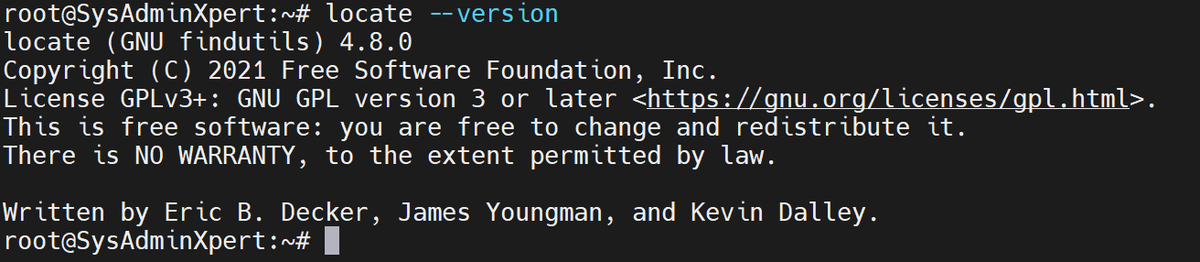
4. Verify Installation: After the installation is complete, you can verify it by checking the version of the “locate” command:
locate --version
Demo Output:
root@SysAdminXpert:~# locate --version
locate (GNU findutils) 4.8.0
Copyright (C) 2021 Free Software Foundation, Inc.
License GPLv3+: GNU GPL version 3 or later <https://gnu.org/licenses/gpl.html>.
This is free software: you are free to change and redistribute it.
There is NO WARRANTY, to the extent permitted by law.

Written by Eric B. Decker, James Youngman, and Kevin Dalley.
root@SysAdminXpert:~#
6. Updating the Locate Database
The “locate” command relies on a database that needs to be updated regularly to ensure accurate search results. To update the database, follow these steps:
1. Open a Terminal: Launch the terminal as before.
2. Update the Database: Use the following command to update the “locate” database:
sudo updatedb
7. Performing Basic Searches
Now that you have the “locate” command installed and the database updated, let’s perform some basic searches:
Search for a File: To search for a specific file, simply use the command followed by the file name. For example, to find a file named “example.txt,” use:
locate example.txt
Search for a Directory: To search for a directory, provide the directory name in the command. For instance, to find a directory named “documents,” enter:
locate documents
8. Advanced Locate Command Options
Searching with locate becomes even more powerful with these tips: The “locate” command offers a range of options to refine your searches. Here are a few useful ones:
-i: Perform a case-insensitive search.-l N: Limit results to N matches.-r: Use regular expressions for advanced pattern matching.- Exact Matches: Enclose your search term in quotes for exact matches.
9. Avoiding Common Pitfalls
While locate is efficient, it has limitations. It might not show recently created files due to its database update frequency. To overcome this, consider using the find command for real-time searching.
10. Automating File Searches with Cron Jobs
Automate regular updates of the locate database with cron jobs. Schedule the updatedb command to run at specific intervals.
11. Enhancing locate with Regular Expressions
Mastering regular expressions allows you to perform more complex searches, expanding locate‘s capabilities.
12. Customizing locate Behavior
Adjust locate behavior by modifying its configuration file. Tweak settings such as file extensions to include or exclude.
13. Integrating locate with Other Commands
Combine locate with commands like grep or find for more refined searches that include content within files.
14. Security Considerations
Keep in mind that the locate database contains file paths, potentially revealing sensitive information. Use it in environments where security isn’t compromised.
15. Conclusion
With the locate command at your fingertips, finding files on Ubuntu 22 becomes a breeze. Say goodbye to endless scrolling and hello to efficient file searching.
FAQs
Q. Can I use locate to search for hidden files?
A: Yes, you can search for hidden files by specifying their filenames.
Q. Why is locate not showing the most recent files?
A. locate relies on a periodically updated database. Use the find command for real-time searches.
Q. Can I use wildcards with locate searches?
A. Yes, you can use wildcards to broaden your search.
Q. Is locate suitable for searching for content within files?
A. No, locate only searches filenames. Use other commands like grep for content searches.
Q. How do I uninstall locate if needed?
A. To uninstall locate, run: sudo apt remove locate.
See also:
How to Install the Locate command to find files on Ubuntu 20
Steps to Install Locate command to find files on Amazon Linux