In this blog, we’ll explain How To Install Apache Cassandra On Ubuntu 20.10/Ubuntu 20.04. Apache Cassandra is an Open-source NoSQL database intended for storing large amounts of data in a decentralized, highly available cluster, provide fault tolerance, consistency across multiple servers, and linear scalability.
Steps to Install Apache Cassandra On Ubuntu
Step 1: Install Java on Ubuntu 20
$ sudo apt install openjdk-8-jdk
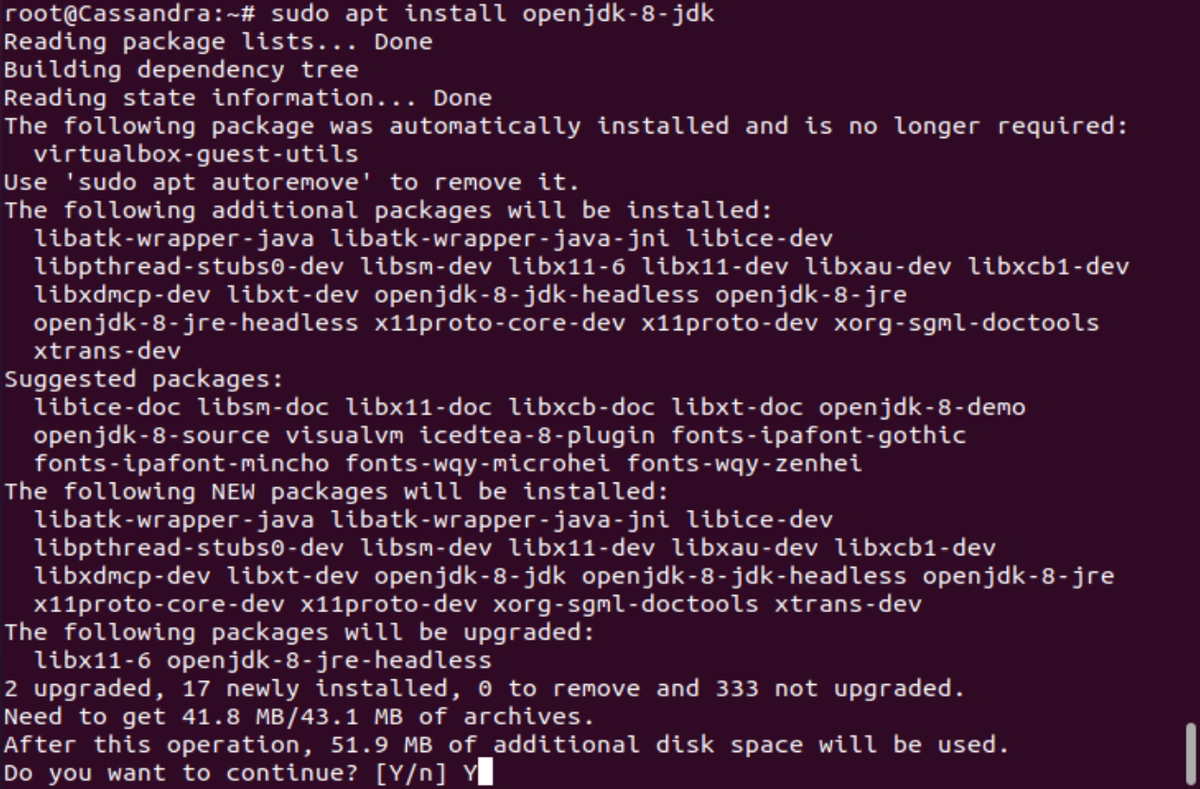
On my system, Java was already there, so it is going to upgrade.
Step 2: Verify Java installation
$ java -version
Sample Output:
root@Cassandra:~# java -version
openjdk version "1.8.0_292"
OpenJDK Runtime Environment (build 1.8.0_292-8u292-b10-0ubuntu1~20.10-b10)
OpenJDK 64-Bit Server VM (build 25.292-b10, mixed mode)
Step 3: Install dependency package:
$ sudo apt install apt-transport-https
Step 4: Import GPG key:
$ wget -q -O - https://www.apache.org/dist/cassandra/KEYS | sudo apt-key add -
Sample Output:
root@Cassandra:~# wget -q -O - https://www.apache.org/dist/cassandra/KEYS | sudo apt-key add -
Warning: apt-key is deprecated. Manage keyring files in trusted.gpg.d instead (see apt-key(8)).
OK
root@Cassandra:~#
Step 5: Add Apache Cassandra’s Repository
$ sudo sh -c 'echo "deb http://www.apache.org/dist/cassandra/debian 311x main" > /etc/apt/sources.list.d/cassandra.list'
Sample Output:
root@Cassandra:~# sudo sh -c 'echo "deb http://www.apache.org/dist/cassandra/debian 311x main" > /etc/apt/sources.list.d/cassandra.list'
root@Cassandra:~#
Step 6: Update Ubuntu System
$ sudo apt update
Step 7: Install Apache Cassandra in Ubuntu
$ sudo apt install cassandra
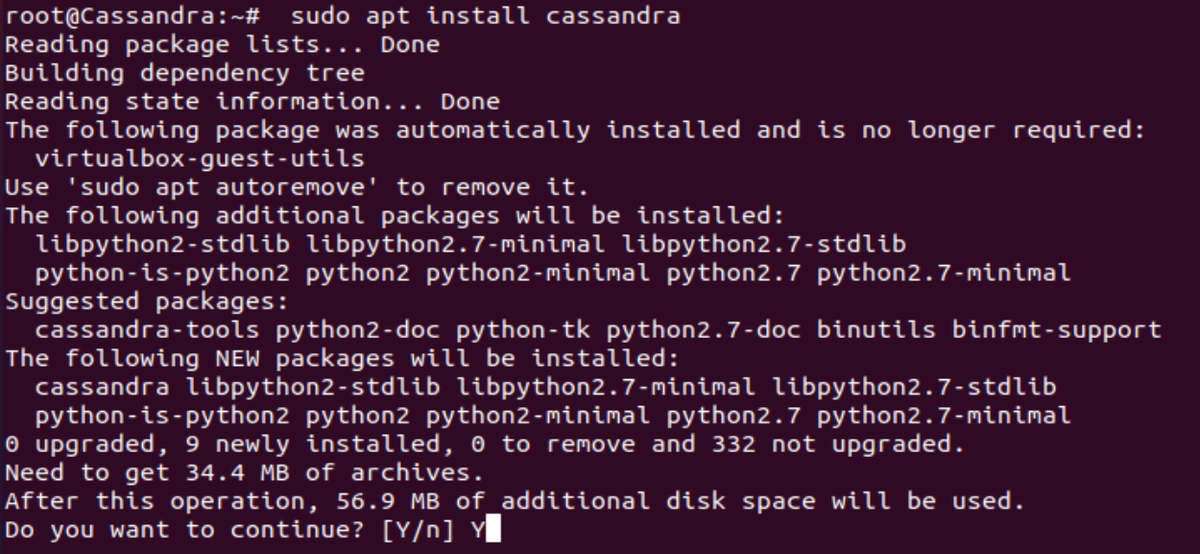
You can also view the latest Cassandra version
After installation, the Cassandra service gets started automatically.
Sample Output:
root@Cassandra:~# sudo apt install cassandra
Reading package lists... Done
Building dependency tree
Reading state information... Done
The following package was automatically installed and is no longer required:
virtualbox-guest-utils
Use 'sudo apt autoremove' to remove it.
The following additional packages will be installed:
libpython2-stdlib libpython2.7-minimal libpython2.7-stdlib
python-is-python2 python2 python2-minimal python2.7 python2.7-minimal
Suggested packages:
cassandra-tools python2-doc python-tk python2.7-doc binutils binfmt-support
The following NEW packages will be installed:
cassandra libpython2-stdlib libpython2.7-minimal libpython2.7-stdlib
python-is-python2 python2 python2-minimal python2.7 python2.7-minimal
0 upgraded, 9 newly installed, 0 to remove and 332 not upgraded.
Need to get 34.4 MB of archives.
After this operation, 56.9 MB of additional disk space will be used.
Do you want to continue? [Y/n] Y
Get:2 http://us.archive.ubuntu.com/ubuntu groovy/universe amd64 libpython2.7-minimal amd64 2.7.18-1build2 [335 kB]
Get:1 https://downloads.apache.org/cassandra/debian 311x/main amd64 cassandra all 3.11.10 [30.7 MB]
Get:3 http://us.archive.ubuntu.com/ubuntu groovy/universe amd64 python2.7-minimal amd64 2.7.18-1build2 [1,264 kB]
Get:4 http://us.archive.ubuntu.com/ubuntu groovy/universe amd64 python2-minimal amd64 2.7.18-2 [13.5 kB]
Get:5 http://us.archive.ubuntu.com/ubuntu groovy/universe amd64 libpython2.7-stdlib amd64 2.7.18-1build2 [1,867 kB]
Get:6 http://us.archive.ubuntu.com/ubuntu groovy/universe amd64 python2.7 amd64 2.7.18-1build2 [248 kB]
Get:7 http://us.archive.ubuntu.com/ubuntu groovy/universe amd64 libpython2-stdlib amd64 2.7.18-2 [7,332 B]
Get:8 http://us.archive.ubuntu.com/ubuntu groovy/universe amd64 python2 amd64 2.7.18-2 [9,068 B]
Get:9 http://us.archive.ubuntu.com/ubuntu groovy/universe amd64 python-is-python2 all 2.7.17-4 [2,496 B]
Fetched 34.4 MB in 1min 12s (474 kB/s)
Selecting previously unselected package libpython2.7-minimal:amd64.
(Reading database ... 155984 files and directories currently installed.)
Preparing to unpack .../0-libpython2.7-minimal_2.7.18-1build2_amd64.deb ...
Unpacking libpython2.7-minimal:amd64 (2.7.18-1build2) ...
Selecting previously unselected package python2.7-minimal.
Preparing to unpack .../1-python2.7-minimal_2.7.18-1build2_amd64.deb ...
Unpacking python2.7-minimal (2.7.18-1build2) ...
Selecting previously unselected package python2-minimal.
Preparing to unpack .../2-python2-minimal_2.7.18-2_amd64.deb ...
Unpacking python2-minimal (2.7.18-2) ...
Selecting previously unselected package libpython2.7-stdlib:amd64.
Preparing to unpack .../3-libpython2.7-stdlib_2.7.18-1build2_amd64.deb ...
Unpacking libpython2.7-stdlib:amd64 (2.7.18-1build2) ...
Selecting previously unselected package python2.7.
Preparing to unpack .../4-python2.7_2.7.18-1build2_amd64.deb ...
Unpacking python2.7 (2.7.18-1build2) ...
Selecting previously unselected package libpython2-stdlib:amd64.
Preparing to unpack .../5-libpython2-stdlib_2.7.18-2_amd64.deb ...
Unpacking libpython2-stdlib:amd64 (2.7.18-2) ...
Setting up libpython2.7-minimal:amd64 (2.7.18-1build2) ...
Setting up python2.7-minimal (2.7.18-1build2) ...
Linking and byte-compiling packages for runtime python2.7...
Setting up python2-minimal (2.7.18-2) ...
Selecting previously unselected package python2.
(Reading database ... 156719 files and directories currently installed.)
Preparing to unpack .../python2_2.7.18-2_amd64.deb ...
Unpacking python2 (2.7.18-2) ...
Selecting previously unselected package python-is-python2.
Preparing to unpack .../python-is-python2_2.7.17-4_all.deb ...
Unpacking python-is-python2 (2.7.17-4) ...
Selecting previously unselected package cassandra.
Preparing to unpack .../cassandra_3.11.10_all.deb ...
Unpacking cassandra (3.11.10) ...
Setting up libpython2.7-stdlib:amd64 (2.7.18-1build2) ...
Setting up python2.7 (2.7.18-1build2) ...
Setting up libpython2-stdlib:amd64 (2.7.18-2) ...
Setting up python2 (2.7.18-2) ...
Setting up python-is-python2 (2.7.17-4) ...
Setting up cassandra (3.11.10) ...
Adding group `cassandra' (GID 141) ...
Done.
vm.max_map_count = 1048575
net.ipv4.tcp_keepalive_time = 300
update-rc.d: warning: start and stop actions are no longer supported; falling b
ack to defaults
Processing triggers for mime-support (3.64ubuntu1) ...
Processing triggers for gnome-menus (3.36.0-1ubuntu1) ...
Processing triggers for systemd (246.6-1ubuntu1) ...
Processing triggers for man-db (2.9.3-2) ...
Processing triggers for desktop-file-utils (0.24-1ubuntu4) ...
root@Cassandra:~#
To Auto-start Cassandra service automatically on boot:
sudo systemctl enable cassandra
Sample Output:
root@Cassandra:~# sudo systemctl enable cassandra
cassandra.service is not a native service, redirecting to systemd-sysv-install.
Executing: /lib/systemd/systemd-sysv-install enable cassandra
root@Cassandra:~#
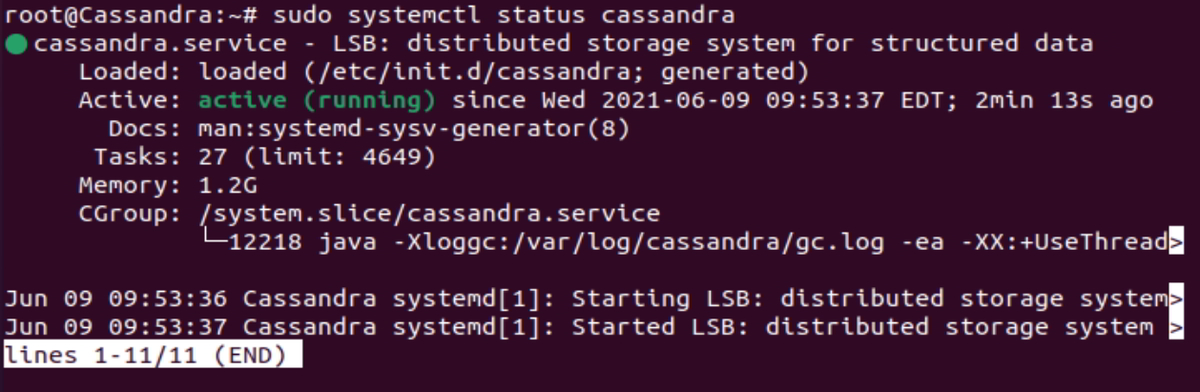
Step 8: Verify Cassandra and nodetool status
$ sudo systemctl status cassandra
Verify the stats of your node
$ sudo nodetool status
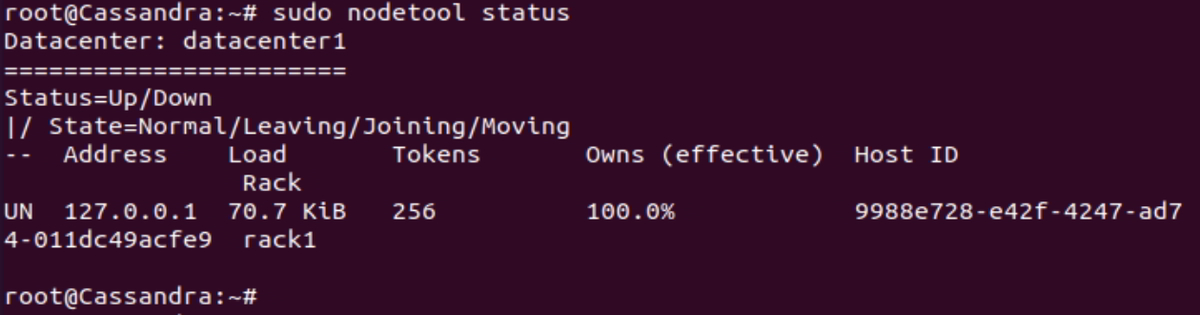
The UN letters in the output signal that the cluster is working.
Step 9: Login to Cassandra terminal
$ cqlsh

Sample output:
root@Cassandra:~# cqlsh
Connected to Test Cluster at 127.0.0.1:9042.
[cqlsh 5.0.1 | Cassandra 3.11.10 | CQL spec 3.4.4 | Native protocol v4]
Use HELP for help.
cqlsh>
Step 10: Configuring Apache Cassandra in Ubuntu
- Configuration files –> /etc/cassandra
- Data is stored –> /var/lib/cassandra
- Start-up file –> /etc/default/cassandra
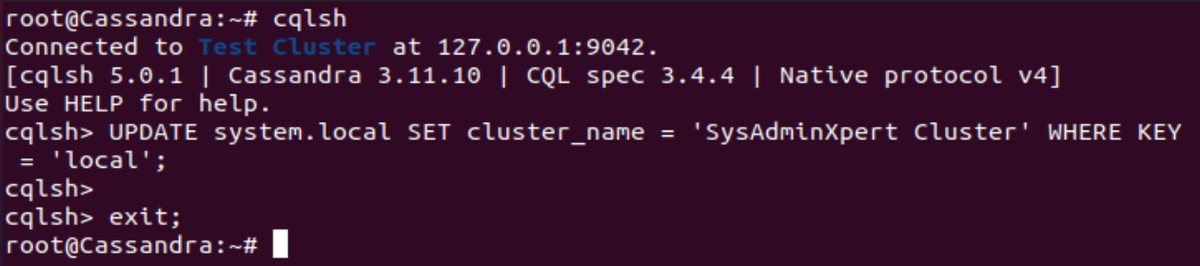
Default Cassandra cluster name is “Test Cluster”, to update cluster name login to Cassandra.
$ cqlsh
In mycase I will set Cassandra cluster name to “SysAdminXpert Cluster”
UPDATE system.local SET cluster_name = 'SysAdminXpert Cluster' WHERE KEY = 'local';
Command to exit the Cassandra prompt
EXIT;
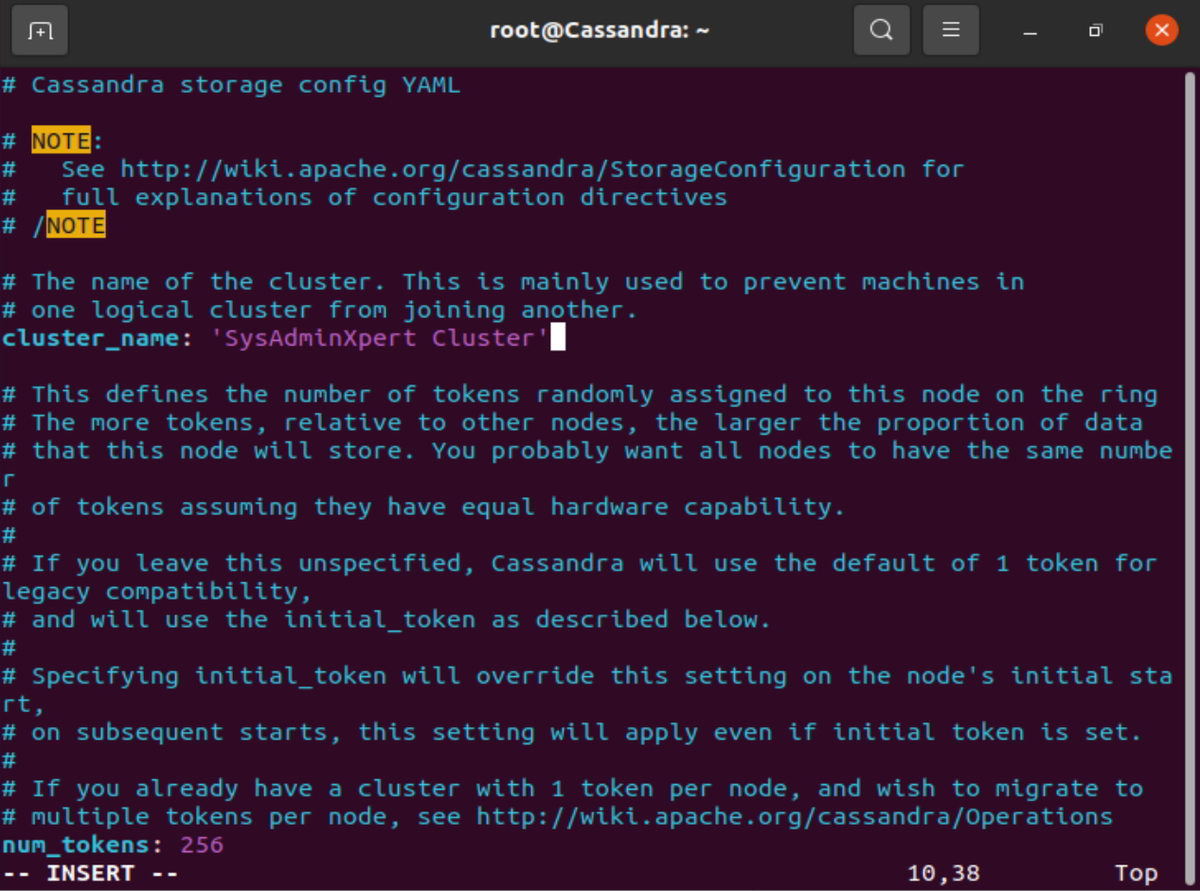
We recommended taking a backup before editing the “cassandra.yaml” file
sudo cp /etc/cassandra/cassandra.yaml /etc/cassandra/cassandra.yaml.org-backup
Locate and edit “cassandra.yaml” file and update the cluster name.
$ sudo vim /etc/cassandra/cassandra.yaml
Search for the “cluster_name” and update the cluster name, I have set it to “SysAdminXpert Cluster”.
Add IP Addresses of Cassandra Nodes. Open the configuration file and under the seed _provider section, find the seeds entry:
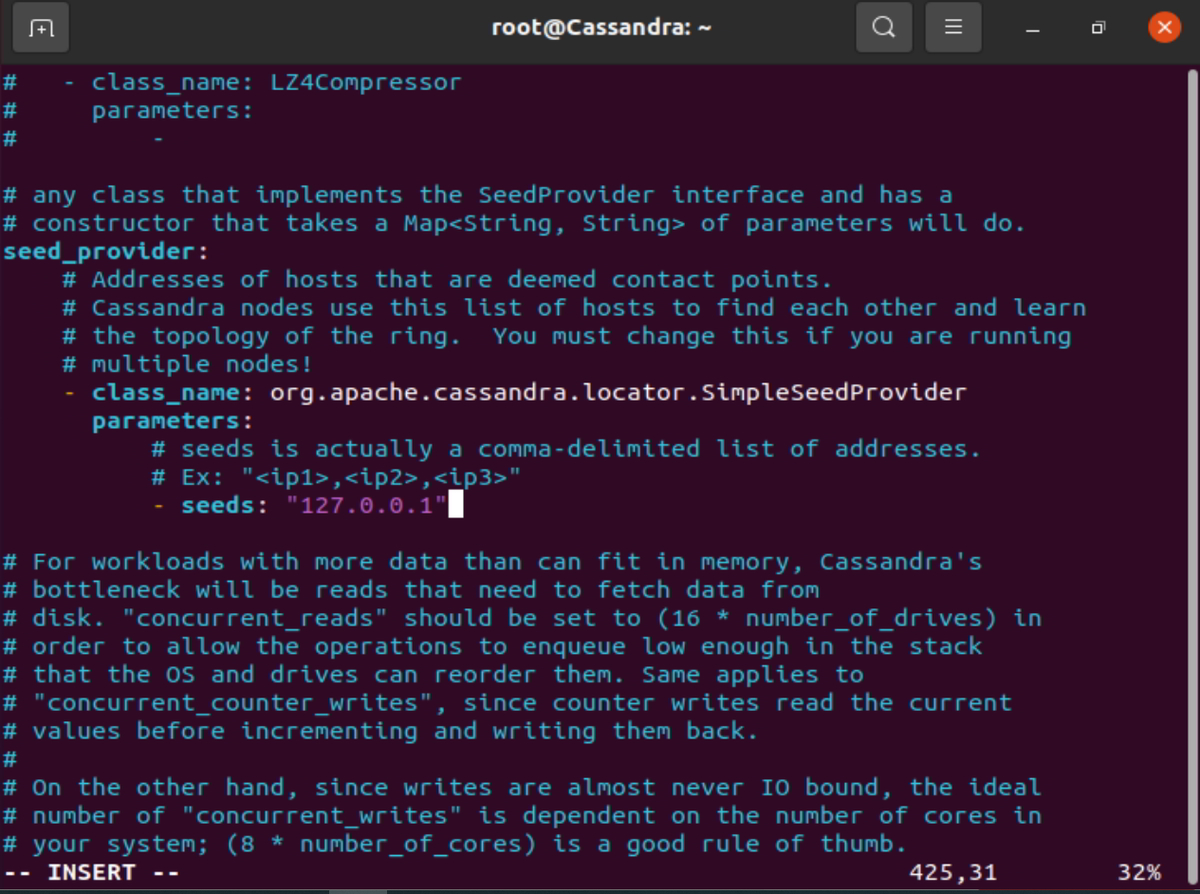
Save and exit “cassandra.yaml” file, to reflect the changes, restart the Cassandra service.
Restart Cassandra Service and verify the status:
$ sudo systemctl restart cassandra && sudo systemctl status cassandra
Re-login to Cassandra Terminal and verify the cluster name which is updated as shown below screenshot.
$ cqlsh

Cassandra cqlsh usage:
Cassandra Query Language Shell (CQLSH) is basically a communication medium between Cassandra and the user. CQLSH is a platform that allows the user to launch the Cassandra query language (CQL).
root@Cassandra:~# cqlsh --help
Usage: cqlsh.py [options] [host [port]]

CQL Shell for Apache Cassandra

Options:
--version show program's version number and exit
-h, --help show this help message and exit
-C, --color Always use color output
--no-color Never use color output
--browser=BROWSER The browser to use to display CQL help, where BROWSER
can be:
- one of the supported browsers in
https://docs.python.org/2/library/webbrowser.html.
- browser path followed by %s, example: /usr/bin
/google-chrome-stable %s
--ssl Use SSL
--no_compact No Compact
-u USERNAME, --username=USERNAME
Authenticate as user.
-p PASSWORD, --password=PASSWORD
Authenticate using password.
-k KEYSPACE, --keyspace=KEYSPACE
Authenticate to the given keyspace.
-f FILE, --file=FILE Execute commands from FILE, then exit
--debug Show additional debugging information
--encoding=ENCODING Specify a non-default encoding for output. (Default:
utf-8)
--cqlshrc=CQLSHRC Specify an alternative cqlshrc file location.
--cqlversion=CQLVERSION
Specify a particular CQL version, by default the
highest version supported by the server will be used.
Examples: "3.0.3", "3.1.0"
--protocol-version=PROTOCOL_VERSION
Specify a specific protcol version otherwise the
client will default and downgrade as necessary
-e EXECUTE, --execute=EXECUTE
Execute the statement and quit.
--connect-timeout=CONNECT_TIMEOUT
Specify the connection timeout in seconds (default: 5
seconds).
--request-timeout=REQUEST_TIMEOUT
Specify the default request timeout in seconds
(default: 10 seconds).
-t, --tty Force tty mode (command prompt).

Connects to 127.0.0.1:9042 by default. These defaults can be changed by
setting $CQLSH_HOST and/or $CQLSH_PORT. When a host (and optional port number)
are given on the command line, they take precedence over any defaults.
root@Cassandra:~#
Command to get version:
This command will show you the version of cqlsh, Cassandra, CQL, and native protocol.
Example:
root@Cassandra:~# cqlsh
Connected to SysAdminXpert Cluster at 127.0.0.1:9042.
[cqlsh 5.0.1 | Cassandra 3.11.10 | CQL spec 3.4.4 | Native protocol v4]
Use HELP for help.
cqlsh>
Command to Show host:
This command will show you Cluster’s name, IP address with port.
Example:
cqlsh> show host
Connected to Test Cluster at 127.0.0.1:9042.
cqlsh>
Command to DESCRIBE:
This command gives the description of all below Schema Elements as mention below:
Syntax:
DESCRIBE CLUSTER
DESCRIBE SCHEMA
DESCRIBE TABLES
DESCRIBE TABLE <table name>
DESCRIBE INDEX <index name>
DESCRIBE KEYSPACES
DESCRIBE KEYSPACE <keyspace name>
DESCRIBE TYPES
DESCRIBE TYPE <type name>
DESCRIBE FUNCTIONS
DESCRIBE FUNCTION <function name>
DESCRIBE AGGREGATES
DESCRIBE AGGREGATE <aggregate function name>
DESCRIBE MATERIALIZED VIEW <view name>
Example:
cqlsh> describe cluster

Cluster: SysAdminXpert Cluster
Partitioner: Murmur3Partitioner

cqlsh>
Command to clears the console:
Syntax:
CLEAR
CLS
End of article. We’ve seen how to install Apache Cassandra on Ubuntu 20.10.