In the world of server administration, managing user accounts and permissions is a critical task. It ensures that only authorized users have access to specific resources, while also safeguarding the system from unauthorized access. This article will provide a comprehensive guide on how to effectively manage user accounts and permissions in a Linux server environment.
Managing User Accounts and Permissions in Linux Server

Understanding User Accounts
User accounts are the cornerstone of user management in a Linux server environment. They enable individuals to log in and access the resources provided by the server. In this section, we’ll delve deeper into the intricacies of user accounts, covering creation, modification, and deletion procedures.
Creating User Accounts
Creating a user account is a pivotal task for a system administrator. It grants access to the server and its resources to authorized individuals. To create a user account, you can utilize the useradd command followed by the desired username. For instance:
sudo useradd john_doe
This command initiates the process of creating a user named “john_doe.”
Modifying User Information
Occasionally, there may be a need to modify user information, such as changing the user’s full name or contact details. The usermod command is employed for this purpose. Here’s an example:
sudo usermod -c "John Doe" john_doe
In this example, the user’s full name is updated to “John Doe.”
Deleting User Accounts
When a user account is no longer needed, it’s important to remove it from the system. This can be accomplished using the userdel command, followed by the username. For example:
sudo userdel john_doe
This command permanently deletes the user account “john_doe.”
User account management is a critical aspect of server administration, ensuring that only authorized individuals have access to the system. By understanding the process of creating, modifying, and deleting user accounts, you’ll be equipped to efficiently manage user access on your Linux server.
User Groups
User groups play a pivotal role in organizing and managing users on a Linux server. They provide a convenient way to group users with similar access rights, simplifying the process of assigning permissions to files and directories. In this section, we’ll explore the creation of user groups, adding users to groups, and managing group memberships.
Creating User Groups
To create a user group, you can utilize the groupadd command followed by the desired group name. For example:
sudo groupadd developers
In this command, a new group named “developers” is created. This group can then be used to grant specific permissions to files and directories for all members of the group.
Adding Users to Groups
Once a group is created, users can be added to it to grant them the privileges associated with that group. The usermod command is employed for this purpose. Here’s an example:
sudo usermod -aG developers john_doe
In this example, the user “john_doe” is added to the “developers” group. This allows John to access resources that are designated for members of the developers group.
Managing Group Memberships
As the composition of your team evolves, you may need to adjust group memberships. To remove a user from a group, you can use the following command:
sudo deluser john_doe developers
This command removes the user “john_doe” from the “developers” group.
Effectively managing user groups is crucial for maintaining a structured and secure environment on your Linux server. By organizing users based on their roles and responsibilities, you can streamline access control and enhance overall system security.
Permissions and Ownership
Understanding file and directory permissions, as well as ownership, is fundamental to controlling access to resources on a Linux server. In this section, we will explore how to set and modify permissions.
File Permissions
File permissions dictate what actions (such as read, write, and execute) can be performed on a file. There are three main types of permissions:
- Read (r): Allows the user to view the contents of the file.
- Write (w): Allows the user to modify or delete the file.
- Execute (x): Allows the user to execute the file if it is a script or program.
These permissions are set for three categories of users: the owner of the file, the group associated with the file, and others.
To modify file permissions, you can use the chmod command. For instance:
chmod u+r myfile.txt
In this example, the owner (u) of the file “myfile.txt” is granted read (r) permission.
Directory Permissions
Directory permissions work similarly to file permissions, but they govern access to directories. The read permission allows users to list the contents of a directory, while the write permission enables users to create or delete files within it. The execute permission is needed to access the contents of a directory.
chmod u+w mydirectory
In this example, the owner (u) of the directory “mydirectory” is granted write (w) permission.
Ownership and Chown Command
Ownership of a file or directory refers to the user and group associated with it. The chown command is used to change ownership. For example:
sudo chown john_doe:developers myfile.txt
In this command, the file “myfile.txt” is assigned to the user “john_doe” and the group “developers.”
Understanding and managing permissions and ownership is crucial for ensuring that the right users have appropriate access to resources on your Linux server.
Sudo Access
Granting sudo access allows users to execute commands with administrative privileges. This is a powerful tool that enables users to perform tasks that require elevated permissions. In this section, we’ll cover how to grant and revoke sudo privileges, as well as best practices for sudo usage.
Granting Sudo Access
To grant sudo access to a user, you need to add them to the sudoers file. The recommended way to do this is by using the visudo command, which ensures that the file is edited safely.
sudo visudo
This command opens the sudoers file in the default text editor. You can then add a line like this:
john_doe ALL=(ALL:ALL) ALL
This line grants the user “john_doe” sudo access to execute any command as any user or group.
Revoking Sudo Privileges
If you need to revoke sudo privileges for a user, you can simply remove their entry from the sudoers file.
Best Practices for Sudo Usage
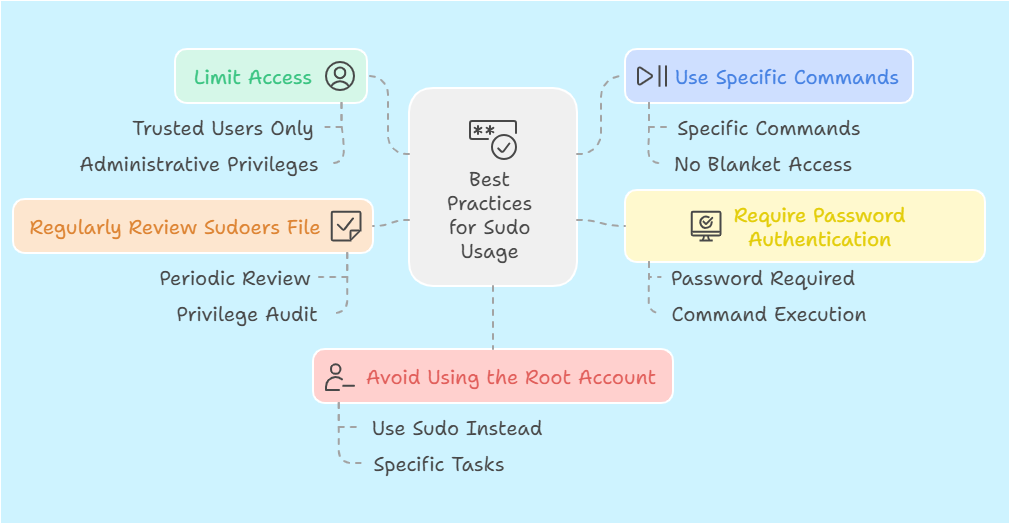
- Limit Access: Only grant sudo access to trusted users who genuinely need administrative privileges.
- Use Specific Commands: Instead of granting blanket sudo access, specify which commands users are allowed to run with sudo.
- Require Password Authentication: Configure sudo to require users to enter their password before executing a command with sudo.
- Regularly Review Sudoers File: Periodically review and audit the sudoers file to ensure that privileges are appropriately assigned.
- Avoid Using the Root Account: Discourage using the root account directly. Instead, use sudo for specific administrative tasks.
By following these best practices, you can ensure that sudo access is used judiciously and securely on your Linux server.
Password Policies
Enforcing strong password policies is a critical aspect of security when managing user accounts on a Linux server. A robust password policy helps safeguard sensitive information and prevents unauthorized access. In this section, we’ll explore how to set up and manage password policies for user accounts.
Enforcing Strong Passwords
A strong password is one that is complex, containing a combination of uppercase and lowercase letters, numbers, and special characters. To enforce strong passwords, you can utilize tools like PAM (Pluggable Authentication Modules) to set password complexity requirements.
Password Expiry and Aging Policies
Implementing password expiry and aging policies is essential for ensuring that users regularly update their passwords. This helps mitigate the risk of unauthorized access due to compromised passwords. You can configure these policies using tools like PAM or by editing the /etc/shadow file.
Resetting User Passwords
As a system administrator, you may need to reset a user’s password in case they forget it or encounter login issues. The passwd command allows you to reset a user’s password:
sudo passwd john_doe
This command prompts you to enter a new password for the user “john_doe.”
By enforcing strong passwords, implementing password expiry and aging policies, and knowing how to reset user passwords, you can significantly enhance the security of your Linux server.
SSH Key Authentication
Using SSH keys for authentication provides an extra layer of security compared to password-based authentication. SSH keys are cryptographic keys that come in pairs – a public key and a private key. In this section, we’ll cover how to generate SSH keys, configure SSH access using keys, and disable password authentication for added security.
Generating SSH Keys
To generate an SSH key pair, you can use the ssh-keygen command. The following command will generate a new SSH key:
ssh-keygen -t rsa -b 4096 -C "your_email@example.com"
This command generates a new RSA key pair with a 4096-bit key length. Make sure to replace “your_email@example.com” with your actual email address.
Configuring SSH Access
After generating the SSH keys, you’ll need to add the public key to the authorized keys file on the server. You can use the ssh-copy-id command to do this:
ssh-copy-id user@hostname
Replace user with your username and hostname with the IP address or domain name of the server.
Disabling Password Authentication
For enhanced security, you can disable password authentication and rely solely on SSH key authentication. To do this, edit the SSH configuration file /etc/ssh/sshd_config and set the following option:
PasswordAuthentication no
After making this change, remember to restart the SSH service for the configuration to take effect:
sudo systemctl restart sshd
By using SSH key authentication and disabling password authentication, you significantly increase the security of your server against unauthorized access.
Access Control Lists (ACLs)
Access Control Lists (ACLs) provide a finer level of control over file and directory permissions compared to the standard owner-group-other (ugo) model. ACLs allow you to grant or deny specific permissions to individual users and groups. In this section, we’ll explore how to understand, set, and manage ACLs on files and directories.
Understanding ACLs
Standard permissions (read, write, execute) are assigned to three categories: owner, group, and others. However, ACLs enable you to specify permissions for specific users and groups beyond these default categories.
Setting ACLs on Files and Directories
To set an ACL on a file or directory, you can use the setfacl command followed by the desired permissions and the user or group it applies to. For example:
setfacl -m u:jane_doe:rw myfile.txt
In this example, the user “jane_doe” is granted read and write permissions to the file “myfile.txt.”
Managing ACL Entries
You can view and modify existing ACL entries using the getfacl and setfacl commands. For example, to add a new user to an existing ACL:
setfacl -m u:bob_smith:rw myfile.txt
This command grants read and write permissions to the user “bob_smith” on the file “myfile.txt.”
ACLs provide a powerful way to fine-tune access control on your Linux server, allowing for precise control over who can access specific files and directories.
Monitoring User Activity
Monitoring user activity is a crucial aspect of server administration, as it allows you to track who has accessed the system, when they logged in, and what actions they performed. In this section, we’ll explore how to monitor user activity using tools like the last command and log files.
Using the last Command
The last command provides a record of recent logins and logouts on the system. By default, it displays the login history for all users:
last
You can also specify a specific user to view their login history:
last username
The output will show the user’s login times, session durations, and the originating IP address (if applicable).
Reviewing Logs for User Activity
Linux systems maintain log files that record various system events, including user logins and actions. The /var/log/auth.log or /var/log/secure file typically contains authentication-related information. You can use tools like grep or cat to search and view these logs.
For example, to view login activity for a specific user:
grep "username" /var/log/auth.log
Detecting Suspicious Activity
Keeping an eye out for unusual or suspicious activity is essential for maintaining server security. Look for repeated failed login attempts, unexpected access patterns, or any unauthorized actions by users.
Regularly monitoring user activity helps identify any potential security breaches or unauthorized access, allowing you to take timely action to mitigate risks.
User Account Lockout
Implementing account lockout policies is an important security measure to protect your Linux server from unauthorized access. Account lockout policies help prevent brute-force attacks by temporarily locking out user accounts after a certain number of failed login attempts. In this section, we’ll explore how to implement account lockout policies and how to handle locked accounts.
Implementing Account Lockout Policies
To implement account lockout policies, you can use tools like fail2ban or pam_tally2. These tools monitor authentication attempts and automatically lock out user accounts that exceed a specified number of failed login attempts.
For example, using pam_tally2:
sudo pam_tally2 --deny=3 --unlock_time=1800 --onerr=fail
This command sets the account lockout policy to deny access after 3 failed login attempts and unlock the account after 1800 seconds (30 minutes).
Unlocking User Accounts
If a user account gets locked due to too many failed login attempts, you can manually unlock it using the pam_tally2 command:
sudo pam_tally2 --reset
This command resets the failed login count for all users, effectively unlocking any locked accounts.
Dealing with Failed Login Attempts
Monitoring failed login attempts is crucial for identifying potential security threats. Regularly reviewing logs for repeated failed login attempts allows you to take proactive measures to protect your server.
By implementing account lockout policies, you add an extra layer of security to your Linux server, making it more resilient against brute-force attacks.
Security Best Practices
Maintaining the security and integrity of a Linux server environment is paramount for safeguarding sensitive information and preventing unauthorized access. Here are some essential security best practices to follow:

- Regularly Review User Accounts: Periodically review and audit user accounts to ensure that only authorized individuals have access. Remove any unnecessary or unused accounts.
- Implement Two-Factor Authentication (2FA): Enable two-factor authentication for user accounts to add an extra layer of security beyond passwords.
- Use Strong Passwords: Enforce strong password policies, requiring passwords to be complex and regularly updated.
- Periodic Security Audits: Conduct regular security audits to identify and address any vulnerabilities or potential threats.
- Disable Unused Accounts: Deactivate or remove accounts that are no longer needed, reducing potential points of entry for attackers.
- Monitor User Activity: Keep a close eye on user activity, especially for privileged accounts, to detect any suspicious behavior.
- Implement Intrusion Detection Systems (IDS): Set up IDS tools to monitor network traffic and detect any unauthorized access or suspicious activity.
- Limit Sudo Access: Only grant sudo privileges to users who require administrative access, and restrict the scope of their permissions to the necessary tasks.
- Encrypt Data in Transit and at Rest: Use encryption protocols like SSL/TLS for secure communication and employ encryption for sensitive data stored on the server.
- Regularly Update and Patch Software: Keep the server’s software and applications up-to-date to protect against known vulnerabilities.
- Set Up Firewalls: Configure firewalls to control inbound and outbound traffic, allowing only necessary services to communicate.
- Perform Backups: Regularly back up critical data to ensure that it can be restored in the event of a security incident or data loss.
- Restrict Physical Access: Limit physical access to server hardware to authorized personnel only, and implement security measures like locks and access controls.
- Use Intrusion Prevention Systems (IPS): Implement IPS tools to actively monitor and respond to potential security threats.
- Stay Informed about Security Trends: Stay updated on the latest security threats, vulnerabilities, and best practices to adapt your security measures accordingly.
By following these security best practices, you can significantly enhance the security posture of your Linux server and protect it from potential security risks.
Backing Up User Data
Creating regular backups of user data is a critical aspect of server administration. It ensures that in the event of data loss, accidental deletion, or system failure, you can restore important information and minimize downtime. In this section, we’ll explore how to create user-specific backups, restore data, and plan for disaster recovery.
Creating User-Specific Backups
To create backups of user data, you can use tools like rsync or set up automated backup scripts. These tools allow you to copy files and directories to a designated backup location.
For example, to back up a user’s home directory to an external drive, you can use the following rsync command:
rsync -av /home/username /mnt/external_drive/
This command synchronizes the contents of the user’s home directory to the external drive.
Restoring User Data
In the event of data loss, having a reliable backup allows you to restore user data quickly. Simply copy the backed-up files back to the original location. For example:
rsync -av /mnt/external_drive/username /home/
This command restores the backed-up data to the user’s home directory.
Disaster Recovery Planning
In addition to regular backups, it’s essential to have a disaster recovery plan in place. This plan should outline the steps to take in case of a major system failure or data loss event. It should include details on how to restore the entire system from backups and any additional configurations needed.
It’s also recommended to periodically test your disaster recovery plan to ensure it functions as expected.
By regularly backing up user data and having a well-defined disaster recovery plan, you can ensure that critical information is protected and can be quickly restored in case of emergencies.
User Account Automation
Automating user account management tasks can significantly streamline administrative processes and reduce manual intervention. This is especially important in environments with a large number of users or frequent user turnover. In this section, we’ll explore how to automate user account creation, modification, and maintenance.
Scripting User Account Creation
You can create scripts to automate the process of adding new user accounts. These scripts can take input parameters such as username, full name, and group memberships, and then execute the necessary commands to create the user.
For example, you can create a Bash script named create_user.sh:
#!/bin/bash

# Usage: create_user.sh <username> <full_name> <group>

# Example: create_user.sh john_doe "John Doe" developers

username=$1

full_name=$2

group=$3

sudo useradd -m -c "$full_name" -G $group $username

sudo passwd $username
This script takes three parameters: username, full name, and group. It then uses useradd to create the user, adds them to the specified group, and sets a password.
Automating Permission Changes
You can also automate permission changes for user accounts. For example, if a user changes roles or responsibilities, you can create a script to adjust their group memberships or file permissions accordingly.
Scheduled User Account Maintenance
Cron jobs or scheduling tools can be used to automate routine user account maintenance tasks. For example, you can schedule a script to run periodically to check for inactive accounts and disable or delete them as needed.
Automation not only saves time but also reduces the potential for human error in user account management.
Example: Automating Password Expiry
You can use a script to enforce password expiry policies:
#!/bin/bash

# Expire passwords for users who haven't changed them in 90 days

for user in $(sudo getent passwd | cut -f1 -d:); do

    last_change=$(sudo chage -l $user | grep "Last password change" | awk -F: '{print $2}' | tr -d ' ')

    today=$(date +%s)

    if (( ($today - $last_change) >= (90 * 86400) )); then

        sudo chage -d 0 $user

        echo "Password for user $user has been expired."

    fi

done
This script checks the last password change date for each user and expires the password if it’s been more than 90 days.
Automating user account management tasks allows you to efficiently manage user access and permissions in a Linux server environment.
Managing Service Accounts
Service accounts play a crucial role in the functionality of applications and services running on a Linux server. These accounts are used by services to interact with the system and access resources. Properly managing service accounts ensures the smooth operation of applications. In this section, we’ll explore how to create, configure, and secure service accounts.
Creating Service Accounts
To create a service account, you can use the useradd command just like you would for a regular user. However, service accounts typically do not require a home directory or login shell. You can omit them when creating the account:
sudo useradd -r -s /sbin/nologin myserviceaccount
In this example, the -r flag creates a system account (which is typically used for services), and the -s /sbin/nologin flag sets the login shell to /sbin/nologin to prevent interactive login.
Configuring Permissions and Access
Service accounts should have the minimal necessary permissions to perform their intended functions. You can add the service account to specific groups or adjust file permissions to grant access to the required resources.
Secure Password Management
Since service accounts don’t typically require password-based authentication, it’s best practice to set a randomly generated, long, and complex password and disable password-based authentication entirely:
sudo passwd -l myserviceaccount
This locks the account’s password, ensuring it cannot be used for login.
Monitoring and Auditing
Regularly monitoring the activities of service accounts is important for security. You can review logs and set up auditing tools to track service account actions.
Service Account Automation
Just like user accounts, you can automate the creation and management of service accounts using scripts or configuration management tools. This helps ensure consistency and reduces manual intervention.
Managing service accounts effectively contributes to the overall security and stability of your Linux server environment.
Role-Based Access Control (RBAC)
Role-Based Access Control (RBAC) is a security model that defines access permissions based on roles and responsibilities within an organization. It provides a structured approach to managing user access and permissions. In this section, we’ll explore how to implement RBAC on a Linux server.
Understanding RBAC
In an RBAC system, permissions are assigned to roles, and users are assigned to specific roles based on their job functions. This helps streamline access control and ensures that users have the necessary permissions to perform their tasks.
Creating Roles
To implement RBAC, you can start by defining roles based on the different responsibilities within your organization. For example, you might have roles like “admin,” “developer,” and “analyst,” each with distinct sets of permissions.
Assigning Users to Roles
Once roles are defined, you can assign users to the appropriate roles based on their job functions. This ensures that each user has the necessary level of access to perform their tasks.
Setting Permissions for Roles
Next, you’ll need to define the permissions associated with each role. This involves specifying what actions each role is allowed or denied to perform. For example, an “admin” role might have full access to system configuration, while a “developer” role may have access to specific development tools.
Implementing RBAC in Linux
In Linux, RBAC can be implemented using tools like sudo and sudoers file. By carefully configuring the sudoers file, you can grant specific commands and privileges to different roles or groups of users.
Regularly Review and Update RBAC Policies
As the organization evolves, it’s important to periodically review and update RBAC policies to reflect any changes in roles or responsibilities.
Implementing RBAC helps ensure that users have the right level of access for their job functions, enhancing security and minimizing the risk of unauthorized actions.
Conclusion
In conclusion, effective management of user accounts and permissions is crucial for maintaining the security and integrity of a Linux server. By following best practices and implementing security measures, you can ensure that only authorized users have access to sensitive information and resources.
FAQs
Q: Can I change the username of an existing user?
A: Yes, you can use the usermod command to change the username.
Q: What should I do if a user forgets their password?
A: You can use the passwd command to reset a user’s password.
Q: How often should I review user accounts for security purposes?
A: It is recommended to review user accounts on a regular basis, at least once every quarter.
Q: Can I assign multiple groups to a user?
A: Yes, a user can be a member of multiple groups.
Q: Is it possible to disable SSH access for a specific user?
A: Yes, you can edit the SSH configuration file to restrict access for specific users.