In this tutorial, We’ll explain how to install Elasticsearch on Ubuntu 20.10/20.04. Elasticsearch is an open-source search and analytics engine. Elasticsearch has mostly used search engines that accept complex search from analytic applications.
Usage:
- Elasticsearch: (Database) Store, Search and Analyse
Steps to install Elasticsearch on Ubuntu 20.10/20.04
Step 1: Update the Ubuntu system
It is recommended to update the system before installing Elasticsearch.
sudo apt update
Step 2: Install required dependencies
sudo apt install apt-transport-https ca-certificates wget

Sample Output:
root@ES-Server:~# sudo apt install apt-transport-https ca-certificates wget
Reading package lists... Done
Building dependency tree
Reading state information... Done
wget is already the newest version (1.20.3-1ubuntu1).
wget set to manually installed.
The following package was automatically installed and is no longer required:
virtualbox-guest-utils
Use 'sudo apt autoremove' to remove it.
The following packages will be upgraded:
apt-transport-https ca-certificates
2 upgraded, 0 newly installed, 0 to remove and 333 not upgraded.
Need to get 1,708 B/149 kB of archives.
After this operation, 2,048 B of additional disk space will be used.
Do you want to continue? [Y/n] Y
Get:1 http://us.archive.ubuntu.com/ubuntu groovy-updates/universe amd64 apt-transport-https all 2.1.10ubuntu0.3 [1,708 B]
Fetched 1,708 B in 1s (1,918 B/s)
Preconfiguring packages ...
(Reading database ... 155198 files and directories currently installed.)
Preparing to unpack .../ca-certificates_20210119~20.10.1_all.deb ...
Unpacking ca-certificates (20210119~20.10.1) over (20200601) ...
Preparing to unpack .../apt-transport-https_2.1.10ubuntu0.3_all.deb ...
Unpacking apt-transport-https (2.1.10ubuntu0.3) over (2.1.10ubuntu0.2) ...
Setting up apt-transport-https (2.1.10ubuntu0.3) ...
Setting up ca-certificates (20210119~20.10.1) ...
Updating certificates in /etc/ssl/certs...
10 added, 7 removed; done.
Processing triggers for man-db (2.9.3-2) ...
Processing triggers for ca-certificates (20210119~20.10.1) ...
Updating certificates in /etc/ssl/certs...
0 added, 0 removed; done.
Running hooks in /etc/ca-certificates/update.d...

done.
done.
root@ES-Server:~#
Step 3: Import GPG key repository’s
wget -qO - https://artifacts.elastic.co/GPG-KEY-elasticsearch | sudo apt-key add -
Sample Output:
root@ES-Server:~# wget -qO - https://artifacts.elastic.co/GPG-KEY-elasticsearch | sudo apt-key add -
Warning: apt-key is deprecated. Manage keyring files in trusted.gpg.d instead (see apt-key(8)).
OK
root@ES-Server:~#
Step 4: Add the Elasticsearch repository to the system
sudo sh -c 'echo "deb https://artifacts.elastic.co/packages/7.x/apt stable main" > /etc/apt/sources.list.d/elastic-7.x.list'
Check Java version:
root@ES-Server:~# java -version
openjdk version "11.0.11" 2021-04-20
OpenJDK Runtime Environment (build 11.0.11+9-Ubuntu-0ubuntu2.20.10)
OpenJDK 64-Bit Server VM (build 11.0.11+9-Ubuntu-0ubuntu2.20.10, mixed mode, sharing)
root@ES-Server:~#
If you don’t have Java then install Java with the below command:
sudo apt-get install default-jdk -y
Step 5: Install Elasticsearch on Ubuntu
You can also view and download Elasticsearch on the Ubuntu system or run the below command to install Elasticsearch.
sudo apt update

sudo apt install elasticsearch
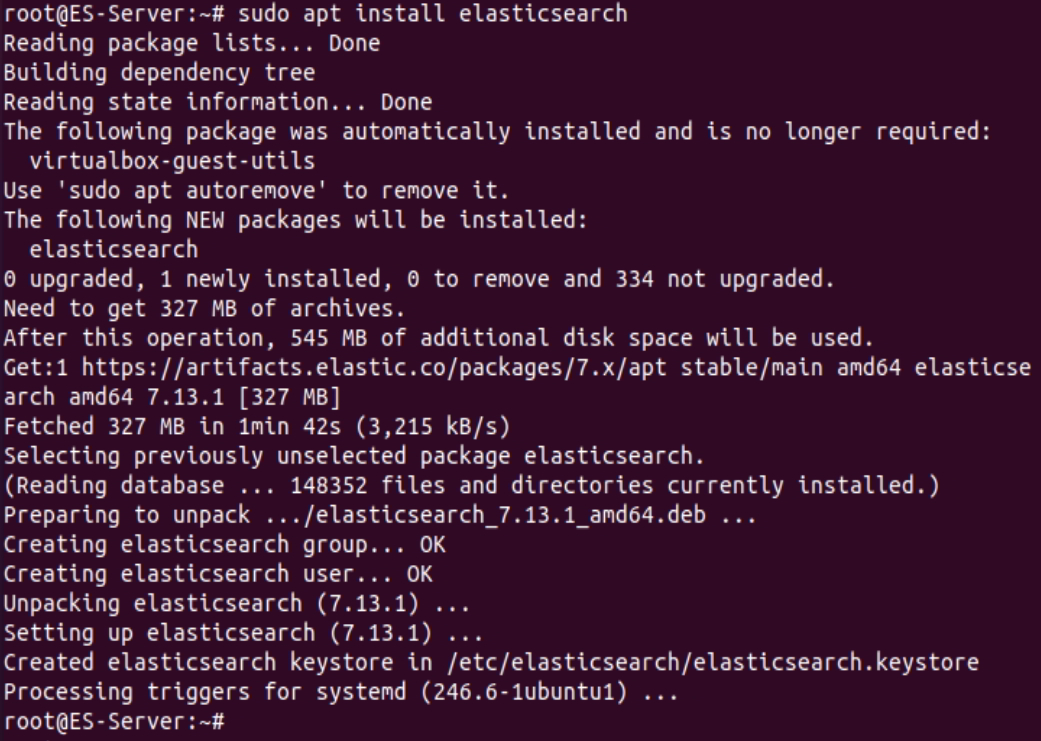
Sample Output:
root@ES-Server:~# sudo apt install elasticsearch
Reading package lists... Done
Building dependency tree
Reading state information... Done
The following package was automatically installed and is no longer required:
virtualbox-guest-utils
Use 'sudo apt autoremove' to remove it.
The following NEW packages will be installed:
elasticsearch
0 upgraded, 1 newly installed, 0 to remove and 334 not upgraded.
Need to get 327 MB of archives.
After this operation, 545 MB of additional disk space will be used.
Get:1 https://artifacts.elastic.co/packages/7.x/apt stable/main amd64 elasticsearch amd64 7.13.1 [327 MB]
Fetched 327 MB in 1min 42s (3,215 kB/s)
Selecting previously unselected package elasticsearch.
(Reading database ... 148352 files and directories currently installed.)
Preparing to unpack .../elasticsearch_7.13.1_amd64.deb ...
Creating elasticsearch group... OK
Creating elasticsearch user... OK
Unpacking elasticsearch (7.13.1) ...
Setting up elasticsearch (7.13.1) ...
Created elasticsearch keystore in /etc/elasticsearch/elasticsearch.keystore
Processing triggers for systemd (246.6-1ubuntu1) ...
root@ES-Server:~#
Create file with this content in /etc/elasticsearch/jvm.options.d/jvm.options
-Xms4g
-Xmx4g
Step 6: Start and Enable Elasticsearch
sudo systemctl enable --now elasticsearch.service
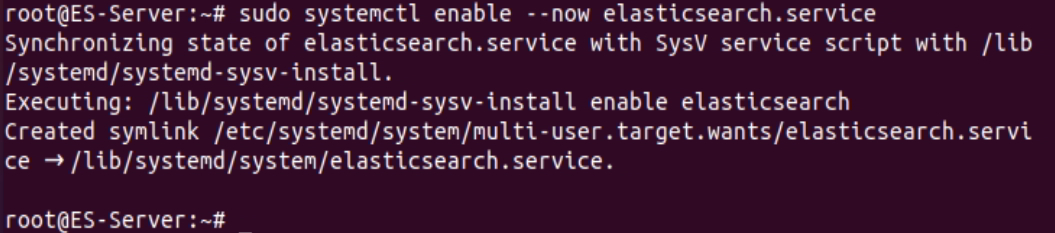
Sample Output:
root@ES-Server:~# sudo systemctl enable --now elasticsearch.service
Synchronizing state of elasticsearch.service with SysV service script with /lib/systemd/systemd-sysv-install.
Executing: /lib/systemd/systemd-sysv-install enable elasticsearch
Created symlink /etc/systemd/system/multi-user.target.wants/elasticsearch.service → /lib/systemd/system/elasticsearch.service.

root@ES-Server:~#
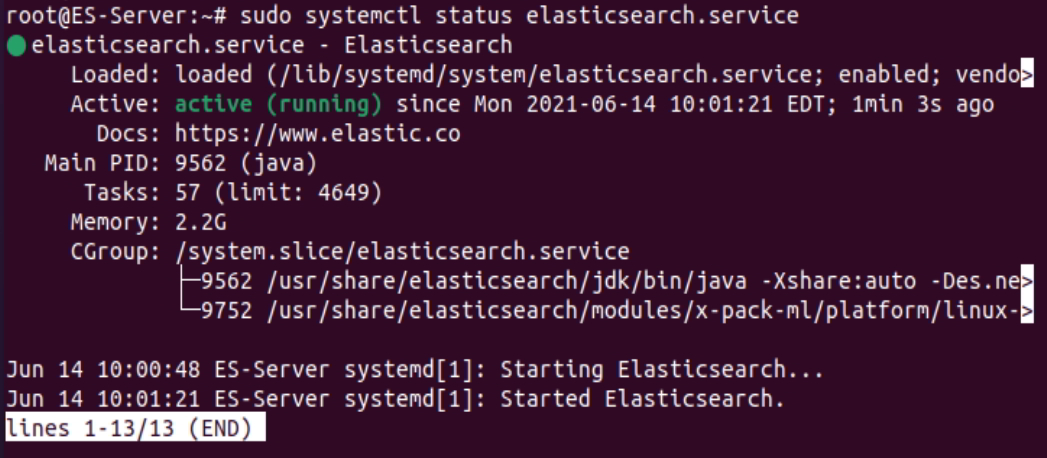
Step 7: Verify Elasticsearch service
sudo systemctl status elasticsearch.service
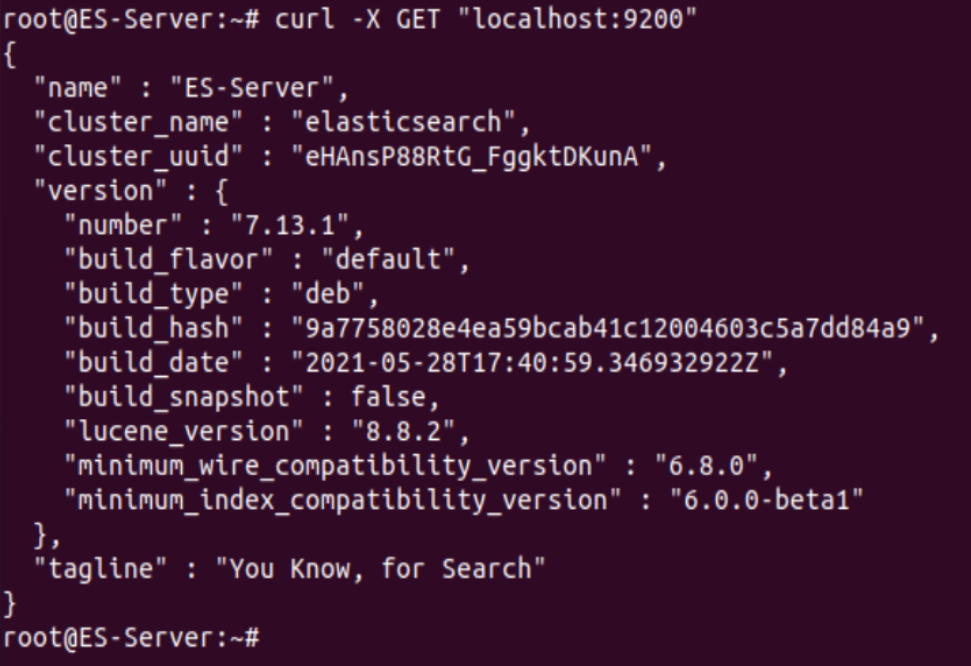
And also curl to localhost with port 9200 and check the status of Elasticsearch cluster.
sudo apt-get install curl vim -y
curl -X GET "localhost:9200"
Sample output
root@ES-Server:~# curl -X GET "localhost:9200"
{
"name" : "ES-Server",
"cluster_name" : "elasticsearch",
"cluster_uuid" : "eHAnsP88RtG_FggktDKunA",
"version" : {
"number" : "7.13.1",
"build_flavor" : "default",
"build_type" : "deb",
"build_hash" : "9a7758028e4ea59bcab41c12004603c5a7dd84a9",
"build_date" : "2021-05-28T17:40:59.346932922Z",
"build_snapshot" : false,
"lucene_version" : "8.8.2",
"minimum_wire_compatibility_version" : "6.8.0",
"minimum_index_compatibility_version" : "6.0.0-beta1"
},
"tagline" : "You Know, for Search"
}
root@ES-Server:~#
Step 8: Configure Elasticsearch on Ubuntu
By default, Elasticsearch runs/listens on localhost. No need to change the default configuration, if Elasticsearch is setup on a single node cluster.
- Elasticsearch data is stored in the /var/lib/elasticsearch directory.
- Configuration files are located in /etc/elasticsearch
- Java can be configured in the /etc/default/elasticsearch file.
Commonly used Elasticsearch commands
Elasticsearch provides a rich set of API endpoints that you can use to interact with the system. Here are some commonly used Elasticsearch commands
Cluster Health:
curl -XGET 'http://localhost:9200/_cat/health?v'
List All Indices:
curl -XGET 'http://localhost:9200/_cat/indices?v'
Create an Index:
curl -XPUT 'http://localhost:9200/my_index'
Index Information:
curl -XGET 'http://localhost:9200/my_index/_settings?pretty'
Add Document to Index:
curl -XPOST 'http://localhost:9200/my_index/_doc/1' -d '{"field1":"value1", "field2":"value2"}'
Search Documents in an Index:
curl -XGET 'http://localhost:9200/my_index/_search?q=field1:value1&pretty'
Delete an Index:
curl -XDELETE 'http://localhost:9200/my_index'
Cluster Nodes Information:
curl -XGET 'http://localhost:9200/_cat/nodes?v'
Cluster State:
curl -XGET 'http://localhost:9200/_cluster/state?pretty'
Mapping Information:
curl -XGET 'http://localhost:9200/my_index/_mapping?pretty'
Cluster Settings:
curl -XGET 'http://localhost:9200/_cluster/settings?pretty'
End of article. We’ve shown you how to install Elasticsearch on Ubuntu 20.10/20.04.
See also:
How to Delete Older Elasticsearch indices using Curator
ELK Stack Architecture Elasticsearch Logstash and Kibana
Steps to Install and Configure Filebeat on Linux