In this article, We’ll explain how to upgrade Java 8 to Java 11 on Rocky Linux or AlmaLinux. Java is a popular programming language used to develop a wide range of applications, from simple desktop programs to complex web applications. Java 8 has been around for several years and is still widely used. However, with the release of Java 11, developers can now take advantage of several new features and improvements. If you are using Rocky Linux and want to upgrade your Java 8 installation to Java 11, this guide will walk you through the steps you need to follow.
Before we get started, it’s important to note that there are different versions of Rocky Linux available. In this guide, we will assume that you are using the latest version of Rocky Linux, which at the time of writing is Rocky Linux 8.
Steps to upgrade Java 8 to Java 11 on Rocky Linux
Step 1: Check Your Current Java Version
Before you upgrade your Java installation, you need to check which version of Java you are currently using. To do this, open a terminal window and enter the following command:
java -version
This command will display the version of Java currently installed on your system. If you see a version number that starts with 1.8, then you are running Java 8.

Sample Output:
[sysadminxpert@RockyLinux ~]$ java -version
openjdk version "1.8.0_362"
OpenJDK Runtime Environment (build 1.8.0_362-b09)
OpenJDK 64-Bit Server VM (build 25.362-b09, mixed mode)
[sysadminxpert@RockyLinux ~]$
Step 2: Install Java 11 on Rocky Linux
sudo yum install java-11-openjdk java-11-openjdk-devel
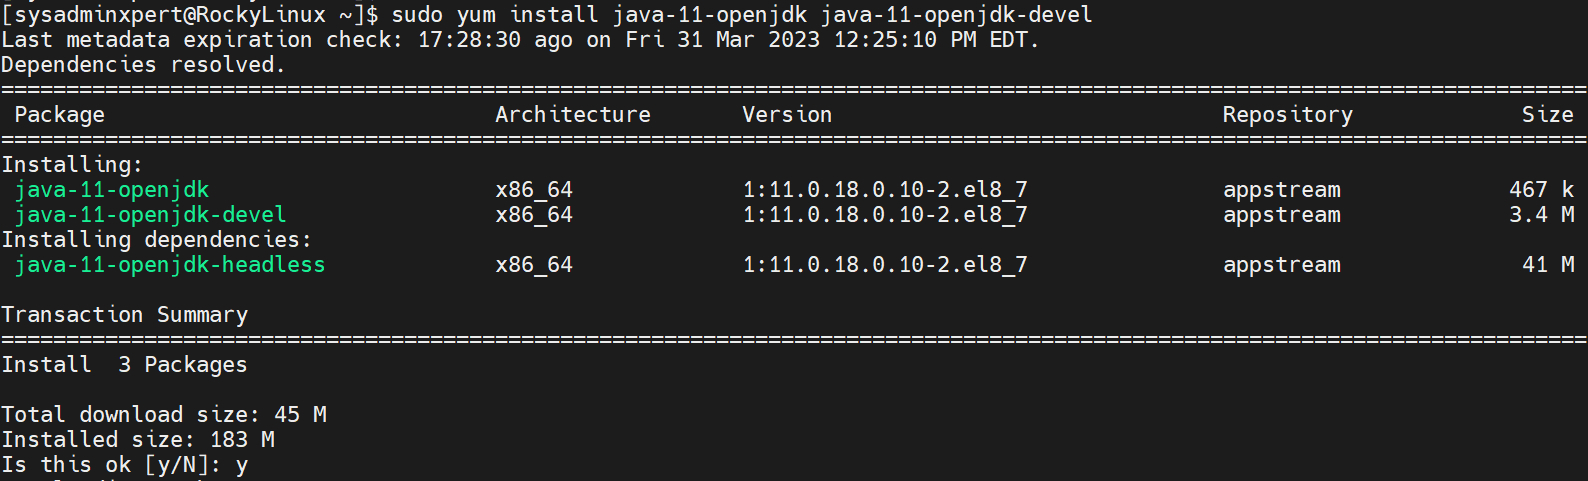
Sample Output:
[sysadminxpert@RockyLinux ~]$ sudo yum install java-11-openjdk java-11-openjdk-devel
Last metadata expiration check: 17:28:30 ago on Fri 31 Mar 2023 12:25:10 PM EDT.
Dependencies resolved.
==========================================================================================================================
Package Architecture Version Repository Size
==========================================================================================================================
Installing:
java-11-openjdk x86_64 1:11.0.18.0.10-2.el8_7 appstream 467 k
java-11-openjdk-devel x86_64 1:11.0.18.0.10-2.el8_7 appstream 3.4 M
Installing dependencies:
java-11-openjdk-headless x86_64 1:11.0.18.0.10-2.el8_7 appstream 41 M

Transaction Summary
==========================================================================================================================
Install 3 Packages

Total download size: 45 M
Installed size: 183 M
Is this ok [y/N]: y
Downloading Packages:
(1/3): java-11-openjdk-11.0.18.0.10-2.el8_7.x86_64.rpm 77 kB/s | 467 kB 00:06
(2/3): java-11-openjdk-devel-11.0.18.0.10-2.el8_7.x86_64.rpm 444 kB/s | 3.4 MB 00:07
(3/3): java-11-openjdk-headless-11.0.18.0.10-2.el8_7.x86_64.rpm 1.8 MB/s | 41 MB 00:23
--------------------------------------------------------------------------------------------------------------------------
Total 1.5 MB/s | 45 MB 00:29
Running transaction check
Transaction check succeeded.
Running transaction test
Transaction test succeeded.
Running transaction
Running scriptlet: java-11-openjdk-headless-1:11.0.18.0.10-2.el8_7.x86_64 1/1
Preparing : 1/1
Installing : java-11-openjdk-headless-1:11.0.18.0.10-2.el8_7.x86_64 1/3
Running scriptlet: java-11-openjdk-headless-1:11.0.18.0.10-2.el8_7.x86_64 1/3
Installing : java-11-openjdk-1:11.0.18.0.10-2.el8_7.x86_64 2/3
Running scriptlet: java-11-openjdk-1:11.0.18.0.10-2.el8_7.x86_64 2/3
Installing : java-11-openjdk-devel-1:11.0.18.0.10-2.el8_7.x86_64 3/3
Running scriptlet: java-11-openjdk-devel-1:11.0.18.0.10-2.el8_7.x86_64 3/3
Running scriptlet: java-11-openjdk-headless-1:11.0.18.0.10-2.el8_7.x86_64 3/3
Running scriptlet: java-11-openjdk-1:11.0.18.0.10-2.el8_7.x86_64 3/3
Running scriptlet: java-11-openjdk-devel-1:11.0.18.0.10-2.el8_7.x86_64 3/3
Verifying : java-11-openjdk-1:11.0.18.0.10-2.el8_7.x86_64 1/3
Verifying : java-11-openjdk-devel-1:11.0.18.0.10-2.el8_7.x86_64 2/3
Verifying : java-11-openjdk-headless-1:11.0.18.0.10-2.el8_7.x86_64 3/3

Installed:
java-11-openjdk-1:11.0.18.0.10-2.el8_7.x86_64 java-11-openjdk-devel-1:11.0.18.0.10-2.el8_7.x86_64
java-11-openjdk-headless-1:11.0.18.0.10-2.el8_7.x86_64

Complete!
[sysadminxpert@RockyLinux ~]$
Step 3: Set Java 11 as the Default Java Version
Now that you have installed Java 11, you need to set it as the default Java version on your system.
sudo alternatives --config java
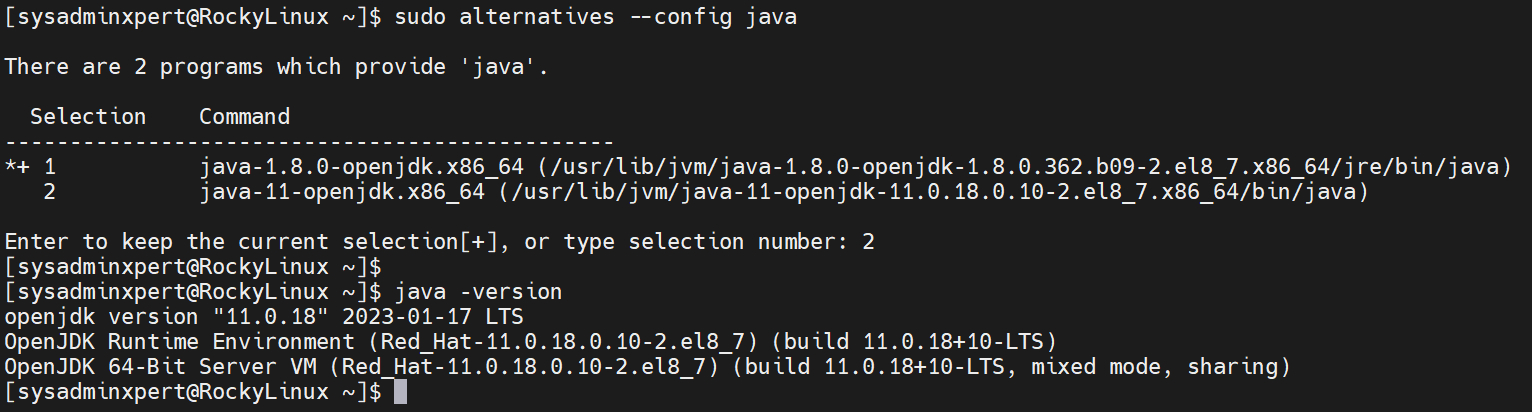
Sample Output:
[sysadminxpert@RockyLinux ~]$ sudo alternatives --config java

There are 2 programs which provide 'java'.

Selection Command
-----------------------------------------------
*+ 1 java-1.8.0-openjdk.x86_64 (/usr/lib/jvm/java-1.8.0-openjdk-1.8.0.362.b09-2.el8_7.x86_64/jre/bin/java)
2 java-11-openjdk.x86_64 (/usr/lib/jvm/java-11-openjdk-11.0.18.0.10-2.el8_7.x86_64/bin/java)

Enter to keep the current selection[+], or type selection number: 2
[sysadminxpert@RockyLinux ~]$
Verify that Java 11 is now the default Java version by running the following command:
java -version
Sample Output:
[sysadminxpert@RockyLinux ~]$ java -version
openjdk version "11.0.18" 2023-01-17 LTS
OpenJDK Runtime Environment (Red_Hat-11.0.18.0.10-2.el8_7) (build 11.0.18+10-LTS)
OpenJDK 64-Bit Server VM (Red_Hat-11.0.18.0.10-2.el8_7) (build 11.0.18+10-LTS, mixed mode, sharing)
[sysadminxpert@RockyLinux ~]$
Step 4: Update Java Applications
Now that you have upgraded your Java installation to Java 11, you need to update any Java applications that you have installed on your system. This is because Java 11 is not backward compatible with Java 8, which means that some applications may not work correctly with the new version of Java.
To update your Java applications, follow these steps:
1. Open a terminal window and enter the following command:
sudo dnf update
This command will update all of the packages on your system, including any Java applications that you have installed.
2. Restart any Java applications that you have running to ensure that they are now using the updated version of Java.
Step 5: Uninstall Java 8 (Optional If not require Java 8)
If you no longer need Java 8 on your system, you can uninstall it to free up disk space. To do this, follow these steps:
1. Open a terminal window and enter the following command to list the installed versions of Java:
sudo alternatives --config java
2. Select the Java 8 version and press Enter.
3. Enter the following command to remove the Java 8 version:
sudo yum remove java-1.8.0-openjdk
4. Verify that Java 8 has been uninstalled by running the following command:
java -version
This command should display an error message indicating that Java 8 is not installed.
Conclusion
In this guide, we have walked you through the steps to upgrade Java 8 to Java 11 on Rocky Linux. By following these steps, you can take advantage of the new features and improvements in Java 11, while also ensuring that your Java applications continue to work correctly.