In this article, we’ll explain how to upgrade Java 11 to Java 16 on Rocky Linux. Java is a popular programming language used to create different types of applications, including web and mobile applications, desktop applications, and games. Java 16 is the latest version of Java that offers new features and improvements over its predecessors, including Java 11. If you are using Rocky Linux and want to upgrade your Java version from Java 11 to Java 16, this blog will guide you through the process step by step.
Before we dive into the upgrade process, let’s understand the benefits of upgrading to Java 16:
1. Improved performance: Java 16 comes with several performance improvements that can help improve the speed and efficiency of your applications.
2. Better security: Java 16 comes with new security features that provide enhanced protection against potential security threats.
3. New features: Java 16 introduces new features, such as records, sealed classes, and pattern matching for instanceof, which can make your code more concise and readable.
Now, let’s get started with the upgrade process.
Steps to Upgrade Java 11 To Java 16 on Rocky Linux
Step 1: Check the Current Java Version
The first step is to check your current Java version to ensure that you are currently using Java 11. To check your Java version, open the terminal and run the following command:
java -version

This command will display the version of Java that you are currently using. If you are using Java 11, you will see a message similar to the following:
Sample Output:
[sysadminxpert@RockyLinux ~]$ java -version
openjdk version "11.0.18" 2023-01-17 LTS
OpenJDK Runtime Environment (Red_Hat-11.0.18.0.10-2.el8_7) (build 11.0.18+10-LTS)
OpenJDK 64-Bit Server VM (Red_Hat-11.0.18.0.10-2.el8_7) (build 11.0.18+10-LTS, mixed mode, sharing)
[sysadminxpert@RockyLinux ~]$
Step 2: Download and Install Java 16 on Rocky Linux
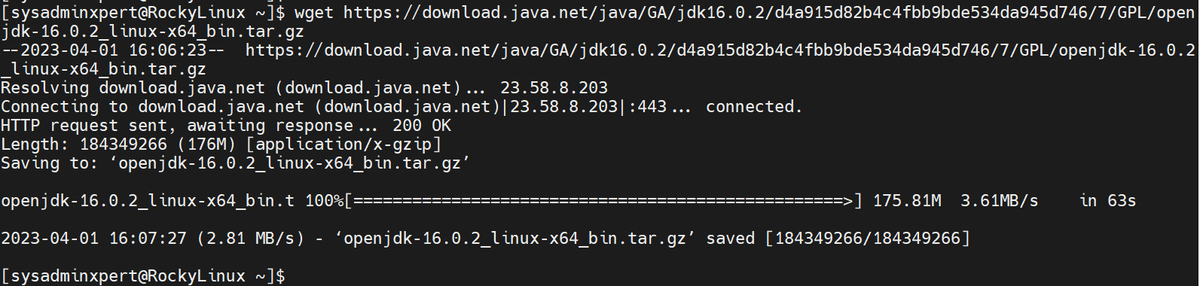
To upgrade to Java 16, you need to download and install the latest version of Java. You can download Java 16 from the official Java website. Alternatively, you can use the following command in the terminal to download and extract it.
wget https://download.java.net/java/GA/jdk16.0.2/d4a915d82b4c4fbb9bde534da945d746/7/GPL/openjdk-16.0.2_linux-x64_bin.tar.gz

tar -xvf openjdk-16.0.2_linux-x64_bin.tar.gz
Sample Output:
[sysadminxpert@RockyLinux ~]$ wget https://download.java.net/java/GA/jdk16.0.2/d4a915d82b4c4fbb9bde534da945d746/7/GPL/openjdk-16.0.2_linux-x64_bin.tar.gz
--2023-04-01 16:06:23-- https://download.java.net/java/GA/jdk16.0.2/d4a915d82b4c4fbb9bde534da945d746/7/GPL/openjdk-16.0.2_linux-x64_bin.tar.gz
Resolving download.java.net (download.java.net)... 23.58.8.203
Connecting to download.java.net (download.java.net)|23.58.8.203|:443... connected.
HTTP request sent, awaiting response... 200 OK
Length: 184349266 (176M) [application/x-gzip]
Saving to: ‘openjdk-16.0.2_linux-x64_bin.tar.gz’

openjdk-16.0.2_linux-x64_bin.t 100%[==================================================>] 175.81M 3.61MB/s in 63s

2023-04-01 16:07:27 (2.81 MB/s) - ‘openjdk-16.0.2_linux-x64_bin.tar.gz’ saved [184349266/184349266]

[sysadminxpert@RockyLinux ~]$
[sysadminxpert@RockyLinux ~]$ tar -xf openjdk-16.0.2_linux-x64_bin.tar.gz
Now move the Java directory to /usr/lib/jvm/ directory
sudo mv jdk-16.0.2 /usr/lib/jvm/
Sample Output
[sysadminxpert@RockyLinux ~]$ sudo mv jdk-16.0.2/ /usr/lib/jvm/
[sysadminxpert@RockyLinux ~]$ ls -ld /usr/lib/jvm/jdk-16.0.2/
drwxrwxr-x 8 sysadminxpert sysadminxpert 96 Apr 1 16:10 /usr/lib/jvm/jdk-16.0.2/
[sysadminxpert@RockyLinux ~]$
Add the new version of java to your system.
sudo alternatives --install "/usr/bin/java" "java" "/usr/lib/jvm/jdk-16.0.2/bin/java" 0
sudo alternatives --install "/usr/bin/javac" "javac" "/usr/lib/jvm/jdk-16.0.2/bin/javac" 0
Use the alternatives command to configure the default Java version.
sudo alternatives --set java /usr/lib/jvm/jdk-16.0.2/bin/java
sudo alternatives --set javac /usr/lib/jvm/jdk-16.0.2/bin/javac
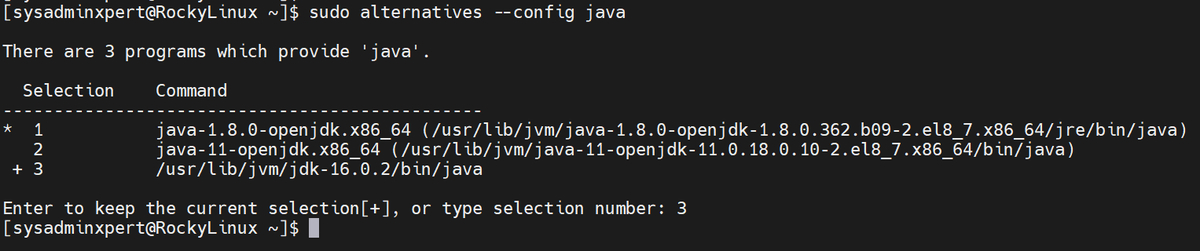
(Optional step) If you need to switch to a different version of Java in the future, you can use the alternatives command again to change the default version.
Change the version of ‘java’:
sudo alternatives --config java
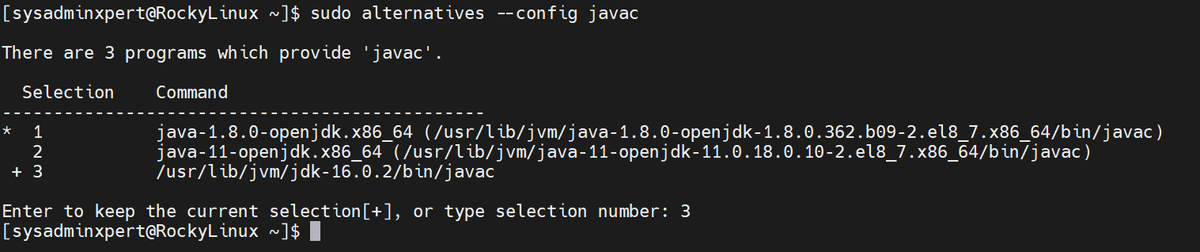
Change the version of ‘javac’:
sudo alternatives --config javac
Step 3: Verify the Java Installation
After completing the above steps, you should verify that Java 16 has been installed correctly and is set as the default Java version. To do this, open the terminal and run the following command:
java --version

javac --version
This command will display the version of Java that you are currently using. If Java 16 has been installed correctly and set as the default Java version, you should see a message similar to the following:
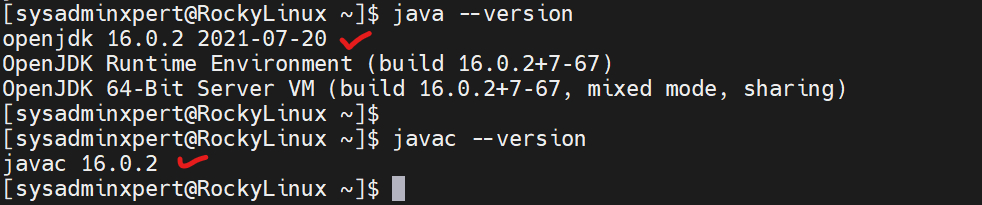
Sample output:
[sysadminxpert@RockyLinux ~]$ java --version
openjdk 16.0.2 2021-07-20
OpenJDK Runtime Environment (build 16.0.2+7-67)
OpenJDK 64-Bit Server VM (build 16.0.2+7-67, mixed mode, sharing)
[sysadminxpert@RockyLinux ~]$
[sysadminxpert@RockyLinux ~]$ javac --version
javac 16.0.2
[sysadminxpert@RockyLinux ~]$
Step 4: Set the JAVA_HOME Environment Variable
After installing Java 16, you need to set the JAVA_HOME environment variable to point to the new Java installation. To do this, open the terminal and enter the following command:
To set the JAVA_HOME path for system-wide configuration, you can follow the steps below:
$ sudo vim /etc/environment
This command will open the environment file in the vim text editor. Add the following line to the file:
JAVA_HOME=”/opt/jdk-16.0.2"
Note that the exact path may vary depending on your system architecture and the version of Java 16 you have installed.
Save the file and exit the text editor.
To apply the changes, you can either log out and log back in or run the following command in the terminal:
source /etc/environment
This will update the environment variables with the new JAVA_HOME path.
After following these steps, the JAVA_HOME environment variable will be set for all users on the system, and you can use it in your applications or scripts as needed.
Verify Java home path
echo $JAVA_HOME
Sample output:
[sysadminxpert@RockyLinux ~]$ echo $JAVA_HOME
/opt/jdk-16.0.2
Congratulations! You have successfully upgraded from Java 11 to Java 16 on Rocky Linux.
Additional Tips
1. Remove Old Java Versions: After upgrading to a new Java version, it’s a good idea to remove the old Java version(s) from your system. To remove Java 11, use the following command:
sudo dnf remove java-11-openjdk
2. Update Java Applications: After upgrading to a new Java version, you should also update your Java applications to ensure that they are compatible with the new Java version.
Conclusion
Upgrading from Java 11 to Java 16 on Rocky Linux is a straightforward process that can be completed in a few simple steps. By upgrading to Java 16, you can take advantage of new features and improvements that can help improve the performance, security, and functionality of your Java applications. As always, it’s important to backup your system before making any changes, and to test your applications thoroughly after upgrading to a new Java version.
End of article. We’ve explained the steps to Upgrade Java 11 To Java 16 on Rocky Linux.