In this Docker Tutorial, we explain what is Docker file and layers of docker Image
What is Docker File and Layers of Docker Image
- It is a sequential set of instructions for the docker engine.
- Availability of such format replaces a bunch of commands intended for the build-up particular Image
- It helps to keep things organized
- The primary way of interacting with Docker and migrating to containers in general.
- In Docker file order of sequence is important as for working each sequential instructions of docker file is processed individually.
- Each instruction creates a layer of the final docker image. The purpose behind this is to enable caching and easy up troubleshooting
- If Docker files going to use the same layer at some stage docker daemon can just reuse the pre-created layer for such purposes.
[ads2]
Docker file Structure
It is a file with no extension at all and thumb rule is to name the file as docker file (dockerfile) with no extension. It is not mandatory to name the docker file as “dockerfile” itself. You can name it as per your convenience as well.
You can use any text editor to create the file just make sure you don’t add the extension to the file, This makes a file compatible to pass auto builder used by docker to build the images.
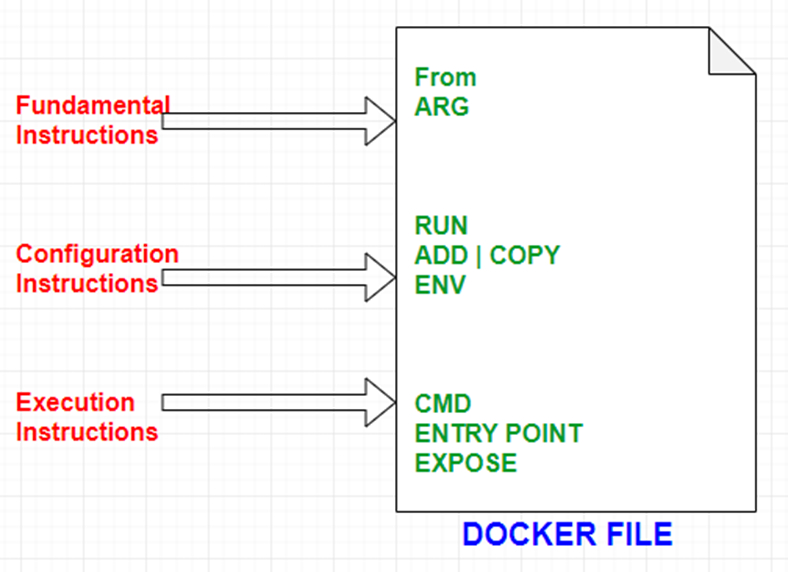
What you see inside the docker file is an instruction to be passed on. The instruction can be generally divided into three categories.
- Fundamental
- Configuration
- Execution instruction
Dockerfile Example – to understand what is Docker File and Layers of Docker Image
Lets see step-by-step How to write docker file
[ads1]
$ touch dockerfile
$ vi dockerfile
ARG CODE_VERSION=16.04
FROM ubuntu:${CODE_VERSION}
RUN apt-get update -y
CMD [“bash”]
- ARG is used to define the arguments used by “FROM” instruction. Although it is not necessary to use ARG.
- We have defined the argument “CODE_VERSION=16.04”, which means that we have the code version 16.04.
- “FROM” is used to specify the base image for the resultant docker image that we intend to create.
- In any case “FROM” instruction must be there in any docker file
- “FROM” is followed by operating system images or application images that are publically available on the docker hub.
- In the above docker file example, we have mention Ubuntu as our base OS image with code version (OS version) 16.04
- $ docker build -t img_from.
- “-t” option is used to tag the image or in other words, name the image to make it easily recognizable
[ads3]
As you can see docker image is build up step by step.
[root@Docker-sysadmin ec2-user]# cat dockerfile
ARG CODE_VERSION=16.04
FROM ubuntu:${CODE_VERSION}
RUN apt-get update -y
CMD [“bash”]
[root@Docker-sysadmin ec2-user]#


[root@Docker-sysadmin ec2-user]# docker build -t img_from .
Sending build context to Docker daemon  8.704kB
Step 1/4 : ARG CODE_VERSION=16.04
Step 2/4 : FROM ubuntu:${CODE_VERSION}
16.04: Pulling from library/ubuntu
7e6591854262: Pull complete
089d60cb4e0a: Pull complete
9c461696bc09: Pull complete
45085432511a: Pull complete
Digest: sha256:6aa6090ee9c1a525cbad1bb6c2ec9278914db754a3a3c5dc9e7d8daa5ee40dce
Status: Downloaded newer image for ubuntu:16.04
 ---> a3551444fc85
Step 3/4 : RUN apt-get update -y
 ---> Running in bcae37e84025
Get:1 http://archive.ubuntu.com/ubuntu xenial InRelease [247 kB]
Get:2 http://security.ubuntu.com/ubuntu xenial-security InRelease [109 kB]
Get:3 http://security.ubuntu.com/ubuntu xenial-security/main amd64 Packages [816 kB]
Get:4 http://archive.ubuntu.com/ubuntu xenial-updates InRelease [109 kB]
Get:5 http://archive.ubuntu.com/ubuntu xenial-backports InRelease [107 kB]
Get:6 http://archive.ubuntu.com/ubuntu xenial/main amd64 Packages [1558 kB]
Get:7 http://security.ubuntu.com/ubuntu xenial-security/restricted amd64 Packages [12.7 kB]
Get:8 http://security.ubuntu.com/ubuntu xenial-security/universe amd64 Packages [552 kB]
Get:9 http://security.ubuntu.com/ubuntu xenial-security/multiverse amd64 Packages [6121 B]
Get:10 http://archive.ubuntu.com/ubuntu xenial/restricted amd64 Packages [14.1 kB]
Get:11 http://archive.ubuntu.com/ubuntu xenial/universe amd64 Packages [9827 kB]
Get:12 http://archive.ubuntu.com/ubuntu xenial/multiverse amd64 Packages [176 kB]
Get:13 http://archive.ubuntu.com/ubuntu xenial-updates/main amd64 Packages [1224 kB]
Get:14 http://archive.ubuntu.com/ubuntu xenial-updates/restricted amd64 Packages [13.1 kB]
Get:15 http://archive.ubuntu.com/ubuntu xenial-updates/universe amd64 Packages [964 kB]
Get:16 http://archive.ubuntu.com/ubuntu xenial-updates/multiverse amd64 Packages [19.1 kB]
Get:17 http://archive.ubuntu.com/ubuntu xenial-backports/main amd64 Packages [7942 B]
Get:18 http://archive.ubuntu.com/ubuntu xenial-backports/universe amd64 Packages [8532 B]
Fetched 15.8 MB in 3s (4893 kB/s)
Reading package lists...
Removing intermediate container bcae37e84025
 ---> 7d0b3d281109
Step 4/4 : CMD [“bash”]
 ---> Running in d892b110529c
Removing intermediate container d892b110529c
 ---> 09c3bad93a38
Successfully built 09c3bad93a38
Successfully tagged img_from:latest
[root@Docker-sysadmin ec2-user]#
In the Docker file, we used Run instruction, which asks docker to execute the command mentioned with it on top of the base images and the results are committed.
[ads2]
Containerize Apache web-server
Dockerfile example
$ vi dockerfile

FROM ubuntu:12.04
LABEL creator: “SysAdminXpert”
RUN apt-get update && apt-get install -y apache2 && apt-get clean
ENV APACHE_RUN_USER www_data
ENV APACHE_RUN_GROUP www_data
ENV APACHE_LOG_DIR /var/log/apache2
EXPOSE 80
CMD [“/usr/sbin/apache2”, “-D”, “FOREGROUND”]
In the above docker file, we have mentioned “FROM” instruction and also added metadata in the form of “LABEL” and mentioned the name of the creator of the file which is “SysAdminXpert”.
Next “RUN” Instruction is used which will perform a general update, install apache2 and cleanup.
The environment variable is set by using “ENV” instruction for USER, GROUP, LOG directory which help to run our apache run-time.
www-data is the default user for web service running on Ubuntu and mentioning it makes the access of permissions for apache to smoother.
“EXPOSE” instruction is used to expose the container’s port “80”.
“CMD” instruction is executing the apache2 web-server from its executable path. Here Apache will run as a foreground application, not as a daemon process as mention in the above example.
[ads4]
Once Docker file is created, now let’s build a Docker image
$ docker build -t image_name .
Docker Image has been built successfully. You can see the latest build image with below cmd
$ docker images
#Docker file
[root@Docker-sysadmin docker-2]# cat dockerfile
FROM ubuntu:12.04
LABEL creator: “SysAdminXpert”
RUN apt-get update && apt-get install -y apache2 && apt-get clean
ENV APACHE_RUN_USER www_data
ENV APACHE_RUN_GROUP www_data
ENV APACHE_LOG_DIR /var/log/apache2
EXPOSE 80
CMD [“/usr/sbin/apache2”, “-D”, “FOREGROUND”]
[root@Docker-sysadmin docker-2]#

#Create/Build a Docker image
[root@Docker-sysadmin docker-2]# docker build -t sysadmin-img .
Sending build context to Docker daemon  2.048kB
Step 1/8 : FROM ubuntu:12.04
12.04: Pulling from library/ubuntu
d8868e50ac4c: Pull complete
83251ac64627: Pull complete
589bba2f1b36: Pull complete
d62ecaceda39: Pull complete
6d93b41cfc6b: Pull complete
Digest: sha256:18305429afa14ea462f810146ba44d4363ae76e4c8dfc38288cf73aa07485005
Status: Downloaded newer image for ubuntu:12.04
 ---> 5b117edd0b76
Step 2/8 : LABEL creator: “SysAdminXpert”
 ---> Running in 784eb135be15
Removing intermediate container 784eb135be15
 ---> e8f824e276ac
Step 3/8 : RUN apt-get update && apt-get install -y apache2 && apt-get clean
 ---> Running in 279e2d9f70d6
Step 4/8 : ENV APACHE_RUN_USER www_data
 ---> Running in c39c7e24f4cc
Removing intermediate container c39c7e24f4cc
 ---> 2baa7a30ef63
Step 5/8 : ENV APACHE_RUN_GROUP www_data
 ---> Running in 91ad16c6b048
Removing intermediate container 91ad16c6b048
 ---> 7c7d34250716
Step 6/8 : ENV APACHE_LOG_DIR /var/log/apache2
 ---> Running in 7c560d37ba0d
Removing intermediate container 7c560d37ba0d
 ---> 4a261003d885
Step 7/8 : EXPOSE 80
 ---> Running in f09fa99461a4
Removing intermediate container f09fa99461a4
 ---> 181b0cd6126b
Step 8/8 : CMD [“/usr/sbin/apache2”, “-D”, “FOREGROUND”]
 ---> Running in 709784a4b462
Removing intermediate container 709784a4b462
 ---> 7e719d84fc81
Successfully built 7e719d84fc81
Successfully tagged sysadmin-img:latest

#verify docker image, sysadmin-img created
[root@Docker-sysadmin docker-2]# docker images
REPOSITORY          TAG                 IMAGE ID            CREATED             SIZE
sysadmin-img        latest              7e719d84fc81        10 seconds ago      179MB
img_from            latest              09c3bad93a38        32 minutes ago      144MB
[root@Docker-sysadmin docker-2]#
What is Docker Image
- A Docker image is a collection or stack of layers that are created from sequential instructions on a docker file.
- The Docker Images can be recognized either by their “Unique Image ID” which is provided by docker or a “convenient name” or “Tag”, which is provided by you while creating Image.
- Docker Image is pulled or pushed from Docker hub
- Each layer apart from the top one is R/O
- The Top layer is R/W type
[ads1]
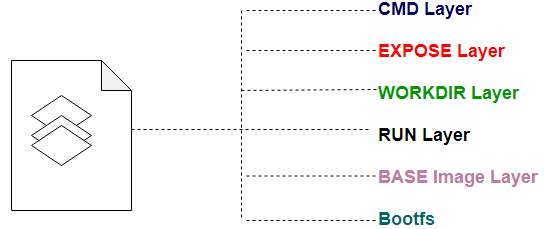
Visualize the layers of Docker Image
End of Docker tutorial. you have learned What is Docker File and Layers of Docker Image.
Check this also Docker Tutorials
[divider style=”normal” top=”20″ bottom=”20″]
thanks for reading these articles, you’ll also like the below articles.
Docker Commands Tutorial for Beginners with Example
Docker Engine Architecture and Stages of Containerization
Solved permission denied while trying to connect to the Docker daemon socket