CentOS Stream 9 is a popular Linux distribution that is known for its stability and reliability. It is widely used in server environments where performance and security are critical. However, some users may prefer to use a graphical user interface (GUI) on their CentOS Stream 9 systems for ease of use and familiarity. GNOME is a popular desktop environment for Linux systems and provides a user-friendly interface. In this article, we will walk you through the steps required to install GNOME GUI on CentOS Stream 9.
Steps to Install GNOME GUI on CentOS Stream 9
Before we begin, please make sure that your CentOS Stream 9 system is up-to-date. You can update your system by running the following command:
sudo dnf update
Once your system is up-to-date, you can proceed with the installation of GNOME GUI. Here are the steps:
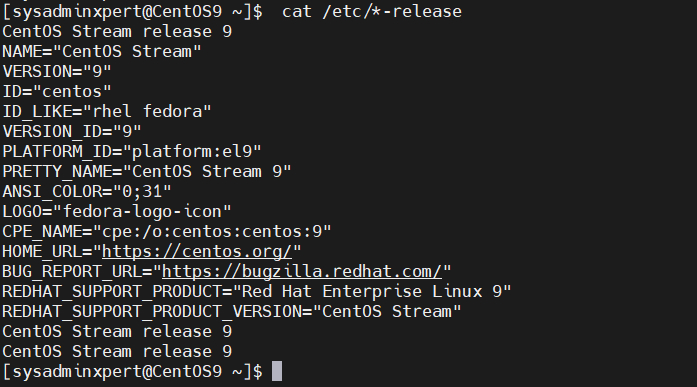
Step 1: Command to check Centos Version
# cat /etc/*-release

Step 2: Install GNOME Desktop
To install GNOME desktop, run the following command:
sudo yum groupinstall "Server with GUI"
This command will download and install all the necessary packages required for GNOME Desktop.
Step 3: Set GNOME Desktop as the Default
To set GNOME Desktop as the default desktop environment, run the following command:
sudo systemctl set-default graphical.target
This command will set the graphical.target as the default target, which means that your system will now boot into GNOME Desktop.
Step 4: Reboot Your System
To apply the changes, reboot your system by running the following command:
sudo reboot
Once your system has rebooted, you should be greeted with the GNOME login screen.
Step 5: Login to GNOME Desktop
Enter your username and password to log in to the GNOME Desktop. You should now have access to the GNOME desktop environment and its various features.
While GNOME Desktop is a great choice for many users, there are also other desktop environments available for CentOS Stream 9, such as KDE, XFCE, and LXDE. These desktop environments may be preferred by users who want a more lightweight or customizable desktop environment.
To install KDE, use this command:
sudo dnf groupinstall "KDE Plasma Workspaces"
To install XFCE, use this command:
sudo dnf groupinstall "Xfce Desktop"
Once installed, you can set either of these desktop environments as the default by running the same command as in Step 3, but with the appropriate target name:
sudo systemctl set-default graphical.target
Where “graphical.target” can be replaced with “kde.target” or “xfce.target” depending on your desktop environment of choice.
Installing a desktop environment can consume valuable system resources and potentially introduce security vulnerabilities. So it is better to use a command-line interface (CLI) for managing the system. However, if you need to install a desktop environment for certain tasks, make sure to take appropriate security measures and keep your system up-to-date with security patches.
Conclusion
In summary, installing a desktop environment like GNOME, KDE, or XFCE on CentOS Stream 9 can provide a more user-friendly experience for those who prefer a graphical interface. In this article, we have shown you how to install GNOME GUI on CentOS Stream 9. The process is straightforward and can be completed in just a few steps. You can easily switch between desktop environments as needed. However, be mindful of potential security risks and performance impacts when installing a desktop environment on a server system.
GNOME Desktop is a popular and user-friendly desktop environment that provides a great experience for users who prefer a graphical interface. We hope that this article has been helpful in guiding you through the installation process.


