In this blog, we’ll explain how to install Git on Rocky Linux 8. Git is a free and open-source distributed version control system that is widely used by developers to manage and track changes in software development projects. It is an essential tool for software development teams that collaborate on projects, as it allows them to work on different versions of code and merge their changes seamlessly. In this blog post, we will guide you through the process of installing Git on Rocky Linux 8.
Rocky Linux is a community-driven, enterprise-grade operating system designed to be a 100% compatible fork of Red Hat Enterprise Linux (RHEL). It is a reliable and stable Linux distribution that is gaining popularity among Linux users and developers. If you are new to Rocky Linux, you can check our guide on how to install Rocky Linux 8 to get started.
Steps to Install Git on Rocky Linux 8
Step 1: Update the System
Before installing Git on Rocky Linux 8, it is essential to update the system to the latest available packages. You can do this by running the following command in the terminal:
sudo dnf update
This command will update all the packages installed on your system to their latest versions.
Step 2: Install Git on Rocky Linux 8
Method 1: Install Git using the DNF package manager
After updating the system, you can install Git on Rocky Linux 8 using the DNF package manager. DNF is the default package manager on Rocky Linux, and it can be used to install, remove, and update packages. To install Git, run the following command in the terminal:
sudo dnf install git
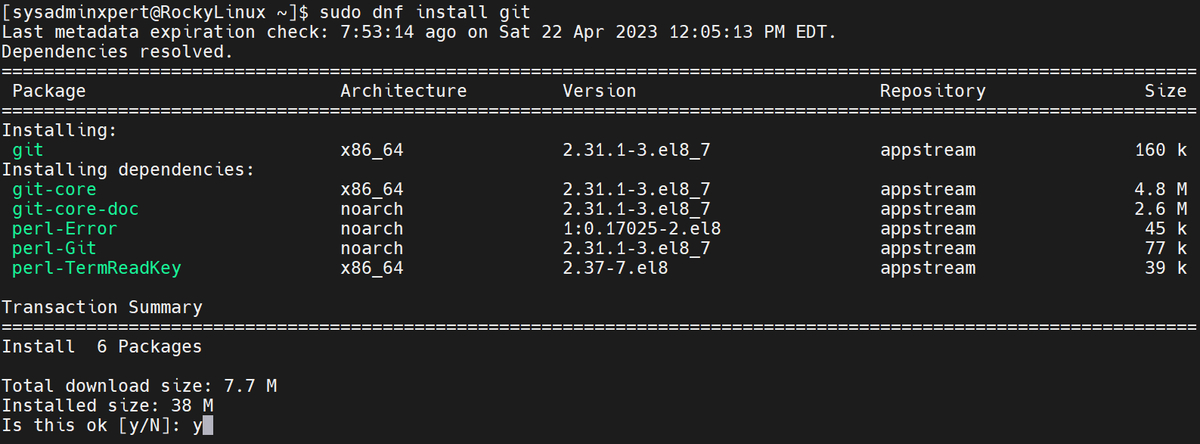
Sample Output:
[sysadminxpert@RockyLinux ~]$ sudo dnf install git
Last metadata expiration check: 7:53:14 ago on Sat 22 Apr 2023 12:05:13 PM EDT.
Dependencies resolved.
=================================================================================================================
Package Architecture Version Repository Size
=================================================================================================================
Installing:
git x86_64 2.31.1-3.el8_7 appstream 160 k
Installing dependencies:
git-core x86_64 2.31.1-3.el8_7 appstream 4.8 M
git-core-doc noarch 2.31.1-3.el8_7 appstream 2.6 M
perl-Error noarch 1:0.17025-2.el8 appstream 45 k
perl-Git noarch 2.31.1-3.el8_7 appstream 77 k
perl-TermReadKey x86_64 2.37-7.el8 appstream 39 k

Transaction Summary
=================================================================================================================
Install 6 Packages

Total download size: 7.7 M
Installed size: 38 M
Is this ok [y/N]: y
Downloading Packages:
(1/6): git-2.31.1-3.el8_7.x86_64.rpm 251 kB/s | 160 kB 00:00
(2/6): perl-Error-0.17025-2.el8.noarch.rpm 431 kB/s | 45 kB 00:00
(3/6): perl-Git-2.31.1-3.el8_7.noarch.rpm 406 kB/s | 77 kB 00:00
(4/6): perl-TermReadKey-2.37-7.el8.x86_64.rpm 205 kB/s | 39 kB 00:00
(5/6): git-core-doc-2.31.1-3.el8_7.noarch.rpm 1.0 MB/s | 2.6 MB 00:02
(6/6): git-core-2.31.1-3.el8_7.x86_64.rpm 1.5 MB/s | 4.8 MB 00:03
-----------------------------------------------------------------------------------------------------------------
Total 1.8 MB/s | 7.7 MB 00:04
Running transaction check
Transaction check succeeded.
Running transaction test
Transaction test succeeded.
Running transaction
Preparing : 1/1
Installing : git-core-2.31.1-3.el8_7.x86_64 1/6
Installing : git-core-doc-2.31.1-3.el8_7.noarch 2/6
Installing : perl-TermReadKey-2.37-7.el8.x86_64 3/6
Installing : perl-Error-1:0.17025-2.el8.noarch 4/6
Installing : perl-Git-2.31.1-3.el8_7.noarch 5/6
Installing : git-2.31.1-3.el8_7.x86_64 6/6
Running scriptlet: git-2.31.1-3.el8_7.x86_64 6/6
Verifying : git-2.31.1-3.el8_7.x86_64 1/6
Verifying : git-core-2.31.1-3.el8_7.x86_64 2/6
Verifying : git-core-doc-2.31.1-3.el8_7.noarch 3/6
Verifying : perl-Error-1:0.17025-2.el8.noarch 4/6
Verifying : perl-Git-2.31.1-3.el8_7.noarch 5/6
Verifying : perl-TermReadKey-2.37-7.el8.x86_64 6/6

Installed:
git-2.31.1-3.el8_7.x86_64 git-core-2.31.1-3.el8_7.x86_64 git-core-doc-2.31.1-3.el8_7.noarch
perl-Error-1:0.17025-2.el8.noarch perl-Git-2.31.1-3.el8_7.noarch perl-TermReadKey-2.37-7.el8.x86_64

Complete!
This command will download and install Git and all its dependencies on your system. Depending on the speed of your internet connection, this process may take some time.
Method 2: Install Git from Source on Rocky Linux
While installing Git from the package manager is the easiest and most convenient method, installing Git from the source can be useful if you want to install a specific version of Git or if you want to customize the installation.
In this blog post, we will guide you through the process of installing Git from source on Rocky Linux 8.
1: Install Dependencies
Before installing Git from the source, you need to install some dependencies. Run the following command to install the necessary dependencies:
sudo dnf install curl-devel expat-devel gettext-devel openssl-devel zlib-devel gcc perl-ExtUtils-MakeMaker
This command will install the required packages to compile and build Git from the source.
2: Download Git Source Code
After installing the dependencies, download the Git source code from the official Git website. Go to the Git website and click on the “Download” button to download the latest version of Git.
Alternatively, you can use the following command to download the source code directly to your terminal:
curl -O https://mirrors.edge.kernel.org/pub/software/scm/git/git-2.31.1.tar.gz
This command will download the Git source code for version 2.31.1. Replace the version number with the version you want to install.
Sample Output:
[sysadminxpert@RockyLinux ~]$ curl -O https://mirrors.edge.kernel.org/pub/software/scm/git/git-2.31.1.tar.gz
% Total % Received % Xferd Average Speed Time Time Time Current
Dload Upload Total Spent Left Speed
100 9890k 100 9890k 0 0 900k 0 0:00:10 0:00:10 --:--:-- 2406k
[sysadminxpert@RockyLinux ~]$
[sysadminxpert@RockyLinux ~]$ ls -l git-2.31.1.tar.gz
-rw-rw-r-- 1 sysadminxpert sysadminxpert 10128216 Apr 22 20:01 git-2.31.1.tar.gz
[sysadminxpert@RockyLinux ~]$
3: Extract the Git Source Code
After downloading the Git source code, extract it using the following command:
tar -zxf git-2.31.1.tar.gz
This command will extract the source code into a new directory named “git-2.31.1”.
4: Build and Install Git
Change to the newly created directory and build Git using the following commands:
cd git-2.31.1

make prefix=/usr/local all

sudo make prefix=/usr/local/ install
The “make prefix=/usr/local/git all” command will build Git, and the “sudo make prefix=/usr/local/git install” command will install it into the /usr/local/git directory.
Step 3: Verify Git Installation
After the installation is complete, you can verify that Git is installed on your system by running the following command:
git --version
This command will display the version of Git installed on your system. If Git is installed correctly, you should see an output similar to the following:
Sample Output:
[sysadminxpert@RockyLinux ~]$ git --version
git version 2.31.1
Step 4: Configure Git
After installing Git on Rocky Linux 8, you need to configure it with your name and email address. This information is used by Git to identify the author of a commit. To configure Git, run the following commands in the terminal:
git config --global user.name "Your Name"

git config --global user.email "youremail@example.com"
Replace “Your Name” with your actual name and “youremail@example.com” with your actual email address. This information will be stored in the Git configuration file located in the home directory (~/.gitconfig).
Step 5: Using Git
Now that Git is installed and configured on your system, you can start using it to manage your software development projects. The following are some basic Git commands that you can use to get started:
- git init: Initializes a new Git repository in the current directory.
- git clone: Clones a remote Git repository to your local machine.
- git add: Adds changes made to files to the staging area.
- git commit: Commits changes made to files to the Git repository.
- git push: Pushes changes made to the Git repository to a remote server.
- git pull: Pulls changes made to a remote Git repository to your local machine.
- git status: Displays the current status of the Git repository.
- git log: Displays the commit history of the Git repository.
Conclusion
In conclusion, Git is an essential tool for software development teams, and installing it on Rocky Linux 8 is a straightforward process. By following the steps outlined in this blog post, you should be able to install Git on your Rocky Linux 8 system and configure it with your name and email address. After installation, you can start using Git to manage your software development projects.
If you are new to Git, we recommend that you learn more about its basic concepts and commands. There are many resources available online that can help you learn Git, including official Git documentation, online tutorials, and books.
We hope that this blog post has been helpful in guiding you through the process of installing Git on Rocky Linux 8. If you have any questions or feedback, feel free to leave a comment below. Thank you for reading!