In this article, we’ll explain how to install Microsoft SQL Server 2022 on Rocky Linux 8 or AlmaLinux 8 is a simple and straightforward process.
Microsoft SQL Server is a relational database management system that is used to store, retrieve, and manage data. It is one of the most popular database management systems used in enterprise environments, and it offers a wide range of features and functionalities to its users. The latest version of Microsoft SQL Server, SQL Server 2022, was released in November 2021, and it offers several new features and improvements over its previous versions.
Rocky Linux 8 and AlmaLinux 8 are two popular Linux distributions that are based on Red Hat Enterprise Linux (RHEL) 8. They are both community-driven distributions that are designed to be 100% compatible with RHEL 8, and they offer long-term support to their users. Both Rocky Linux 8 and AlmaLinux 8 are free and open-source operating systems that can be used for a wide range of purposes, including server deployments, cloud computing, and development environments.
Before we begin with the installation process, there are a few prerequisites that need to be fulfilled. First, you need to ensure that your system meets the minimum hardware requirements for Microsoft SQL Server 2022. Microsoft recommends a minimum of 2GB of RAM and 6GB of free disk space. Additionally, you need to have root access or sudo privileges on your Linux system to install and configure Microsoft SQL Server 2022.
Steps to Install Microsoft SQL Server 2022 on Rocky Linux 8 or AlmaLinux 8
Step 1: Install the Required Dependencies
The first step in the installation process is to install the required dependencies on your Linux system. These dependencies are necessary to run Microsoft SQL Server 2022 on your system. To install the required dependencies, open a terminal window and run the following commands:
For Rocky Linux 8:
sudo dnf install -y curl wget gnupg2 libnuma-devel openssl-devel
For AlmaLinux 8:
sudo dnf install -y curl wget gnupg2 libnuma-devel openssl-devel
Step 2: Import the Microsoft GPG Key
Next, you need to import the Microsoft GPG key to your Linux system. This key is used to verify the integrity of the Microsoft SQL Server 2022 packages that you will download in the next step. To import the Microsoft GPG key, run the following command:
sudo rpm --import https://packages.microsoft.com/keys/microsoft.asc
Step 3: Add the Microsoft SQL Server Repository
After importing the Microsoft GPG key, you need to add the Microsoft SQL Server repository to your Linux system. This repository contains the Microsoft SQL Server 2022 packages that you will install. To add the repository, run the following commands:
For Rocky Linux 8:
sudo curl -o /etc/yum.repos.d/mssql-server.repo https://packages.microsoft.com/config/rhel/8/mssql-server-2022.repo
For AlmaLinux 8:
sudo curl -o /etc/yum.repos.d/mssql-server.repo https://packages.microsoft.com/config/rhel/8/mssql-server-2022.repo
After adding Microsoft SQL Server Repository you can verify with cat command.
$ cat /etc/yum.repos.d/mssql-server.repo
Sample output:
[sysadminxpert@RockyLinux ~]$ cat /etc/yum.repos.d/mssql-server.repo
[packages-microsoft-com-mssql-server-2022]
name=packages-microsoft-com-mssql-server-2022
baseurl=https://packages.microsoft.com/rhel/8/mssql-server-2022/
enabled=1
gpgcheck=1
gpgkey=https://packages.microsoft.com/keys/microsoft.asc
[sysadminxpert@RockyLinux ~]$
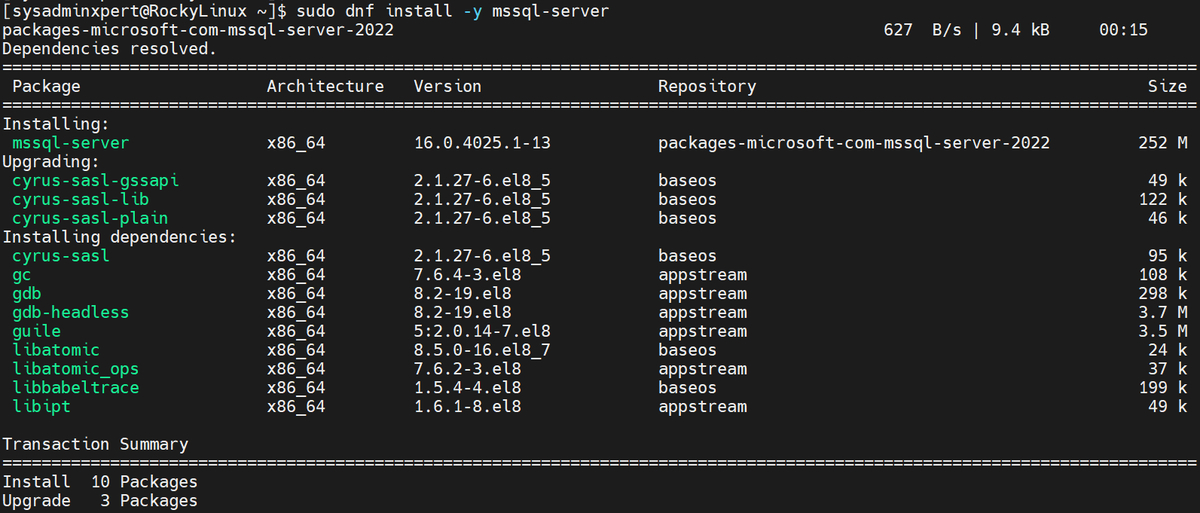
Step 4: Install Microsoft SQL Server 2022
With the repository added, you can now install Microsoft SQL Server 2022 on your Linux system. To install Microsoft SQL Server 2022, run the following command:
sudo dnf install -y mssql-server
Sample Output:
[sysadminxpert@RockyLinux ~]$ sudo dnf install -y mssql-server
packages-microsoft-com-mssql-server-2022 627 B/s | 9.4 kB 00:15
Dependencies resolved.
==========================================================================================================================
Package Architecture Version Repository Size
==========================================================================================================================
Installing:
mssql-server x86_64 16.0.4025.1-13 packages-microsoft-com-mssql-server-2022 252 M
Upgrading:
cyrus-sasl-gssapi x86_64 2.1.27-6.el8_5 baseos 49 k
cyrus-sasl-lib x86_64 2.1.27-6.el8_5 baseos 122 k
cyrus-sasl-plain x86_64 2.1.27-6.el8_5 baseos 46 k
Installing dependencies:
cyrus-sasl x86_64 2.1.27-6.el8_5 baseos 95 k
gc x86_64 7.6.4-3.el8 appstream 108 k
gdb x86_64 8.2-19.el8 appstream 298 k
gdb-headless x86_64 8.2-19.el8 appstream 3.7 M
guile x86_64 5:2.0.14-7.el8 appstream 3.5 M
libatomic x86_64 8.5.0-16.el8_7 baseos 24 k
libatomic_ops x86_64 7.6.2-3.el8 appstream 37 k
libbabeltrace x86_64 1.5.4-4.el8 baseos 199 k
libipt x86_64 1.6.1-8.el8 appstream 49 k

Transaction Summary
==========================================================================================================================
Install 10 Packages
Upgrade 3 Packages

Total download size: 260 M
Downloading Packages:
(1/13): gdb-8.2-19.el8.x86_64.rpm 51 kB/s | 298 kB 00:05
(2/13): gc-7.6.4-3.el8.x86_64.rpm 18 kB/s | 108 kB 00:05
(3/13): libatomic_ops-7.6.2-3.el8.x86_64.rpm 159 kB/s | 37 kB 00:00
(4/13): libipt-1.6.1-8.el8.x86_64.rpm 287 kB/s | 49 kB 00:00
(5/13): gdb-headless-8.2-19.el8.x86_64.rpm 532 kB/s | 3.7 MB 00:07
(6/13): libatomic-8.5.0-16.el8_7.x86_64.rpm 40 kB/s | 24 kB 00:00
(7/13): cyrus-sasl-2.1.27-6.el8_5.x86_64.rpm 63 kB/s | 95 kB 00:01
(8/13): guile-2.0.14-7.el8.x86_64.rpm 1.5 MB/s | 3.5 MB 00:02
(9/13): cyrus-sasl-gssapi-2.1.27-6.el8_5.x86_64.rpm 329 kB/s | 49 kB 00:00
(10/13): libbabeltrace-1.5.4-4.el8.x86_64.rpm 313 kB/s | 199 kB 00:00
(11/13): cyrus-sasl-plain-2.1.27-6.el8_5.x86_64.rpm 369 kB/s | 46 kB 00:00
(12/13): cyrus-sasl-lib-2.1.27-6.el8_5.x86_64.rpm 758 kB/s | 122 kB 00:00
(13/13): mssql-server-16.0.4025.1-13.x86_64.rpm 3.6 MB/s | 252 MB 01:10
--------------------------------------------------------------------------------------------------------------------------
Total 3.0 MB/s | 260 MB 01:26
Running transaction check
Transaction check succeeded.
Running transaction test
Transaction test succeeded.
Running transaction
Preparing : 1/1
Upgrading : cyrus-sasl-lib-2.1.27-6.el8_5.x86_64 1/16
Running scriptlet: cyrus-sasl-lib-2.1.27-6.el8_5.x86_64 1/16
Running scriptlet: cyrus-sasl-2.1.27-6.el8_5.x86_64 2/16
Installing : cyrus-sasl-2.1.27-6.el8_5.x86_64 2/16
Running scriptlet: cyrus-sasl-2.1.27-6.el8_5.x86_64 2/16
Upgrading : cyrus-sasl-gssapi-2.1.27-6.el8_5.x86_64 3/16
Installing : libbabeltrace-1.5.4-4.el8.x86_64 4/16
Running scriptlet: libbabeltrace-1.5.4-4.el8.x86_64 4/16
Installing : libatomic-8.5.0-16.el8_7.x86_64 5/16
Running scriptlet: libatomic-8.5.0-16.el8_7.x86_64 5/16
Installing : libipt-1.6.1-8.el8.x86_64 6/16
Installing : libatomic_ops-7.6.2-3.el8.x86_64 7/16
Installing : gc-7.6.4-3.el8.x86_64 8/16
Installing : guile-5:2.0.14-7.el8.x86_64 9/16
Running scriptlet: guile-5:2.0.14-7.el8.x86_64 9/16
Installing : gdb-headless-8.2-19.el8.x86_64 10/16
Installing : gdb-8.2-19.el8.x86_64 11/16
Running scriptlet: mssql-server-16.0.4025.1-13.x86_64 12/16
Installing : mssql-server-16.0.4025.1-13.x86_64 12/16
Running scriptlet: mssql-server-16.0.4025.1-13.x86_64 12/16

+--------------------------------------------------------------+
Please run 'sudo /opt/mssql/bin/mssql-conf setup'
to complete the setup of Microsoft SQL Server
+--------------------------------------------------------------+

Upgrading : cyrus-sasl-plain-2.1.27-6.el8_5.x86_64 13/16
Cleanup : cyrus-sasl-plain-2.1.27-5.el8.x86_64 14/16
Cleanup : cyrus-sasl-gssapi-2.1.27-5.el8.x86_64 15/16
Cleanup : cyrus-sasl-lib-2.1.27-5.el8.x86_64 16/16
Running scriptlet: cyrus-sasl-lib-2.1.27-5.el8.x86_64 16/16
Running scriptlet: guile-5:2.0.14-7.el8.x86_64 16/16
Running scriptlet: cyrus-sasl-lib-2.1.27-5.el8.x86_64 16/16
Verifying : gc-7.6.4-3.el8.x86_64 1/16
Verifying : gdb-8.2-19.el8.x86_64 2/16
Verifying : gdb-headless-8.2-19.el8.x86_64 3/16
Verifying : guile-5:2.0.14-7.el8.x86_64 4/16
Verifying : libatomic_ops-7.6.2-3.el8.x86_64 5/16
Verifying : libipt-1.6.1-8.el8.x86_64 6/16
Verifying : cyrus-sasl-2.1.27-6.el8_5.x86_64 7/16
Verifying : libatomic-8.5.0-16.el8_7.x86_64 8/16
Verifying : libbabeltrace-1.5.4-4.el8.x86_64 9/16
Verifying : mssql-server-16.0.4025.1-13.x86_64 10/16
Verifying : cyrus-sasl-gssapi-2.1.27-6.el8_5.x86_64 11/16
Verifying : cyrus-sasl-gssapi-2.1.27-5.el8.x86_64 12/16
Verifying : cyrus-sasl-lib-2.1.27-6.el8_5.x86_64 13/16
Verifying : cyrus-sasl-lib-2.1.27-5.el8.x86_64 14/16
Verifying : cyrus-sasl-plain-2.1.27-6.el8_5.x86_64 15/16
Verifying : cyrus-sasl-plain-2.1.27-5.el8.x86_64 16/16

Upgraded:
cyrus-sasl-gssapi-2.1.27-6.el8_5.x86_64 cyrus-sasl-lib-2.1.27-6.el8_5.x86_64 cyrus-sasl-plain-2.1.27-6.el8_5.x86_64
Installed:
cyrus-sasl-2.1.27-6.el8_5.x86_64 gc-7.6.4-3.el8.x86_64 gdb-8.2-19.el8.x86_64
gdb-headless-8.2-19.el8.x86_64 guile-5:2.0.14-7.el8.x86_64 libatomic-8.5.0-16.el8_7.x86_64
libatomic_ops-7.6.2-3.el8.x86_64 libbabeltrace-1.5.4-4.el8.x86_64 libipt-1.6.1-8.el8.x86_64
mssql-server-16.0.4025.1-13.x86_64

Complete!
[sysadminxpert@RockyLinux ~]$
This command will download and install the Microsoft SQL Server 2022 packages on your Linux system.
Step 5: Configure Microsoft SQL Server 2022
After installing Microsoft SQL Server 2022, you need to configure it to suit your needs. The configuration process involves setting up the initial system settings, creating a system administrator account, and starting the SQL Server service.
To begin the configuration process, run the following command:
sudo /opt/mssql/bin/mssql-conf setup
Or
mssql-conf setup
This command will start the Microsoft SQL Server configuration tool, which will guide you through the configuration process. Follow the prompts to set up the initial system settings, create a system administrator account, and start the SQL Server service.
In this blog, I have selected the Express (free) SQL server edition. Select as per your requirement.
[sysadminxpert@RockyLinux ~]$ sudo /opt/mssql/bin/mssql-conf setup
Choose an edition of SQL Server:
1) Evaluation (free, no production use rights, 180-day limit)
2) Developer (free, no production use rights)
3) Express (free)
4) Web (PAID)
5) Standard (PAID)
6) Enterprise (PAID) - CPU core utilization restricted to 20 physical/40 hyperthreaded
7) Enterprise Core (PAID) - CPU core utilization up to Operating System Maximum
8) I bought a license through a retail sales channel and have a product key to enter.
9) Standard (Billed through Azure) - Use pay-as-you-go billing through Azure.
10) Enterprise Core (Billed through Azure) - Use pay-as-you-go billing through Azure.

Details about editions can be found at
https://go.microsoft.com/fwlink/?LinkId=2109348&clcid=0x409

Use of PAID editions of this software requires separate licensing through a
Microsoft Volume Licensing program.
By choosing a PAID edition, you are verifying that you have the appropriate
number of licenses in place to install and run this software.
By choosing an edition billed Pay-As-You-Go through Azure, you are verifying
that the server and SQL Server will be connected to Azure by installing the
management agent and Azure extension for SQL Server.

Enter your edition(1-10): 3
Accept the License term:
The license terms for this product can be found in
/usr/share/doc/mssql-server or downloaded from:
https://go.microsoft.com/fwlink/?LinkId=2104294&clcid=0x409

The privacy statement can be viewed at:
https://go.microsoft.com/fwlink/?LinkId=853010&clcid=0x409

Do you accept the license terms? [Yes/No]:Yes
Configure a strong password for SQL Server.
Enter the SQL Server system administrator password:
Confirm the SQL Server system administrator password:
Configuring SQL Server...
Once the configuration is successfully done then you will get the below output.
The licensing PID was successfully processed. The new edition is [Express Edition].
ForceFlush is enabled for this instance.
ForceFlush feature is enabled for log durability.
Created symlink /etc/systemd/system/multi-user.target.wants/mssql-server.service → /usr/lib/systemd/system/mssql-server.service.
Setup has completed successfully. SQL Server is now starting.
Configure Firewall to allow remote SQL Server Connections:
If you want to allow remote SQL server connections then follow the below command.
sudo firewall-cmd --zone=public --add-port=1433/tcp --permanent

sudo firewall-cmd --reload
Step 6: Verify the Installation
Once the configuration process is complete, you can verify the installation by connecting to the Microsoft SQL Server instance from a remote machine using SQL Server Management Studio (SSMS) or the sqlcmd utility.
Connect to the Microsoft SQL Server instance using SSMS:
follow these steps:
- Download and install SSMS on a remote machine.
- Open SSMS and click on the Connect button.
- In the Connect to Server dialog box, enter the IP address or hostname of the Linux system where Microsoft SQL Server is installed.
- Select SQL Server Authentication as the authentication method and enter the system administrator account credentials that you created during the configuration process.
- Click on the Connect button to connect to the Microsoft SQL Server instance.
Connect to the Microsoft SQL Server instance using sqlcmd command line:
Install SQL server command-line tools:
To connect to the Microsoft SQL Server instance using the sqlcmd utility, follow these steps:
1. Open a terminal window on a remote machine.
2. Install the sqlcmd utility by running the following command:
sudo curl -o /etc/yum.repos.d/msprod.repo https://packages.microsoft.com/config/rhel/8/prod.repo

sudo dnf install -y mssql-tools unixODBC-devel
Sample Output:
[sysadminxpert@RockyLinux ~]$ sudo dnf install -y mssql-tools unixODBC-devel
packages-microsoft-com-prod 476 kB/s | 6.4 MB 00:13
Last metadata expiration check: 0:00:03 ago on Sat 22 Apr 2023 07:22:32 AM EDT.
Dependencies resolved.
==========================================================================================================================
Package Architecture Version Repository Size
==========================================================================================================================
Installing:
mssql-tools x86_64 17.10.1.1-1 packages-microsoft-com-prod 291 k
unixODBC-devel x86_64 2.3.11-1.rh packages-microsoft-com-prod 53 k
Installing dependencies:
msodbcsql17 x86_64 17.10.2.1-1 packages-microsoft-com-prod 908 k
unixODBC x86_64 2.3.11-1.rh packages-microsoft-com-prod 274 k

Transaction Summary
==========================================================================================================================
Install 4 Packages

Total download size: 1.5 M
Installed size: 3.8 M
Downloading Packages:
(1/4): msodbcsql17-17.10.2.1-1.x86_64.rpm 136 kB/s | 908 kB 00:06
(2/4): mssql-tools-17.10.1.1-1.x86_64.rpm 35 kB/s | 291 kB 00:08
(3/4): unixODBC-2.3.11-1.rh.x86_64.rpm 32 kB/s | 274 kB 00:08
(4/4): unixODBC-devel-2.3.11-1.rh.x86_64.rpm 26 kB/s | 53 kB 00:02
--------------------------------------------------------------------------------------------------------------------------
Total 175 kB/s | 1.5 MB 00:08
Running transaction check
Transaction check succeeded.
Running transaction test
Transaction test succeeded.
Running transaction
Preparing : 1/1
Installing : unixODBC-2.3.11-1.rh.x86_64 1/4
Running scriptlet: unixODBC-2.3.11-1.rh.x86_64 1/4
Running scriptlet: msodbcsql17-17.10.2.1-1.x86_64 2/4
The license terms for this product can be downloaded from
https://aka.ms/odbc17eula and found in
/usr/share/doc/msodbcsql17/LICENSE.txt . By entering 'YES',
you indicate that you accept the license terms.

Do you accept the license terms? (Enter YES or NO)
YES
Installing : msodbcsql17-17.10.2.1-1.x86_64 2/4
Running scriptlet: msodbcsql17-17.10.2.1-1.x86_64 2/4
odbcinst: Driver installed. Usage count increased to 1.
Target directory is /etc

Running scriptlet: mssql-tools-17.10.1.1-1.x86_64 3/4
The license terms for this product can be downloaded from
http://go.microsoft.com/fwlink/?LinkId=746949 and found in
/usr/share/doc/mssql-tools/LICENSE.txt . By entering 'YES',
you indicate that you accept the license terms.

Do you accept the license terms? (Enter YES or NO)
YES
Installing : mssql-tools-17.10.1.1-1.x86_64 3/4
Installing : unixODBC-devel-2.3.11-1.rh.x86_64 4/4
Running scriptlet: msodbcsql17-17.10.2.1-1.x86_64 4/4
Running scriptlet: unixODBC-devel-2.3.11-1.rh.x86_64 4/4
Verifying : msodbcsql17-17.10.2.1-1.x86_64 1/4
Verifying : mssql-tools-17.10.1.1-1.x86_64 2/4
Verifying : unixODBC-2.3.11-1.rh.x86_64 3/4
Verifying : unixODBC-devel-2.3.11-1.rh.x86_64 4/4

Installed:
msodbcsql17-17.10.2.1-1.x86_64 mssql-tools-17.10.1.1-1.x86_64 unixODBC-2.3.11-1.rh.x86_64
unixODBC-devel-2.3.11-1.rh.x86_64

Complete!
[sysadminxpert@RockyLinux ~]$
Next, we add /opt/mssql-tools/bin/ to our PATH environment variable
echo 'export PATH="$PATH:/opt/mssql-tools/bin"' >> ~/.bashrc

source ~/.bashrc
3. Connect to the Microsoft SQL Server instance by running the following command:
Parameters which is used while connecting to the SQL server is as follows:
-S: Specify SQL Server name
-U: Specify a username
-P: Providing user password
sqlcmd -S <ip-address-or-hostname> -U <system-administrator-account> -P <system-administrator-account-password>
Replace <ip-address-or-hostname>, <system-administrator-account>, and <system-administrator-account-password> with the appropriate values.
If the connection is successful, you should see a prompt that looks like this:
1>

Congratulations, you have successfully installed and configured Microsoft SQL Server 2022 on Rocky Linux 8 or AlmaLinux 8!
Conclusion
In this guide, we have provided step-by-step instructions on how to install Microsoft SQL Server 2022 on Rocky Linux 8 or AlmaLinux 8. We have also covered the prerequisites, dependencies, and configuration steps required to get Microsoft SQL Server up and running on your Linux system. With these instructions, you should be able to install and configure Microsoft SQL Server 2022 on your Linux system with ease.
See also:
How to Install PostgreSQL on Rocky Linux and AlmaLinux
How To Install PostgreSQL 12 on Ubuntu 20.04/18.04/16.04
Monitor MySQL or MariaDB Databases using Netdata on CentOS 7 or RHEL 7
How to Install PostgreSQL 12 on Fedora 33
How To Install PostgreSQL 12 on CentOS 7 or RHEL 7
Steps to Install MySQL8 on CentOS