In this blog, We’ll explain how to Install InfluxDB and Telegraf on Rocky Linux 8 or AlmaLinux 8. InfluxDB and Telegraf are two powerful tools for collecting, storing, and analyzing time-series data. They are widely used in monitoring and analytics applications and are an essential part of the modern IT infrastructure. In this guide, we will show you how to install and configure InfluxDB and Telegraf on Rocky Linux 8 or AlmaLinux 8.
Steps to Install InfluxDB and Telegraf on Rocky Linux 8 or AlmaLinux 8
Step 1: Update the system
Before installing InfluxDB and Telegraf, it’s a good practice to update the system and ensure that all packages are up to date. To do this, run the following command:
sudo dnf update
This command will update all packages on your system, including the kernel, applications, and libraries.
Step 2: Install InfluxDB
InfluxDB is a high-performance, distributed, and scalable time-series database that can store and query large amounts of data. To install InfluxDB on Rocky Linux 8 or AlmaLinux 8, follow these steps:
1. Add the InfluxDB repository to your system by running the following command:
cat <<EOF | sudo tee /etc/yum.repos.d/influxdata.repo
[influxdata]
name = InfluxData Repository - Stable
baseurl = https://repos.influxdata.com/stable/\$basearch/main
enabled = 1
gpgcheck = 1
gpgkey = https://repos.influxdata.com/influxdata-archive_compat.key
EOF
Sample output:
[sysadminxpert@RockyLinux ~]$ cat <<EOF | sudo tee /etc/yum.repos.d/influxdata.repo
> [influxdata]
> name = InfluxData Repository - Stable
> baseurl = https://repos.influxdata.com/stable/\$basearch/main
> enabled = 1
> gpgcheck = 1
> gpgkey = https://repos.influxdata.com/influxdata-archive_compat.key
> EOF
[influxdata]
name = InfluxData Repository - Stable
baseurl = https://repos.influxdata.com/stable/$basearch/main
enabled = 1
gpgcheck = 1
gpgkey = https://repos.influxdata.com/influxdata-archive_compat.key
[sysadminxpert@RockyLinux ~]$
2. Verify Repo file
$ cat /etc/yum.repos.d/influxdata.repo
Sample Output:
[sysadminxpert@RockyLinux ~]$ cat /etc/yum.repos.d/influxdata.repo
[influxdata]
name = InfluxData Repository - Stable
baseurl = https://repos.influxdata.com/stable/$basearch/main
enabled = 1
gpgcheck = 1
gpgkey = https://repos.influxdata.com/influxdata-archive_compat.key
[sysadminxpert@RockyLinux ~]$
3. Install InfluxDB on Rocky Linux or AlmaLinux
sudo dnf install influxdb2 influxdb2-cli
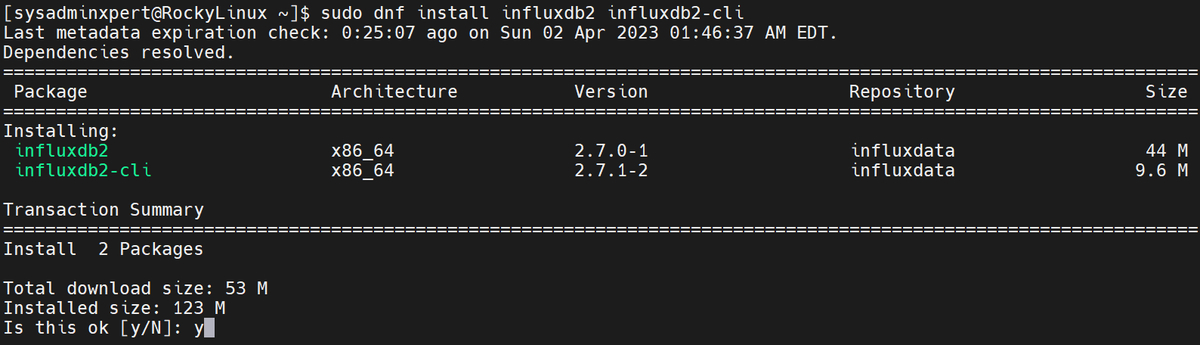
[sysadminxpert@RockyLinux ~]$ sudo dnf install influxdb2 influxdb2-cli
Last metadata expiration check: 0:25:07 ago on Sun 02 Apr 2023 01:46:37 AM EDT.
Dependencies resolved.
=================================================================================================================
Package Architecture Version Repository Size
=================================================================================================================
Installing:
influxdb2 x86_64 2.7.0-1 influxdata 44 M
influxdb2-cli x86_64 2.7.1-2 influxdata 9.6 M

Transaction Summary
=================================================================================================================
Install 2 Packages

Total download size: 53 M
Installed size: 123 M
Is this ok [y/N]: y
Downloading Packages:
(1/2): influxdb2-client-2.7.1-2.x86_64.rpm 260 kB/s | 9.6 MB 00:37
(2/2): influxdb2-2.7.0.x86_64.rpm 120 kB/s | 44 MB 06:11
-----------------------------------------------------------------------------------------------------------------
Total 147 kB/s | 53 MB 06:11
Running transaction check
Transaction check succeeded.
Running transaction test
Transaction test succeeded.
Running transaction
Preparing : 1/1
Installing : influxdb2-cli-2.7.1-2.x86_64 1/2
Running scriptlet: influxdb2-2.7.0-1.x86_64 2/2
Installing : influxdb2-2.7.0-1.x86_64 2/2
Running scriptlet: influxdb2-2.7.0-1.x86_64 2/2
Created symlink /etc/systemd/system/influxd.service → /usr/lib/systemd/system/influxdb.service.
Created symlink /etc/systemd/system/multi-user.target.wants/influxdb.service → /usr/lib/systemd/system/influxdb.service.
Config file /etc/influxdb/config.toml already exists, writing defaults to /etc/influxdb/config.toml.defaults

Verifying : influxdb2-2.7.0-1.x86_64 1/2
Verifying : influxdb2-cli-2.7.1-2.x86_64 2/2

Installed:
influxdb2-2.7.0-1.x86_64 influxdb2-cli-2.7.1-2.x86_64

Complete!
[sysadminxpert@RockyLinux ~]$
4. Start InfluxDB and enable the service to start on boot
Once the installation is complete, start the InfluxDB service and enable it to start automatically at boot time using the following commands:
sudo systemctl start influxdb

sudo systemctl enable influxdb
5. Verify that InfluxDB status
sudo systemctl status influxdb
If InfluxDB is running, you should see a message indicating that the service is active and running.
Sample output:
[sysadminxpert@RockyLinux ~]$ sudo systemctl status influxdb
● influxdb.service - InfluxDB is an open-source, distributed, time series database
Loaded: loaded (/usr/lib/systemd/system/influxdb.service; enabled; vendor preset: disabled)
Active: active (running) since Sun 2023-04-02 01:50:07 EDT; 8s ago
Docs: https://docs.influxdata.com/influxdb/
Main PID: 6034 (influxd)
Tasks: 8 (limit: 23669)
Memory: 49.5M
CGroup: /system.slice/influxdb.service
└─6034 /usr/bin/influxd

Apr 02 01:50:07 RockyLinux influxd-systemd-start.sh[6034]: ts=2023-04-02T05:50:07.084146Z lvl=info msg="Open sto>
Apr 02 01:50:07 RockyLinux influxd-systemd-start.sh[6034]: ts=2023-04-02T05:50:07.084383Z lvl=info msg="Open sto>
Apr 02 01:50:07 RockyLinux influxd-systemd-start.sh[6034]: ts=2023-04-02T05:50:07.084455Z lvl=info msg="Starting>
Apr 02 01:50:07 RockyLinux influxd-systemd-start.sh[6034]: ts=2023-04-02T05:50:07.084555Z lvl=info msg="Starting>
Apr 02 01:50:07 RockyLinux influxd-systemd-start.sh[6034]: ts=2023-04-02T05:50:07.091765Z lvl=info msg="Starting>
Apr 02 01:50:07 RockyLinux influxd-systemd-start.sh[6034]: ts=2023-04-02T05:50:07.115926Z lvl=info msg="Configur>
Apr 02 01:50:07 RockyLinux influxd-systemd-start.sh[6034]: ts=2023-04-02T05:50:07.169304Z lvl=info msg=Starting >
Apr 02 01:50:07 RockyLinux influxd-systemd-start.sh[6034]: ts=2023-04-02T05:50:07.172879Z lvl=info msg=Listening>
Apr 02 01:50:07 RockyLinux influxd-systemd-start.sh[6033]: InfluxDB started
Apr 02 01:50:07 RockyLinux systemd[1]: Started InfluxDB is an open-source, distributed, time series database.
lines 1-20/20 (END)
Step 3: Configure Firewall
Check the port on which influxdb service is running
$ sudo ss -plunt|grep influxd
Sample Output:
[sysadminxpert@RockyLinux ~]$ sudo ss -plunt|grep influxd
tcp LISTEN 0 128 *:8086 *:* users:(("influxd",pid=6034,fd=9))
Allow the InfluxDB port through the firewall
sudo firewall-cmd --add-port=8086/tcp --permanent

sudo firewall-cmd --reload
Step 4: Configure InfluxDB2 on Rocky Linux
Follow the below command to start the configuration:
sudo influx setup -t setup_influxdb_token

Sample Output:
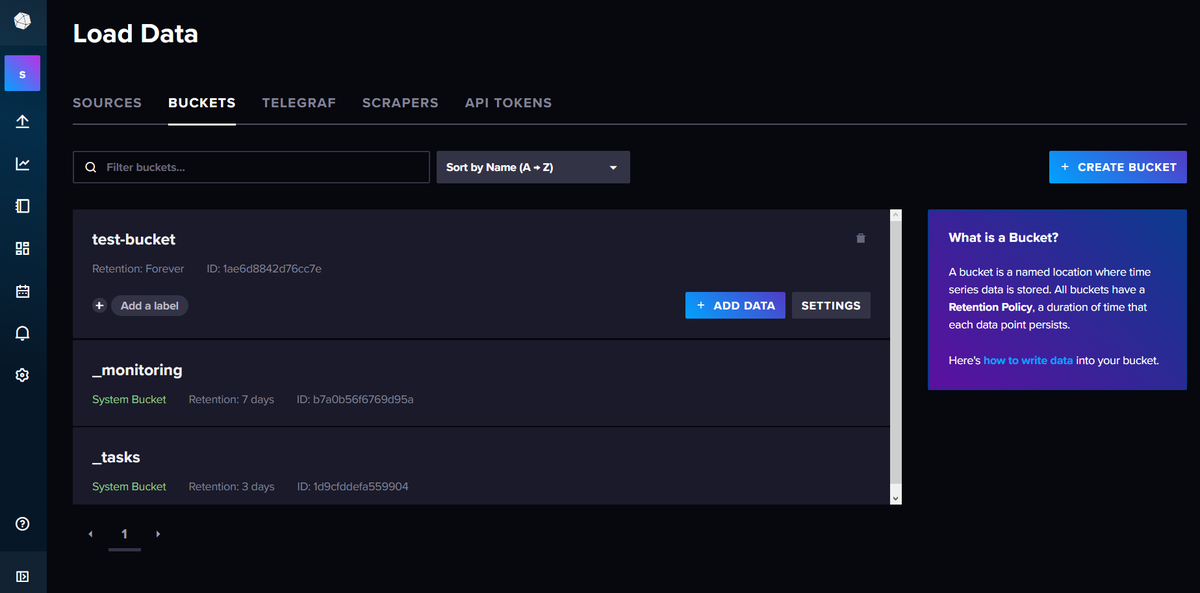
[sysadminxpert@RockyLinux ~]$ sudo influx setup -t setup_influxdb_token
> Welcome to InfluxDB 2.0!
? Please type your primary username sysadmin
? Please type your password ********
? Please type your password again ********
? Please type your primary organization name sysadminxpert-org
? Please type your primary bucket name test-bucket
? Please type your retention period in hours, or 0 for infinite 0
? Setup with these parameters?
Username: sysadmin
Organization: sysadminxpert-org
Bucket: test-bucket
Retention Period: infinite
Yes
User Organization Bucket
sysadmin sysadminxpert-org test-bucket
[sysadminxpert@RockyLinux ~]$
View token/authentications on the influxdb
$ sudo influx auth list
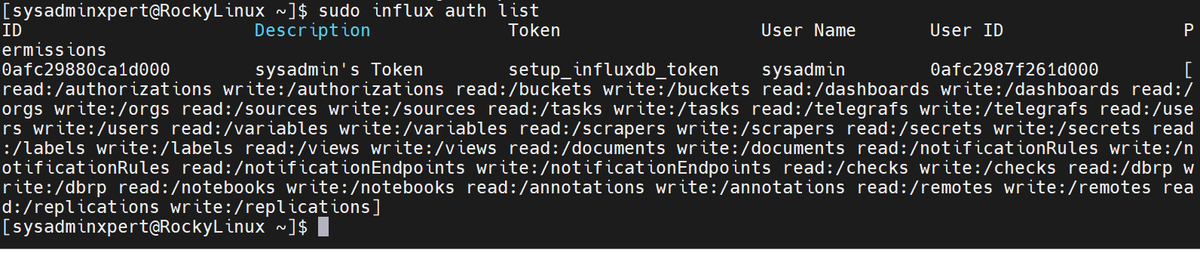
Sample output:
[sysadminxpert@RockyLinux ~]$ sudo influx auth list
ID Description Token User Name User ID Permissions
0afc29880ca1d000 sysadmin's Token setup_influxdb_token sysadmin 0afc2987f261d000 [read:/authorizations write:/authorizations read:/buckets write:/buckets read:/dashboards write:/dashboards read:/orgs write:/orgs read:/sources write:/sources read:/tasks write:/tasks read:/telegrafs write:/telegrafs read:/users write:/users read:/variables write:/variables read:/scrapers write:/scrapers read:/secrets write:/secrets read:/labels write:/labels read:/views write:/views read:/documents write:/documents read:/notificationRules write:/notificationRules read:/notificationEndpoints write:/notificationEndpoints read:/checks write:/checks read:/dbrp write:/dbrp read:/notebooks write:/notebooks read:/annotations write:/annotations read:/remotes write:/remotes read:/replications write:/replications]
[sysadminxpert@RockyLinux ~]$
Verify list of users
$ sudo influx user list
[sysadminxpert@RockyLinux ~]$ sudo influx user list
ID Name
0afc2987f261d000 sysadmin
Access CLI
$ influx v1 shell --token setup_influxdb_token
Sample Output:
[sysadminxpert@RockyLinux ~]$ influx v1 shell --token setup_influxdb_token
InfluxQL Shell dev
Connected to InfluxDB OSS v2.7.0
>
Details of databases or buckets on the influxdb server
Show databases

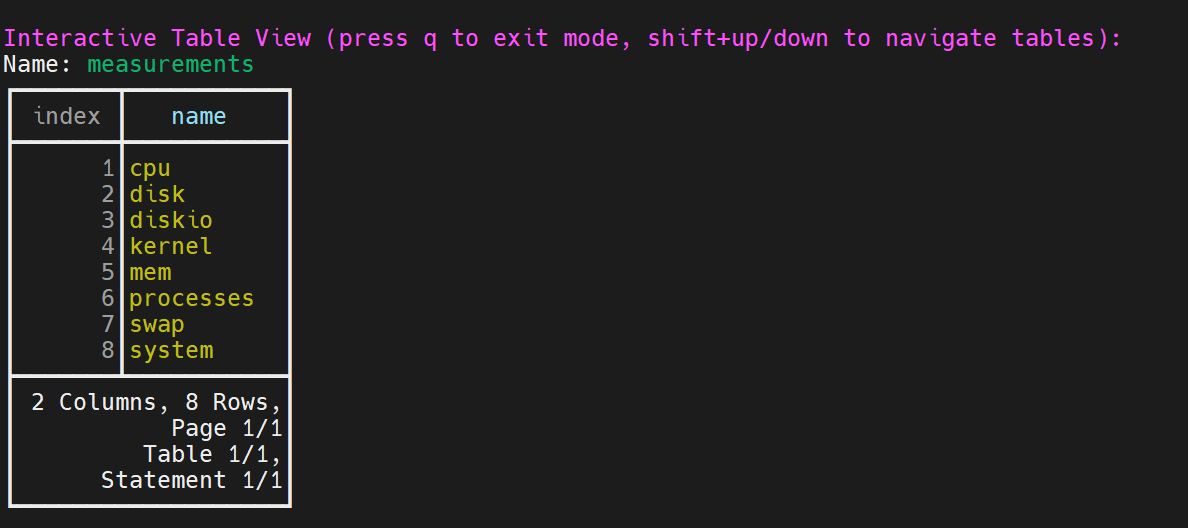
- Press “q” to exit mode, shift+up/down to navigate tables
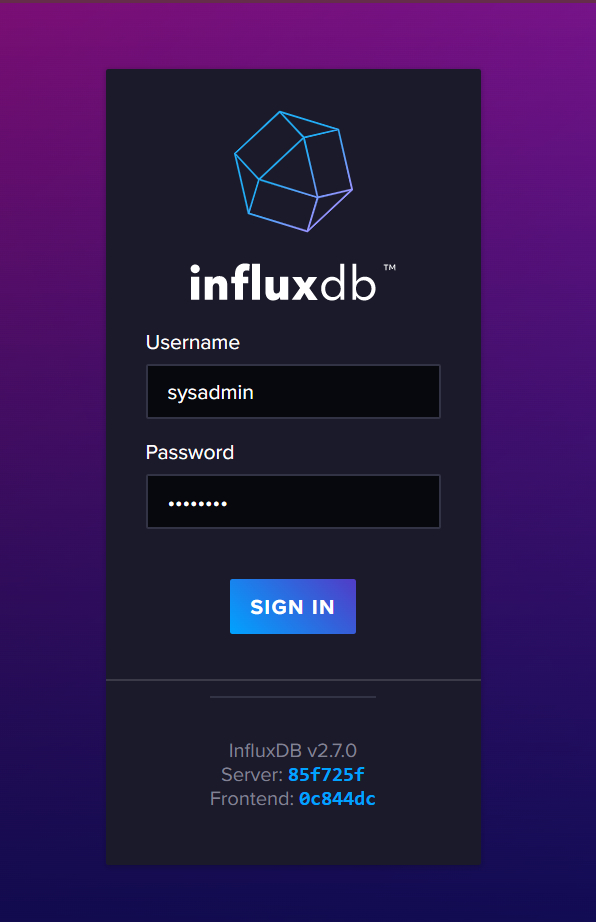
Access Influxdb on the web browser
Goto: http://IP_Address:8086
Login with the same username which is created during influxdb setup
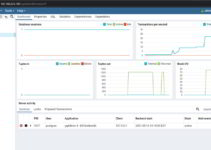
Influxdb web-based administration dashboard
View buckets
Step 5: Install and configure Telegraf on Rocky Linux 9 or AlmaLinux 9
Telegraf is a plugin-driven server agent that can collect, process, and forward metrics and event data. It can collect data from a wide range of sources, including system metrics, log files, and databases. To install Telegraf on Rocky Linux 8 or AlmaLinux 8, follow these steps:
Install Telegraf using the following command
sudo dnf install telegraf
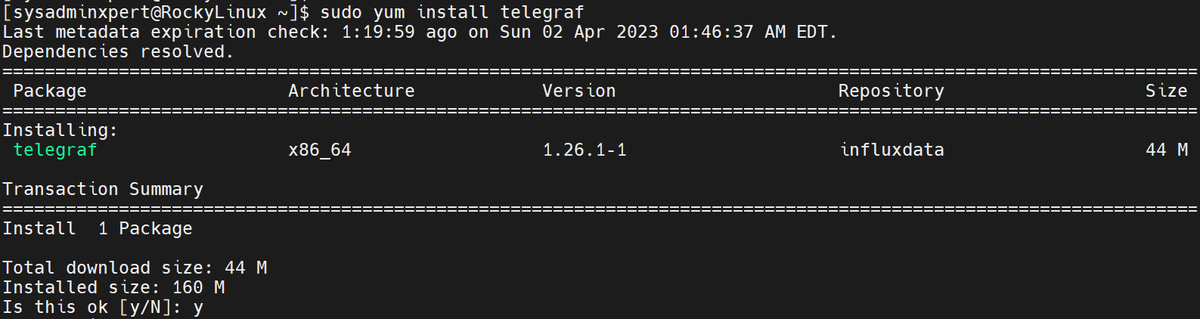
Sample Output:
[sysadminxpert@RockyLinux ~]$ sudo yum install telegraf
Last metadata expiration check: 1:19:59 ago on Sun 02 Apr 2023 01:46:37 AM EDT.
Dependencies resolved.
=================================================================================================================
Package Architecture Version Repository Size
=================================================================================================================
Installing:
telegraf x86_64 1.26.1-1 influxdata 44 M

Transaction Summary
=================================================================================================================
Install 1 Package

Total download size: 44 M
Installed size: 160 M
Is this ok [y/N]: y
Downloading Packages:
telegraf-1.26.1-1.x86_64.rpm 2.5 MB/s | 44 MB 00:17
-----------------------------------------------------------------------------------------------------------------
Total 2.5 MB/s | 44 MB 00:17
Running transaction check
Transaction check succeeded.
Running transaction test
Transaction test succeeded.
Running transaction
Preparing : 1/1
Running scriptlet: telegraf-1.26.1-1.x86_64 1/1
Installing : telegraf-1.26.1-1.x86_64 1/1
Running scriptlet: telegraf-1.26.1-1.x86_64 1/1
Created symlink /etc/systemd/system/multi-user.target.wants/telegraf.service → /usr/lib/systemd/system/telegraf.service.

Verifying : telegraf-1.26.1-1.x86_64 1/1

Installed:
telegraf-1.26.1-1.x86_64

Complete!
[sysadminxpert@RockyLinux ~]$
Step 6: Configure Telegraf
After installing Telegraf, you need to configure it to collect and send data to InfluxDB. To do this, follow these steps:
1. Open the Telegraf configuration file using your favorite editor. For example, to use nano, run the following command:
sudo vim /etc/telegraf/telegraf.conf
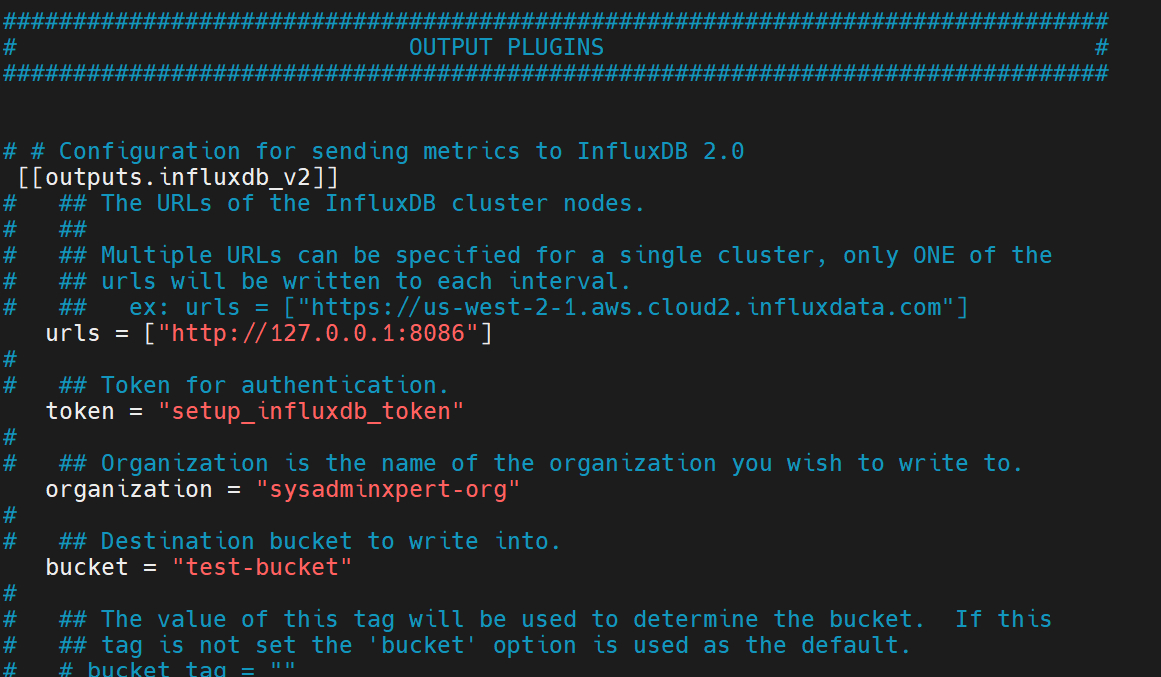
2. Find the [[outputs.influxdb_v2]] section and uncomment it by removing the # symbol at the beginning of each line. Then, replace the placeholder values with your InfluxDB configuration details. For example, to send data to InfluxDB running on the same system, use the following configuration:
[[outputs.influxdb_v2]]
urls = ["http://localhost:8086"]
token = "token_influxdb"
username = "your_influxdb_username"
password = "your_influxdb_password"
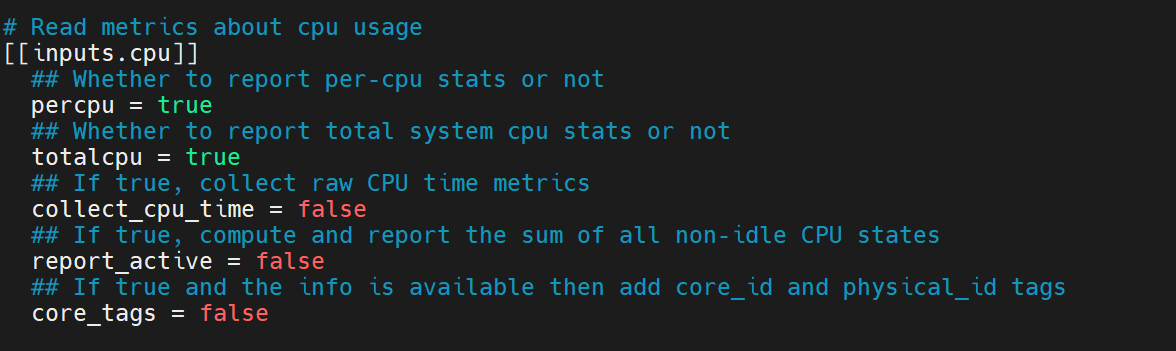
3. Find the [inputs] section and uncomment the plugins that you want to use to collect data. For example, to collect system metrics, uncomment the [[inputs.cpu]] and [[inputs.mem]] sections:
[[inputs.cpu]]
percpu = true
totalcpu = true
collect_cpu_time = false
report_active = false

[[inputs.mem]]
4. Save the changes and exit the editor.
Step 7: Start and verify Telegraf
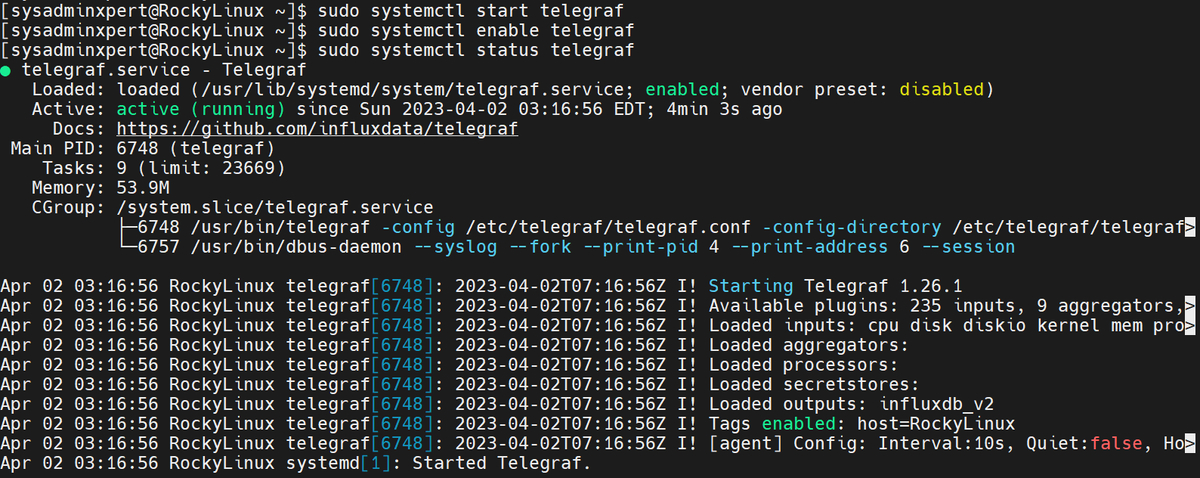
After configuring Telegraf, start the Telegraf service and enable it to start automatically at boot time using the following commands:
sudo systemctl start telegraf

sudo systemctl enable telegraf
To verify that Telegraf is running and sending data to InfluxDB, use the following command:
sudo systemctl status telegraf
Sample Output:
[sysadminxpert@RockyLinux ~]$ sudo systemctl start telegraf
[sysadminxpert@RockyLinux ~]$ sudo systemctl enable telegraf
[sysadminxpert@RockyLinux ~]$ sudo systemctl status telegraf
● telegraf.service - Telegraf
Loaded: loaded (/usr/lib/systemd/system/telegraf.service; enabled; vendor preset: disabled)
Active: active (running) since Sun 2023-04-02 03:16:56 EDT; 4min 3s ago
Docs: https://github.com/influxdata/telegraf
Main PID: 6748 (telegraf)
Tasks: 9 (limit: 23669)
Memory: 53.9M
CGroup: /system.slice/telegraf.service
├─6748 /usr/bin/telegraf -config /etc/telegraf/telegraf.conf -config-directory /etc/telegraf/telegraf>
└─6757 /usr/bin/dbus-daemon --syslog --fork --print-pid 4 --print-address 6 --session

Apr 02 03:16:56 RockyLinux telegraf[6748]: 2023-04-02T07:16:56Z I! Starting Telegraf 1.26.1
Apr 02 03:16:56 RockyLinux telegraf[6748]: 2023-04-02T07:16:56Z I! Available plugins: 235 inputs, 9 aggregators,>
Apr 02 03:16:56 RockyLinux telegraf[6748]: 2023-04-02T07:16:56Z I! Loaded inputs: cpu disk diskio kernel mem pro>
Apr 02 03:16:56 RockyLinux telegraf[6748]: 2023-04-02T07:16:56Z I! Loaded aggregators:
Apr 02 03:16:56 RockyLinux telegraf[6748]: 2023-04-02T07:16:56Z I! Loaded processors:
Apr 02 03:16:56 RockyLinux telegraf[6748]: 2023-04-02T07:16:56Z I! Loaded secretstores:
Apr 02 03:16:56 RockyLinux telegraf[6748]: 2023-04-02T07:16:56Z I! Loaded outputs: influxdb_v2
Apr 02 03:16:56 RockyLinux telegraf[6748]: 2023-04-02T07:16:56Z I! Tags enabled: host=RockyLinux
Apr 02 03:16:56 RockyLinux telegraf[6748]: 2023-04-02T07:16:56Z I! [agent] Config: Interval:10s, Quiet:false, Ho>
Apr 02 03:16:56 RockyLinux systemd[1]: Started Telegraf.
If Telegraf is running and sending data to InfluxDB, you should see a message indicating that the service is active and running.
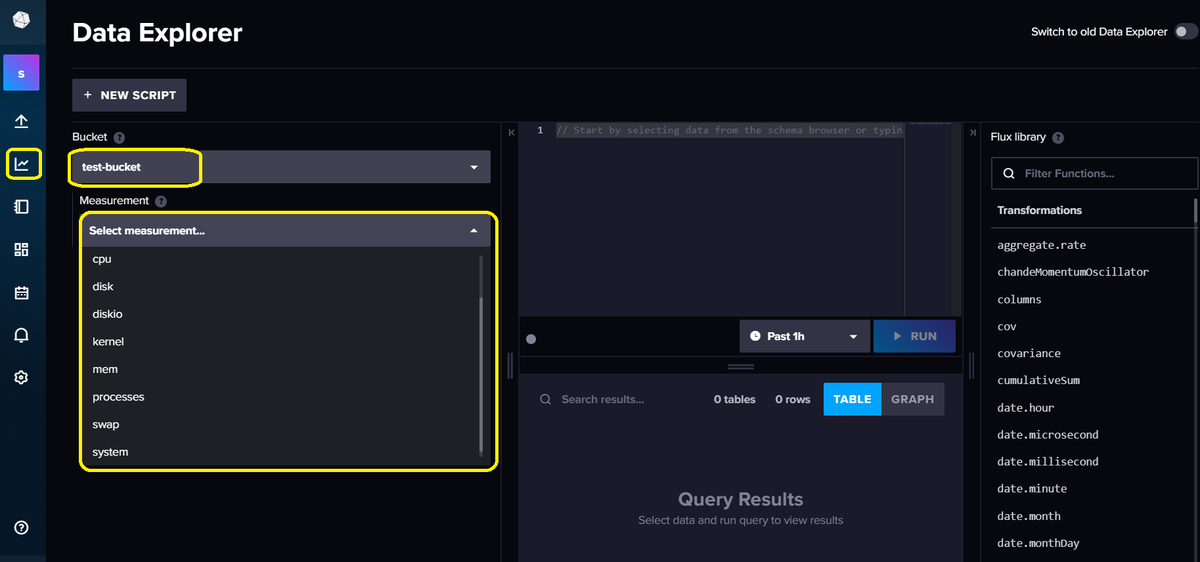
Verify InfluxDB bucket and measurements
- you will see measurements are added.
Another way to confirm measurements
- connect to the influxdb shell via the ‘influx’ command below.
sudo influx v1 shell

use test-bucket

SHOW MEASUREMENTS
Sample Output:
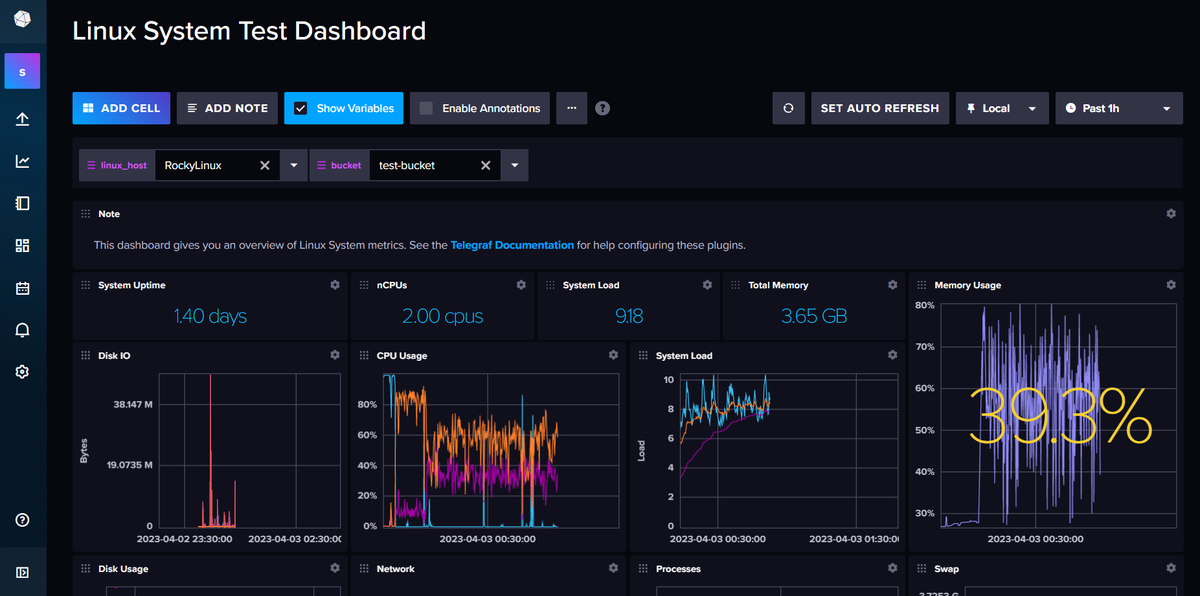
Step 8: Create a Sample Dashboard
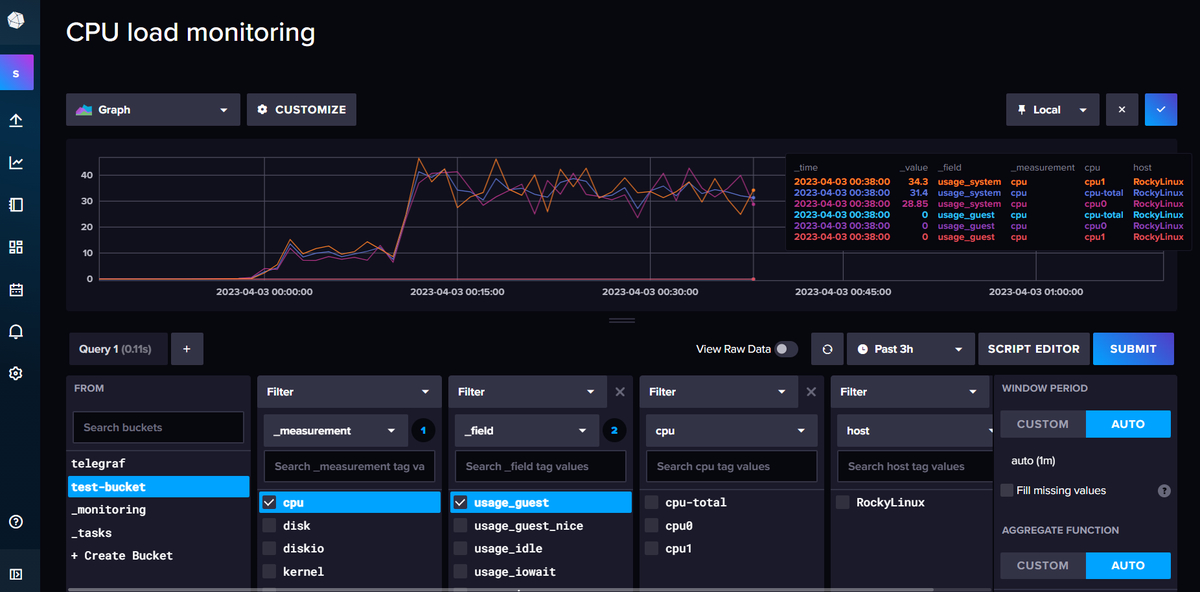
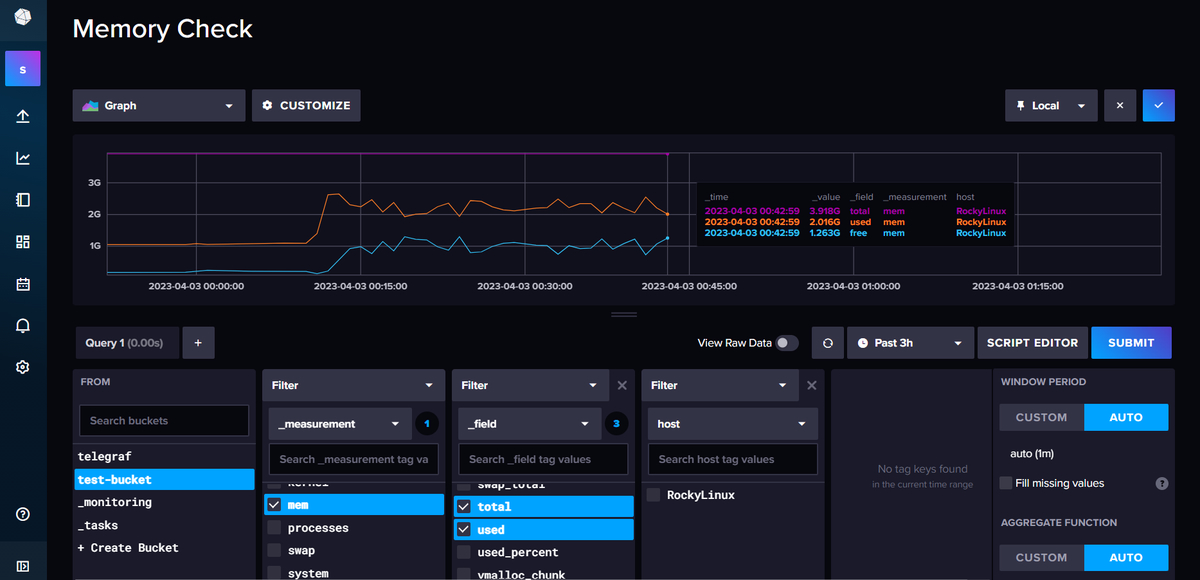
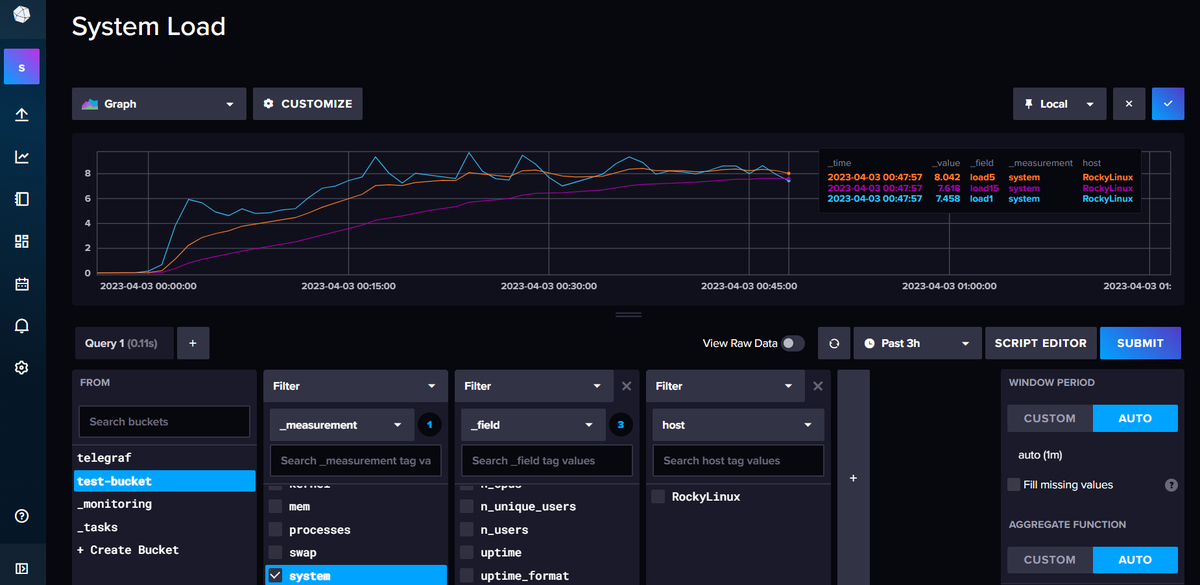
Create influxdb dashboards and visualize metrics collected by the telegraf service.
CPU Usage Graphs:
Memory usage graphs:
System Load:
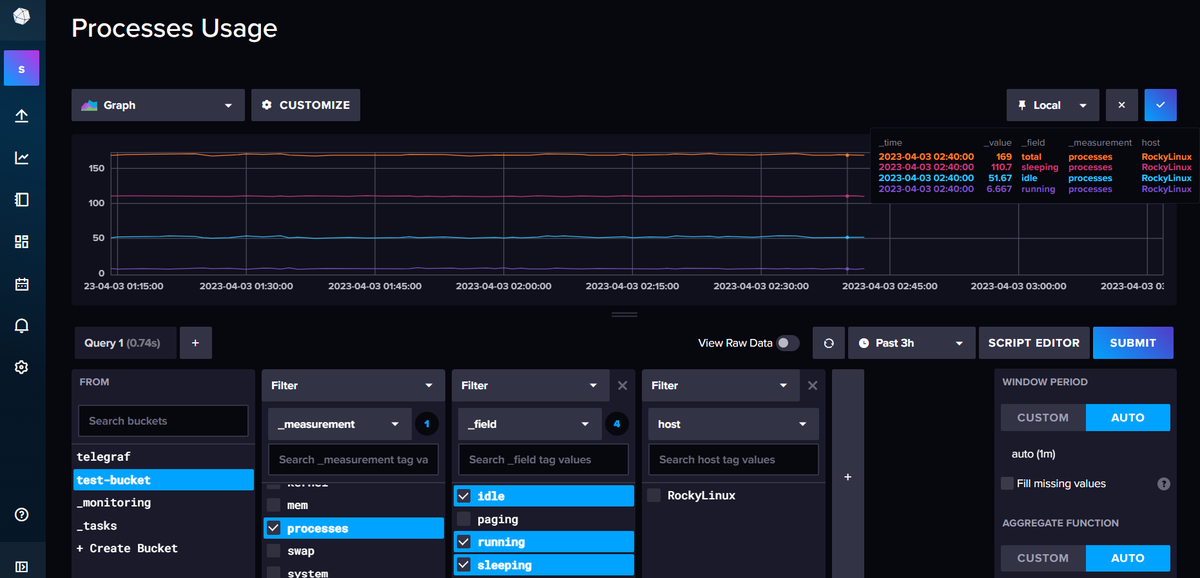
Processes usage:
Sample Test Dashboard:
- You can also import Dasboard template’s.
Conclusion
InfluxDB and Telegraf are powerful tools for collecting, storing, and analyzing time-series data. By following the steps in this guide, you can easily install and configure InfluxDB and Telegraf on Rocky Linux 8 or AlmaLinux 8. Once installed, you can use these tools to collect data from a wide range of sources and analyze it using the powerful querying and visualization features of InfluxDB.
See also:
How to Install InfluxDB on Ubuntu 20.10