In this tutorial, you’ll learn how to monitor your website uptime and status using Upptime. Upptime is a free open-source tool. Using Upptime you don’t need any agents or server configuration, you just need GitHub Pages and GitHub Actions.
You can also explore other free and commercial tools to monitor your website uptime and status such as Pingdom, UptimeRobot, Uptrends, and many more.
Monitoring the uptime and status of a website is crucial for ensuring that it is accessible to users and functioning optimally. Downtime can have a negative impact on the user experience and even lead to loss of revenue and reputation damage. Therefore, it is essential to monitor your website’s uptime and status to identify and resolve any issues quickly.
Monitor your Website Uptime and Status using Upptime:
What is Upptime?
Upptime is an open-source tool that helps you monitor your website’s uptime and status. It is a self-hosted solution that uses various technologies, including GitHub Actions, GitHub Pages, and serverless functions, to monitor websites’ uptime and status.
Upptime is based on the Statusfy framework and leverages the power of GitHub to provide a reliable and scalable monitoring solution. It is free to use and can be deployed easily to any server or cloud platform that supports serverless functions.
How does Upptime work?
Upptime works by periodically sending requests to your website and checking for a response. It sends HTTP GET requests to the URLs you specify and checks the status code returned by the server. If the status code indicates that the website is up and running, Upptime considers it to be ‘healthy’. If the status code indicates an error or the server does not respond within a specified time, Upptime considers it to be ‘unhealthy’.
Upptime also checks the SSL certificate status of your website to ensure that it is valid and not expired. It can send notifications via various channels, including email, Slack, and more, to alert you when your website is down or experiencing issues.
GitHub Actions is used as an uptime monitor
– For every 5mins of intervals monitoring is done
– And it will also record the response time for every 6hrs and committed to the git
– You will also get graphs on a daily basis
GitHub Issues are used for incident reports
– It is used for incident reports
– you will get notifications updates on slack
– when the website/URL is down, an Issue will be opened, and it will automatically be closed when the website/URL comes up/Active
GitHub Pages are used for the status website
– A simple, beautiful, and accessible PWA is generated
– Built with Svelte and Sapper
– Fetches data from this repository using the GitHub API
Steps to Configure Upptime for Monitoring Website
1. Fork/Replicate Upptime GitHub repository
There is two option to replicate the Official Upptime GitHub repository
– you can fork/”use the template”
For this tutorial, I followed below steps:
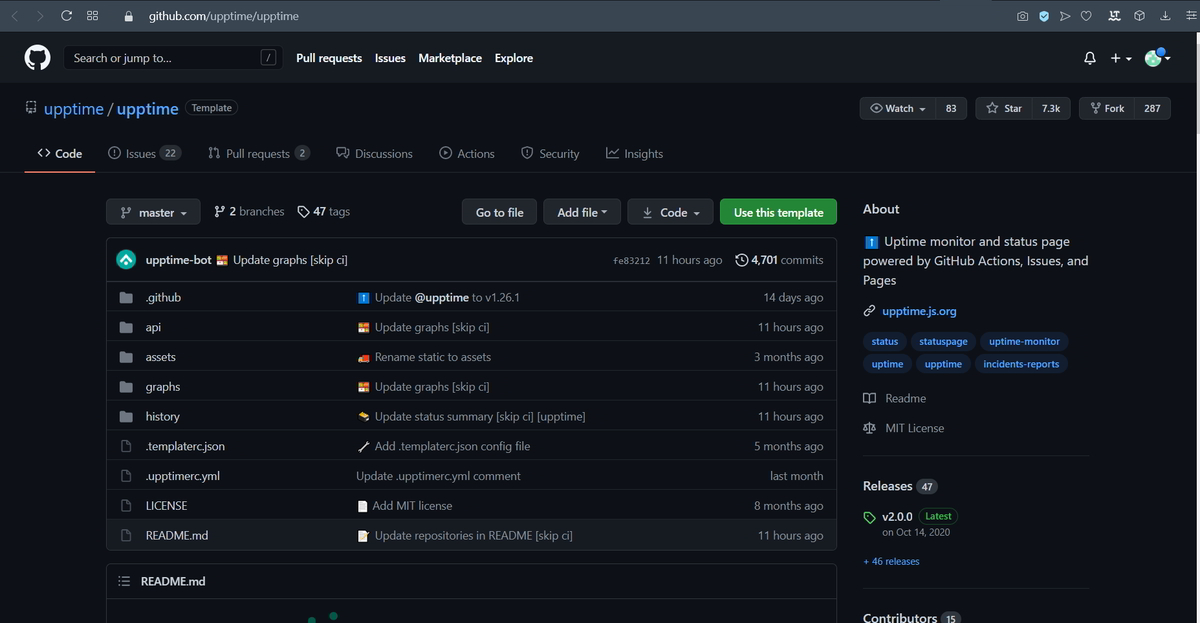
1. Goto Official Upptime GitHub Repository https://github.com/upptime/upptime
2. On the top-right side click on the “Use this template” button
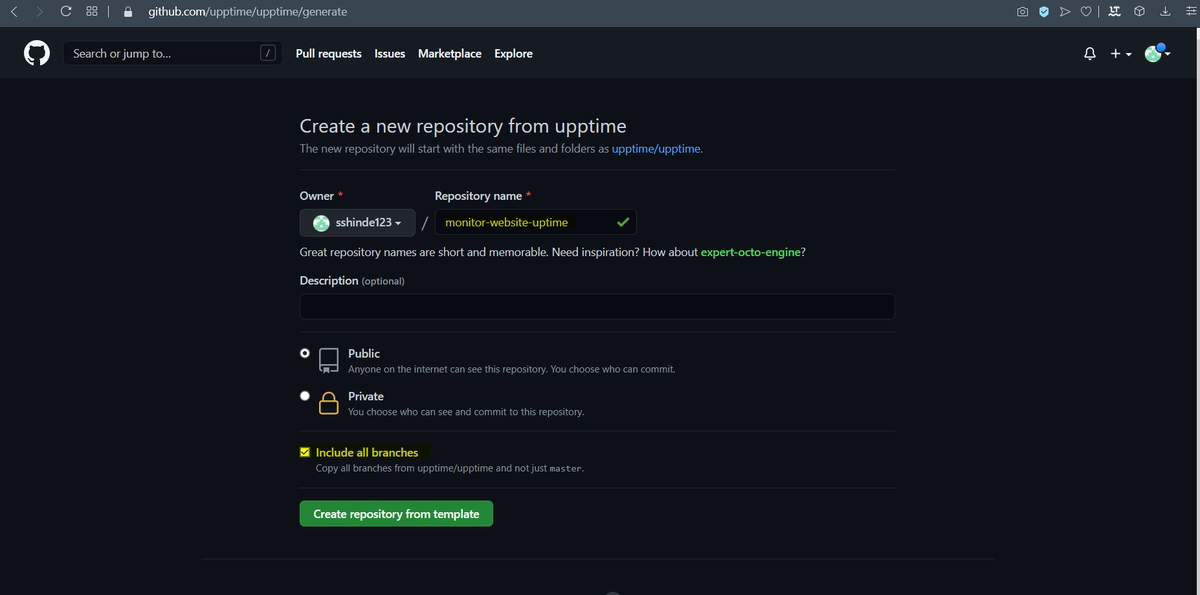
3. Enter a name for your new repository and check “Include all branches”
4. Click on “Create repository from template“. I have given the name GitHub repository “Monitor-website-uptime”.
Note: As part of GitHub repository billing, If you use a private repository then you need to pay for this and If you are using a public repository then GitHub offers unlimited free build minutes.
“Upptime uses thousands of build minutes every month (approximately 3,000 minutes in the default setting)”
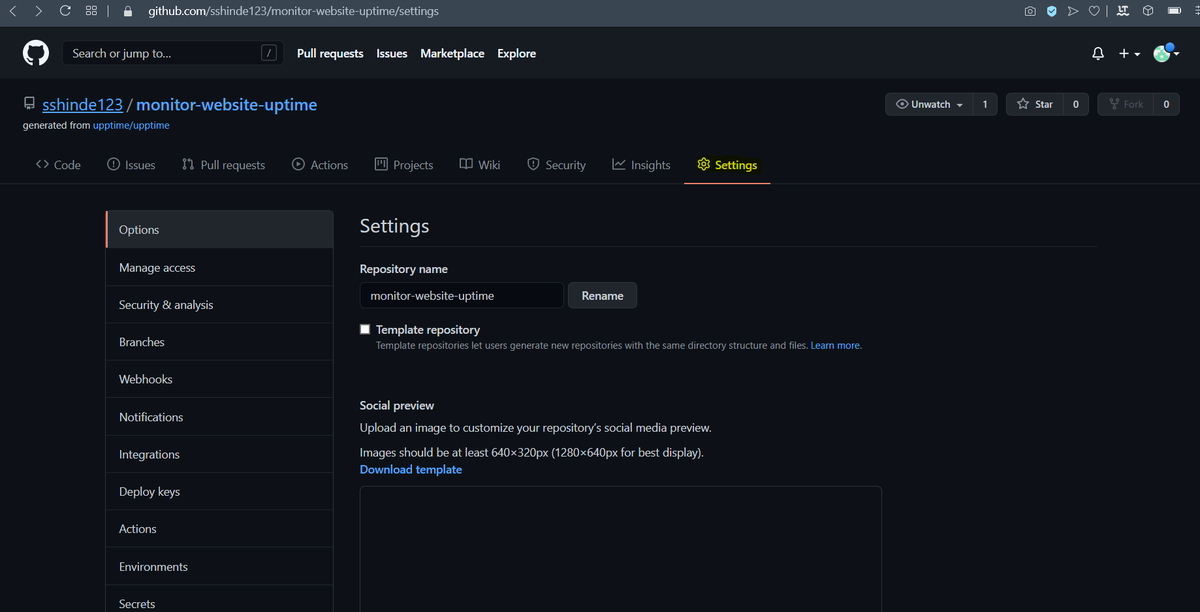
2: Steps to enable publishing
To get a static status website, you have to enable GitHub Pages on your new repository.
1. Go to your repository settings page
2. Scroll to “GitHub Pages” settings
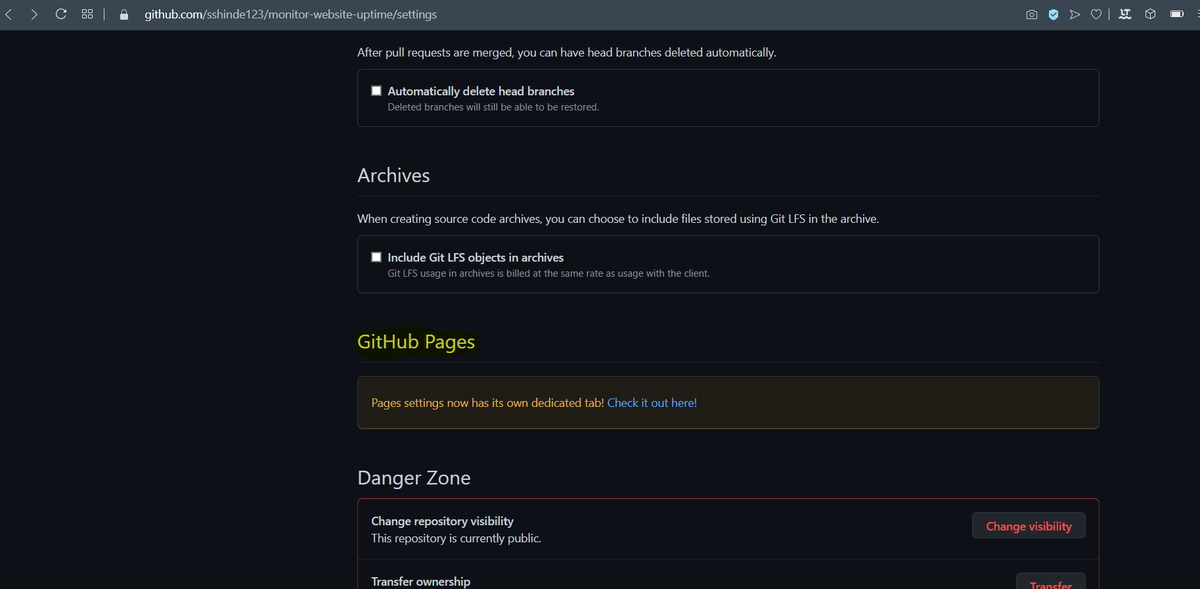
3. Under “Source”, change “None” to gh-pages, and In the folder dropdown, select /(root)
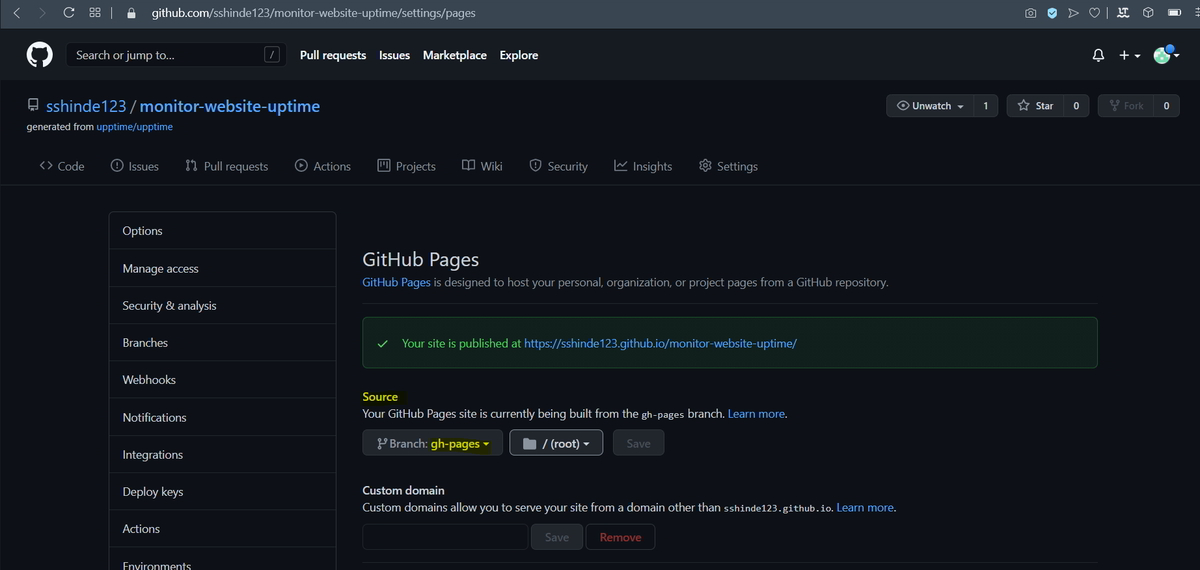
4. Click on “Save”
3. Step to Add repository secrets
You need to create a personal access token, this is required by Upptime
Steps to create PAT token (Personal Access Token):
1. Navigate to Profile in the top-right corner and click on settings
2. On the left sidebar, click on “Developer settings”
3. Click on “Personal access tokens”
4. Click “Generate new token”
5. Select the “repo” and “workflow” scopes
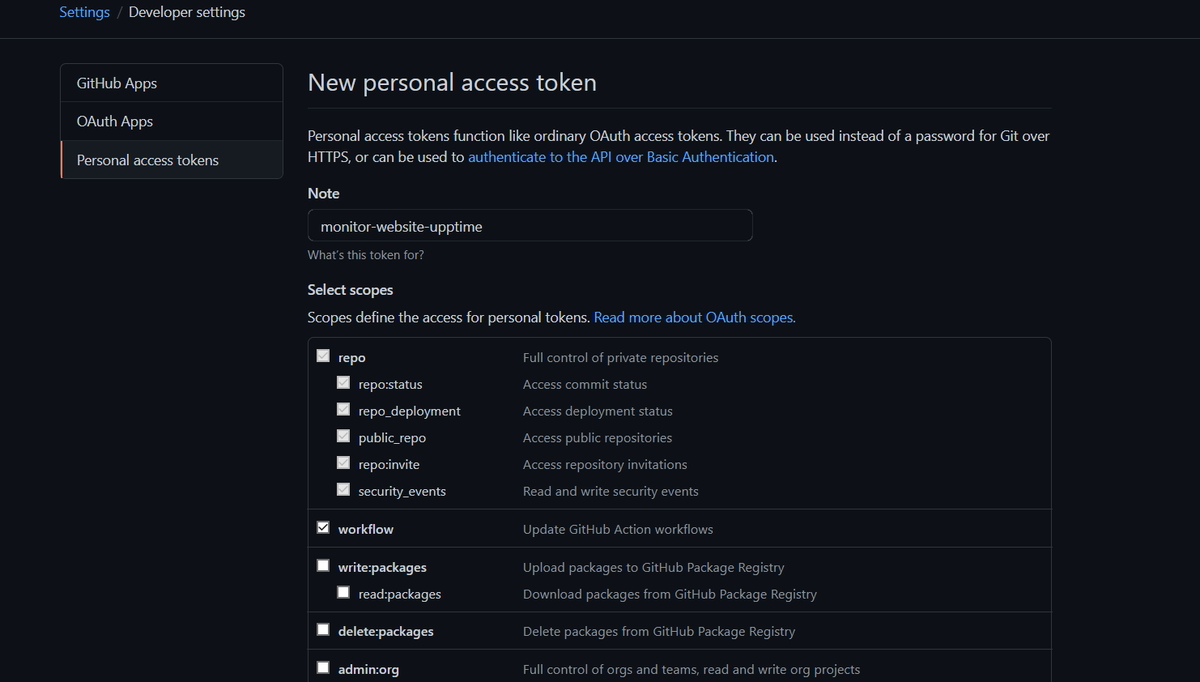
6. Click “Generate token”
Don’t forget to copy the generated token, as you’ll not see it again because it is available only once for copying.
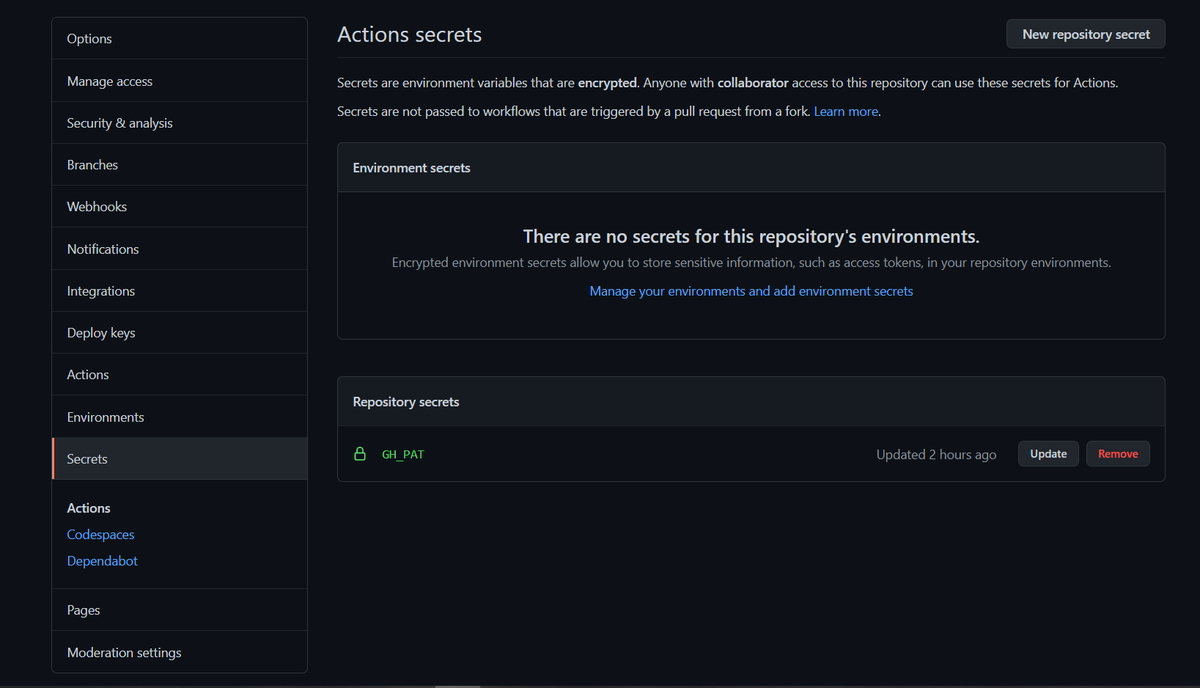
4. Add Generated token as a repository secret:
1. Goto settings in your GitHub Upptime repository
2. On the left side click on “Secrets”
3. Click on the “New repository secret” Button
4. Give the name for the Secrets as GH_PAT
5. Enter the token into the value field which is generated in the previous step
6. Save it by clicking on “Add secret”
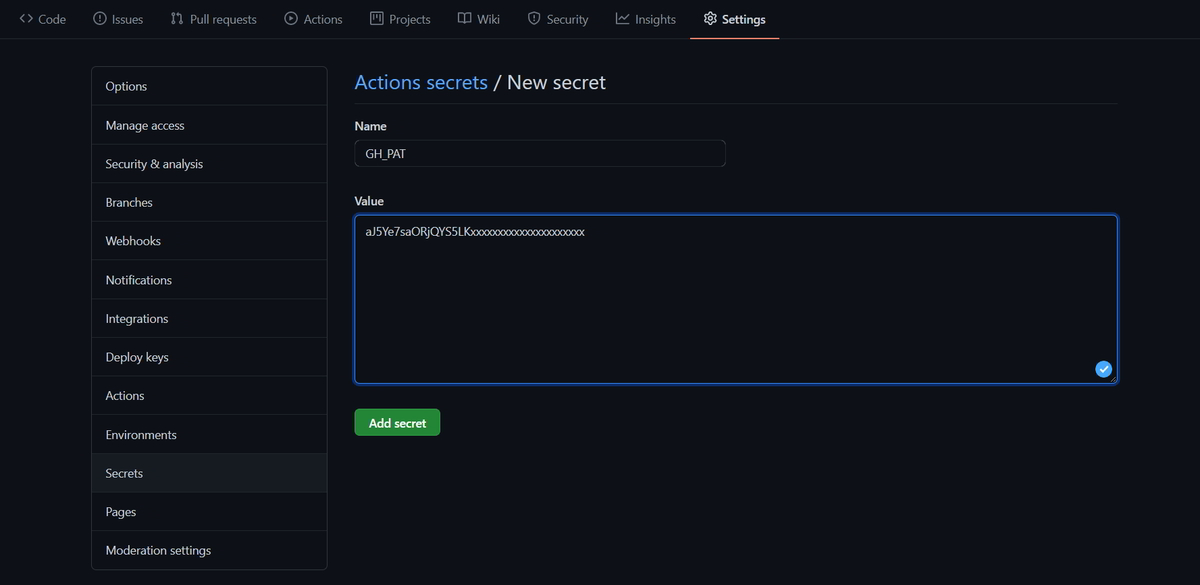
As shown below screenshot you should be able to see the Repository Secrets added.
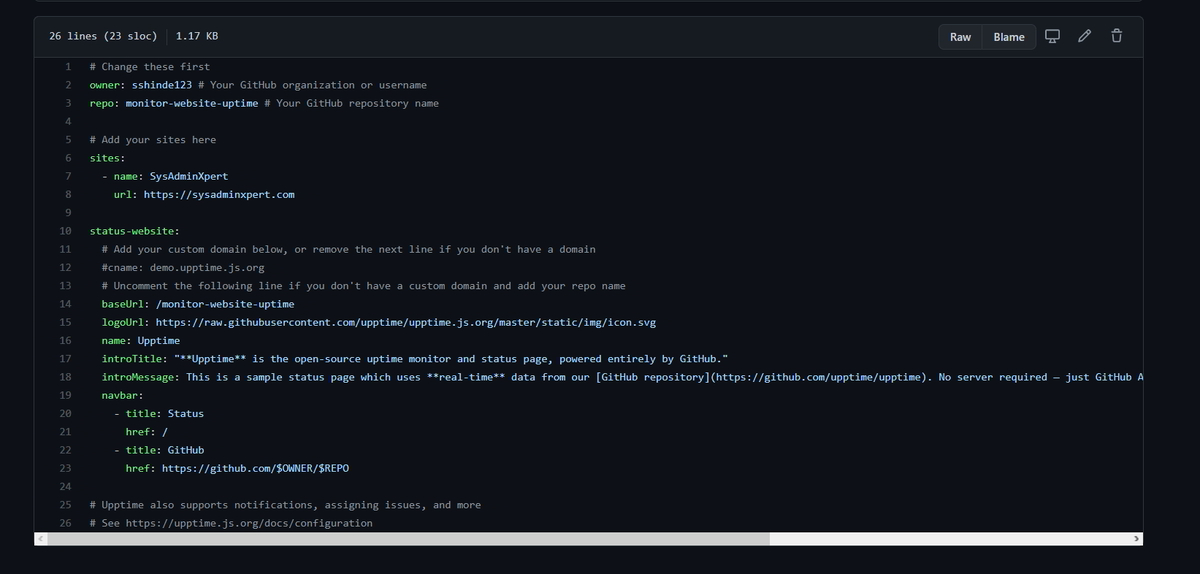
5. Update configuration
Update the configuration in a “ .upptimerc.yml ” file. Add the URL/endpoints which you want to monitor.
Edit the “ .upptimerc.yml ” file as mention below:
1. Change “owner” to your actual GitHub username
2. Change the upptime “repo” name to your GitHub repo which you have created in my case it is “monitor-website-uptime”
3. Add your website under sites and remove the existing endpoints/URL
4. If you have a custom domain then add cname of your website or else remove the line
5. Enable the baseUrl by Uncommenting the line and change the value to your GitHub repository in my case it is “monitor-website-uptime”
Sample .upptimerc.yml configuration file.
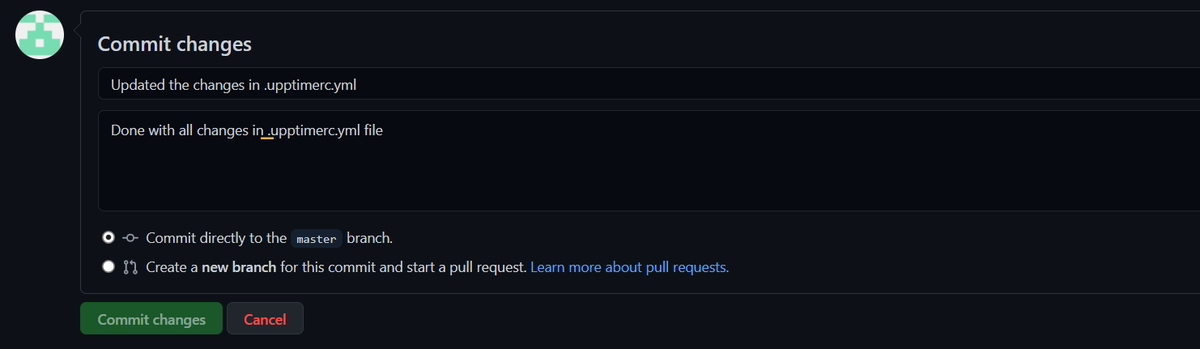
Once you have done all changes mentioned above then commit the changes in the master branch.
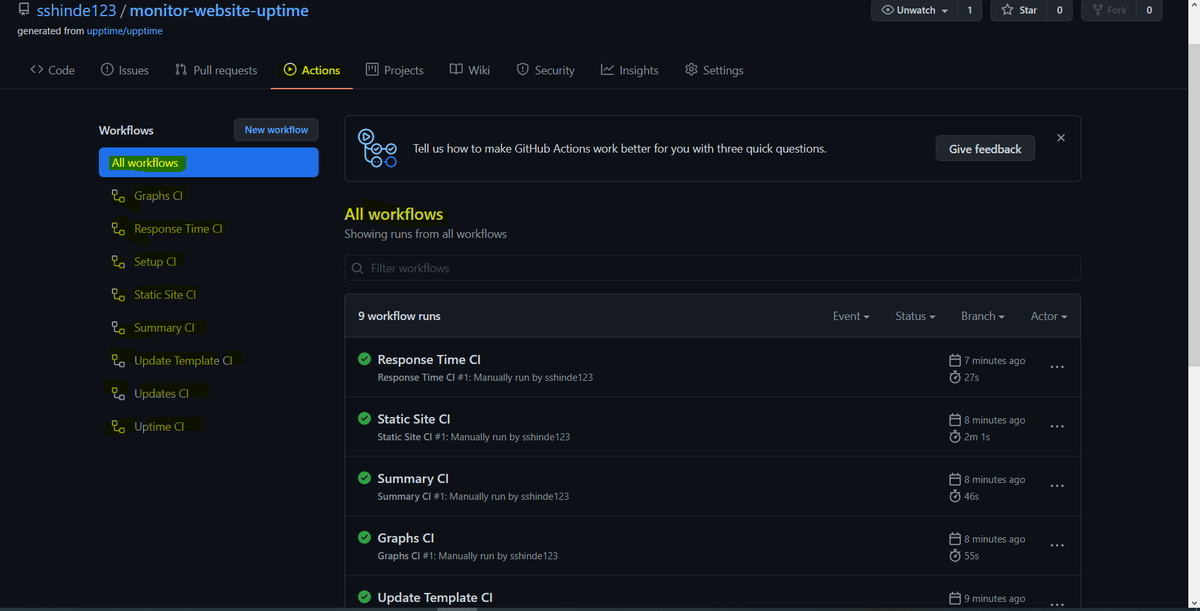
After a few mins check the progress in the action tab.
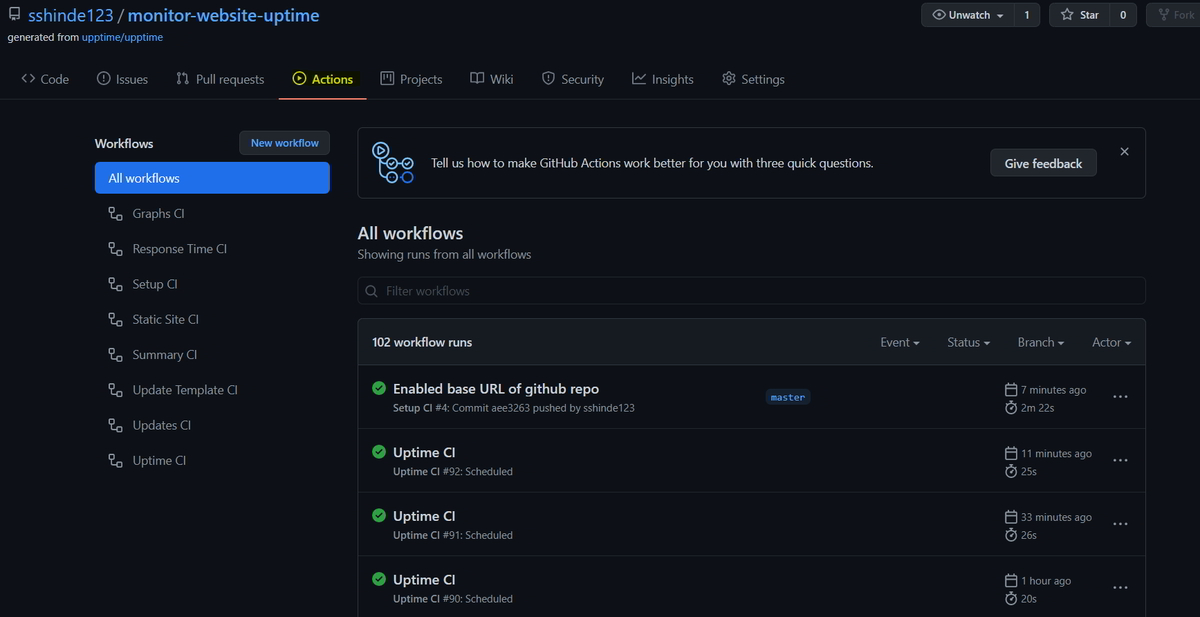
Wait till all workflows get to run or else you can also run workflows manually.
You will get an e-mail notification if there is an issue raised by GitHub actions.
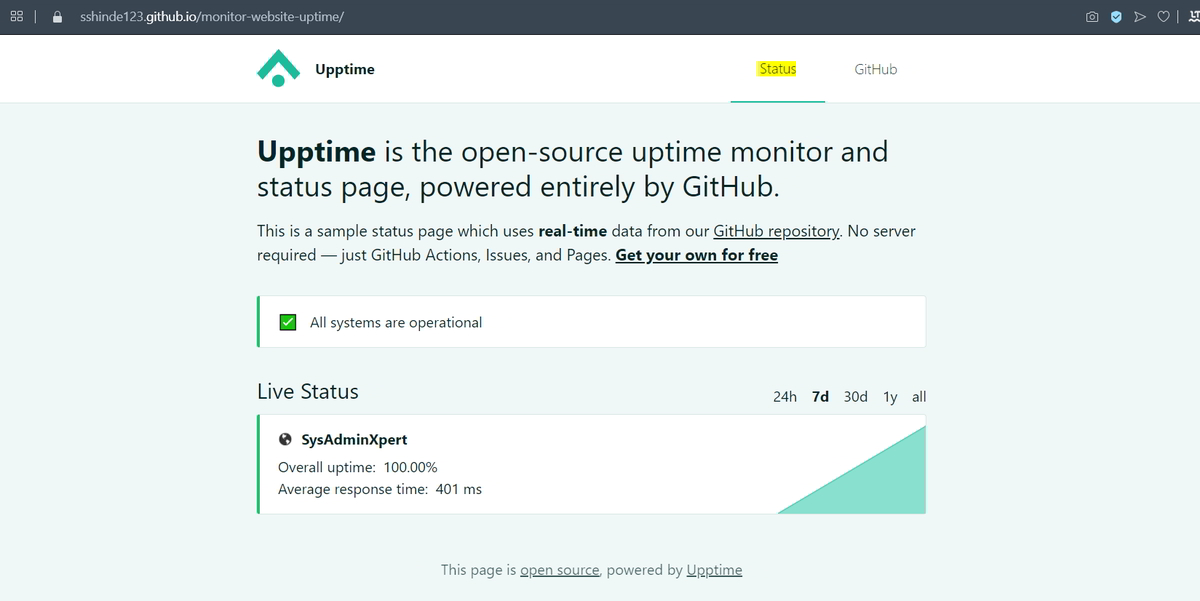
Goto your Upptime repo (“monitor-website-uptime”) and scroll down and check the website status it should be in Live state.
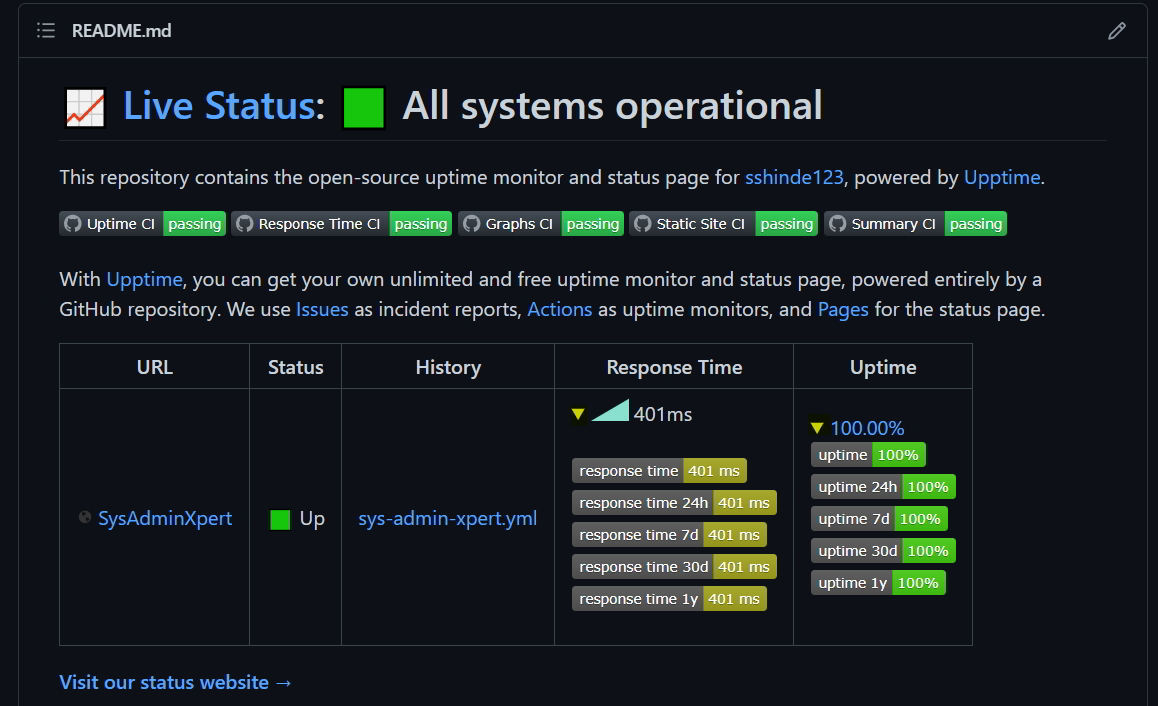
As per the above screenshot click on “Visit our status website” and explore it.
Upptime allows you to configure various settings, such as the interval between checks, the number of consecutive failed checks required to trigger an alert, and more. You can customize these settings to suit your needs and requirements.
By monitoring your website’s uptime and status using Upptime, you can quickly identify and resolve any issues that may affect the user experience. Upptime’s real-time monitoring and notifications allow you to take immediate action and prevent downtime or performance issues.
Conclusion
Monitoring your website’s uptime and status is essential for ensuring that it is accessible and functioning optimally. Upptime is an open-source tool that can help you monitor your website’s uptime and status easily. It is a self-hosted solution that uses various technologies, including GitHub Actions, GitHub Pages, and serverless functions, to monitor your website’s health.
Installing and configuring Upptime is straightforward and can be done in a few simple steps. Once you have deployed Upptime, you can start monitoring your website’s uptime and status and receive real-time notifications when issues arise.
Upptime is a reliable and scalable monitoring solution that can be customized to suit your needs and requirements. It is free to use and can be deployed to any server or cloud platform that supports serverless functions.
By using Upptime, you can ensure that your website is always up and running, providing a positive user experience, and preventing revenue loss and reputation damage.
FAQs:
Here are some of the FAQs listed:
What are the benefits of using Upptime?
Upptime provides real-time monitoring and notifications, allowing you to identify and resolve any issues quickly. It is also highly customizable, allowing you to configure various settings and notification channels to suit your needs and requirements. Additionally, it is free to use and can be deployed to any server or cloud platform that supports serverless functions.
Can I use Upptime to monitor multiple websites?
Yes, you can use Upptime to monitor multiple websites by configuring multiple URLs in the .env file. You can also customize the monitoring settings and notification channels for each website to suit your needs and requirements.
What types of notifications does Upptime support?
Upptime supports a range of notification channels, including email, Slack, Discord, and more. You can customize the notifications’ content and frequency, and choose which channels you want to use.
Does Upptime have any limitations?
Upptime relies on external services, such as GitHub Actions and serverless functions, which may have limitations in terms of their usage and availability. Additionally, Upptime may not be suitable for monitoring large-scale websites with complex architectures and multiple endpoints.
How often does Upptime check my website’s status?
By default, Upptime checks your website’s status every 5 minutes. However, you can customize the interval between checks in the .env file.
Can I contribute to the Upptime project?
Yes, Upptime is an open-source project, and you can contribute to its development by submitting pull requests or creating issues on its GitHub repository.
Are there any alternatives to Upptime?
Yes, there are several alternatives to Upptime, including Pingdom, UptimeRobot, and StatusCake. These tools offer similar features and functionality, but may differ in terms of pricing, customization options, and ease of use.
Can I monitor my website’s response time with Upptime?
Yes, Upptime provides response time metrics for each monitored URL, allowing you to track your website’s performance and identify any issues that may affect the user experience.
Does Upptime require any special server or cloud platform to run?
No, Upptime can be deployed to any server or cloud platform that supports serverless functions, such as AWS Lambda or Google Cloud Functions. It does not require any special infrastructure or hardware to run.
End of the article, – How to Monitor your website uptime and status using Upptime.